Unconfigured Ad Widget

Collapse

A tutorial for AK build parties.

Collapse
This is a sticky topic.
X
X
 
  • Time
  • Show
Clear All
new posts
  • 69Mach1
    Super Moderator
    CGN Contributor - Lifetime
    • Jan 2006
    • 15032

    A tutorial for AK build parties.

    I thought I'd do a write up of tips for AK building for our numerous build parties. These are tips and suggestions to help the new builder. I'll try to go in chronological order as best I can.

    Dremel tools.
    We'll start off with the small tools that every new builder can bring and will need. A dremel is necessary, but there will be plenty to borrow at the party if you don't have one. Just bring your own dremel tips. Bring extras of each as well.


    A diamond bit is used for "egging" (enlarging) the rivets holes, and grinding of the magazine release latch for fitment.
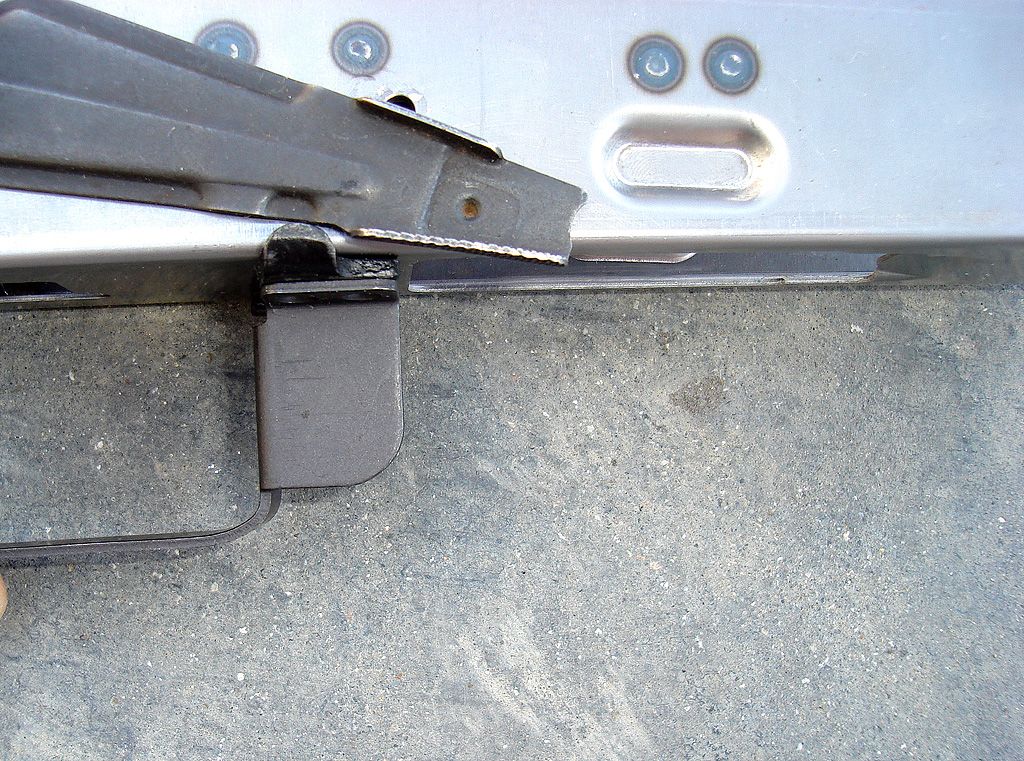
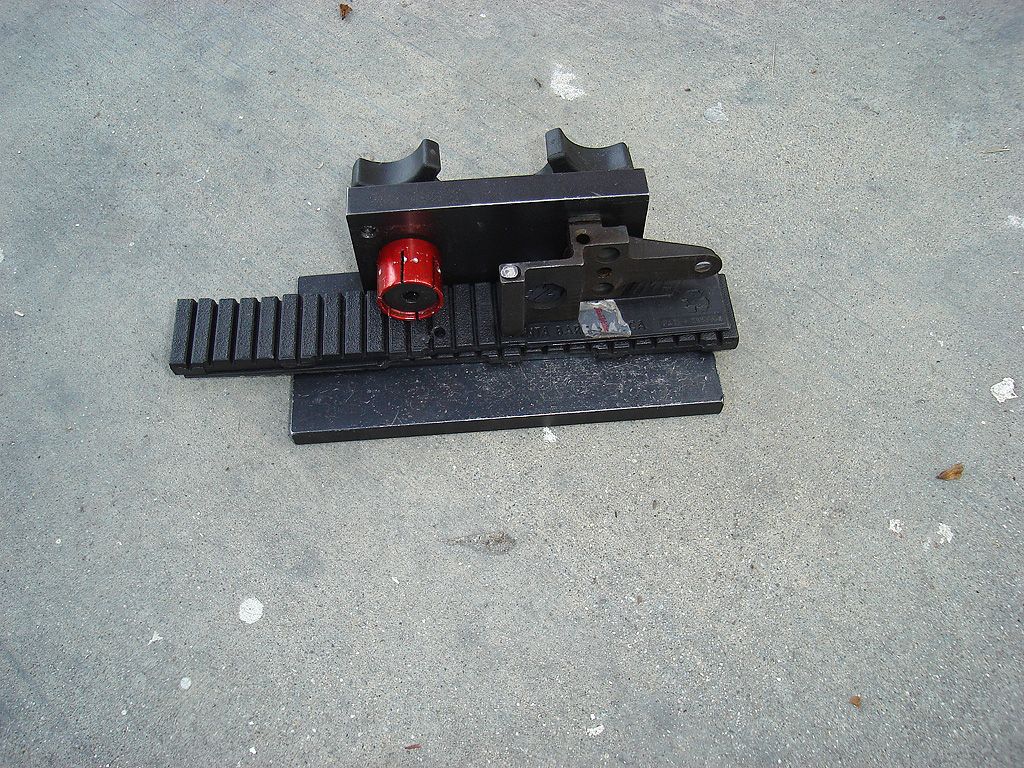
    A drum type grinder is used for cleaning up the lower rail's magazine guide after cutting them down and for minor grinding.
    A cutting wheel is used for cutting down rivet heads and the magazine guide rail. And for general purpose cutting.
    A 5/32 inch drill bit is for drilling rivets holes, drilling out rivets, and whatever else needs to be drilled. We can never have enough 5/32" bits.

    In addition to these tips, a small and large hand file, some sand paper, and a punch set are needed.

    Rivets.
    There are different types and lengths of rivets. Each has a specific place on the receiver. Each packet of rivets you get will be specific to the type of AK receiver/build you are going to do. Here are the different types of rivets.

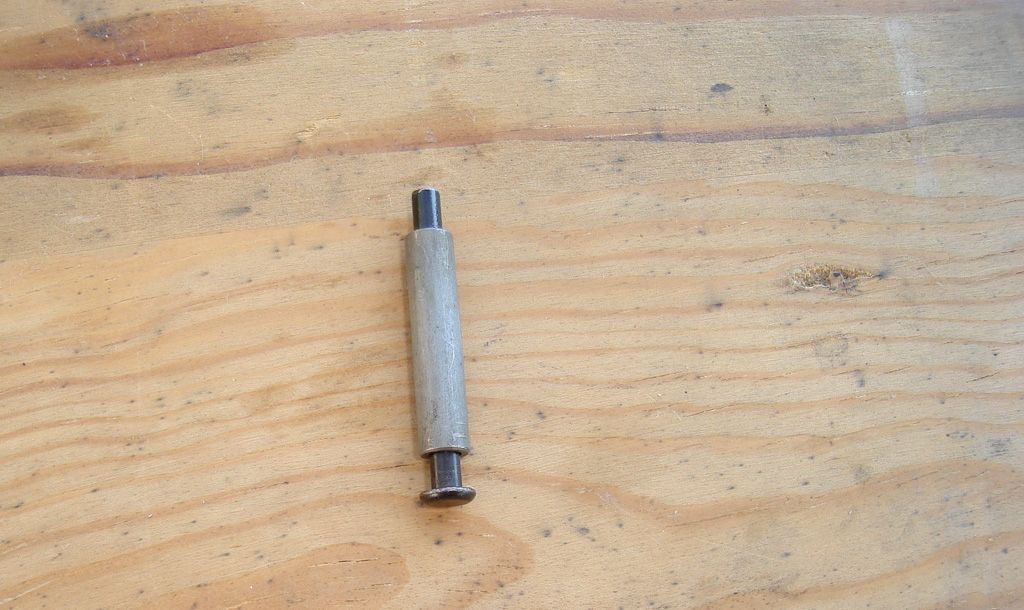
    The longest one is for the rear trunnion. The shortest one on the left is for the back of the trigger guard, unless you're using or your receiver has a pistol grip reinforcement plate.

    The two on the right are for the front of the trigger guard, some different type rear trunnions, and for the front trunnion. If you look closely, you will notice that the one on the far right has a taper to the bottom of the head. That is a "swell neck" rivet. Those will match up to countersunk rivet holes in the front trunnion, and on some rear trunnions.

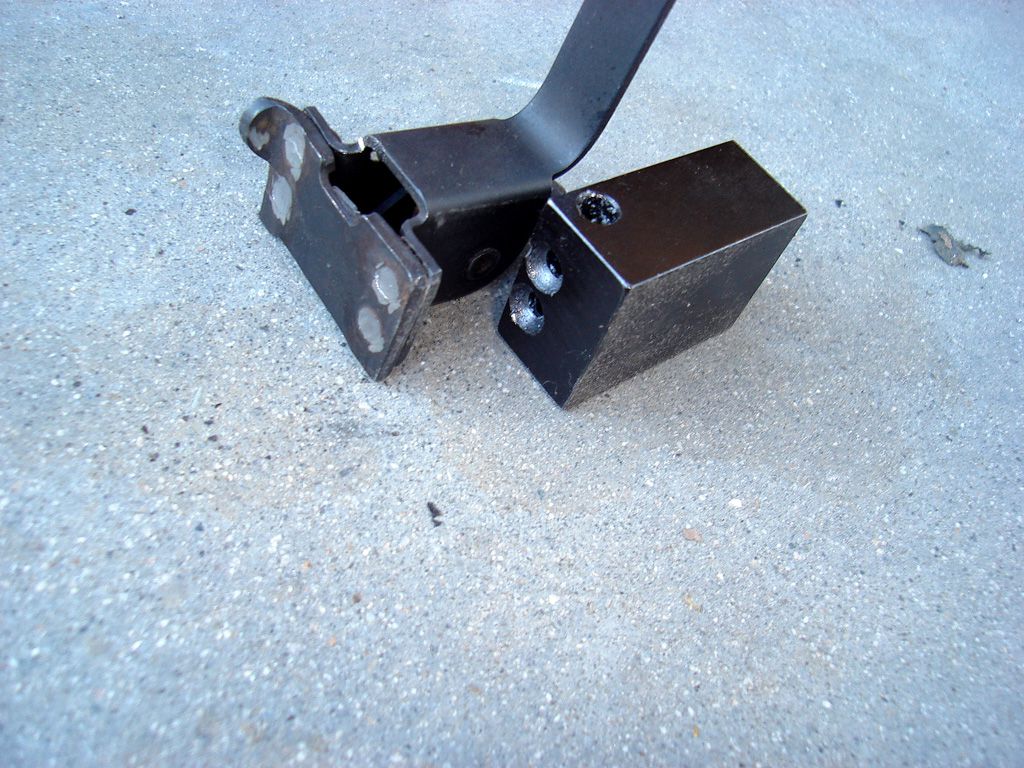
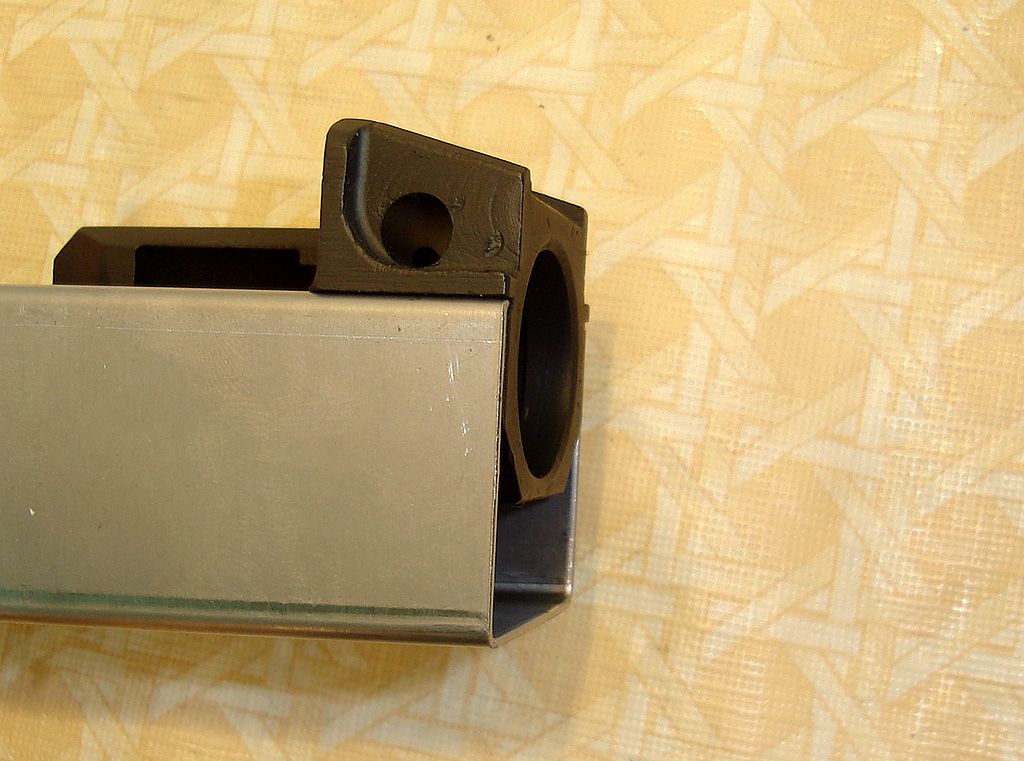
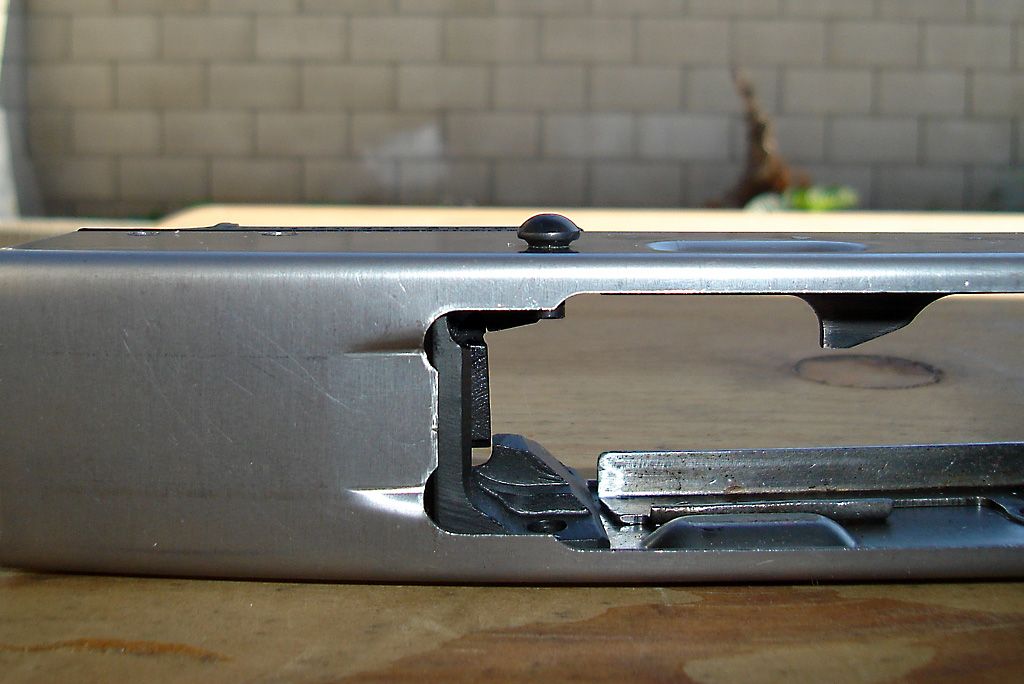
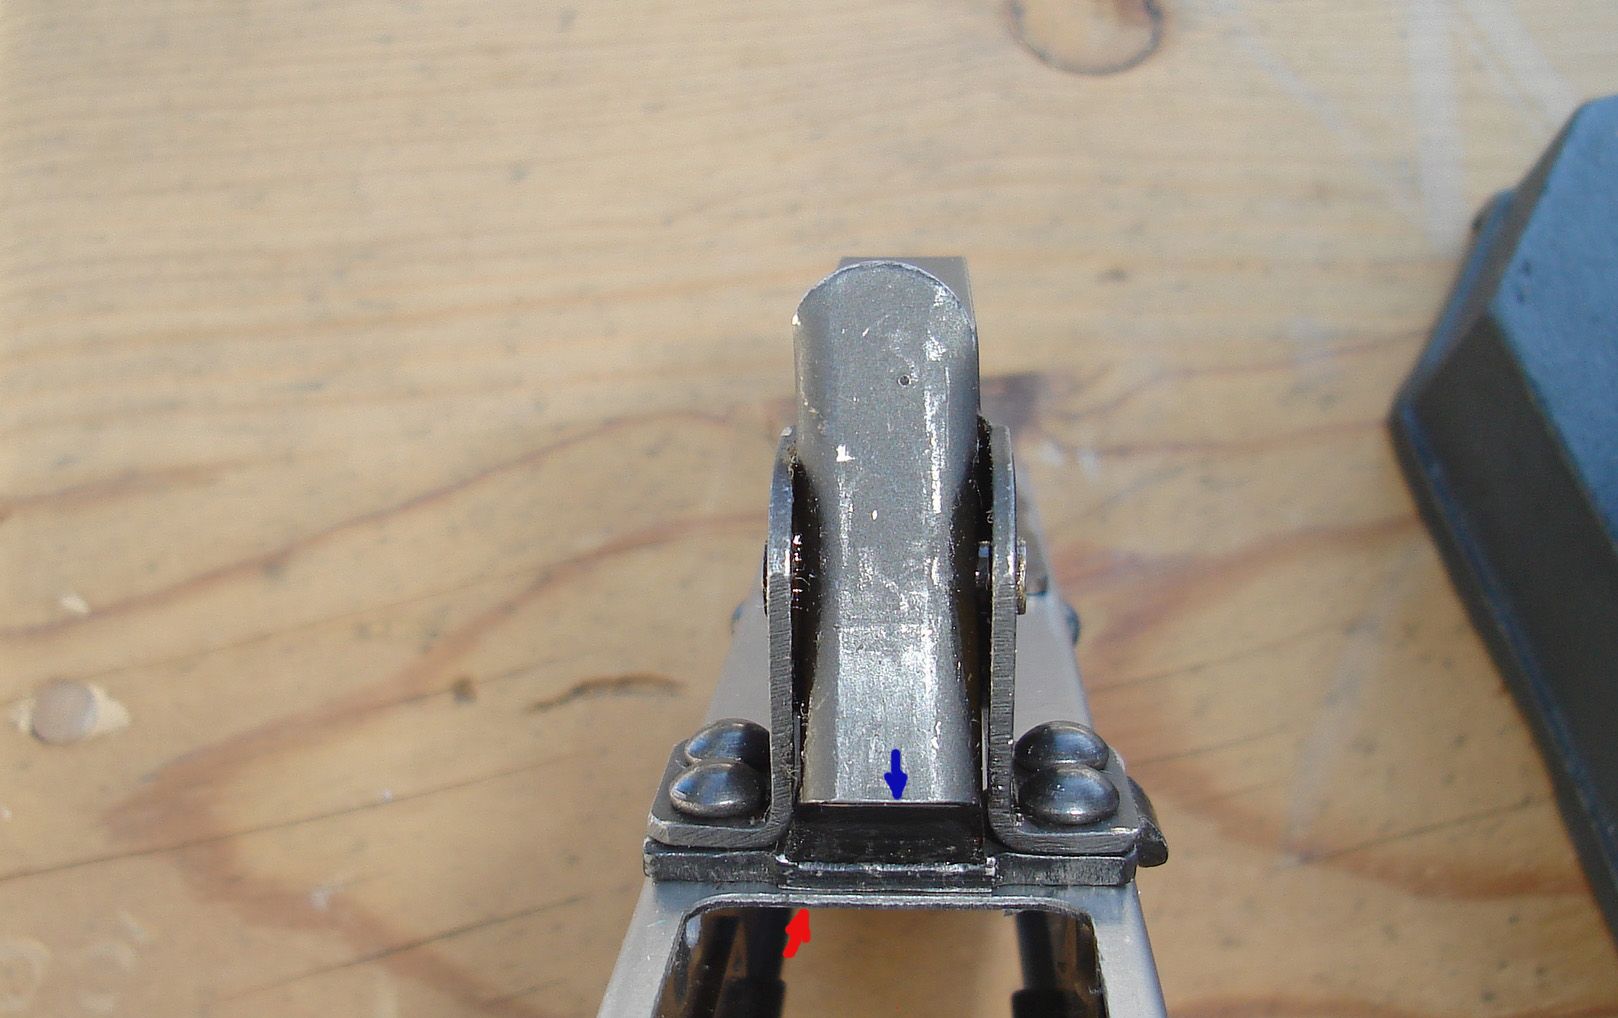
    Here's an AKM front trunnion with a countersunk hole on the lower left.


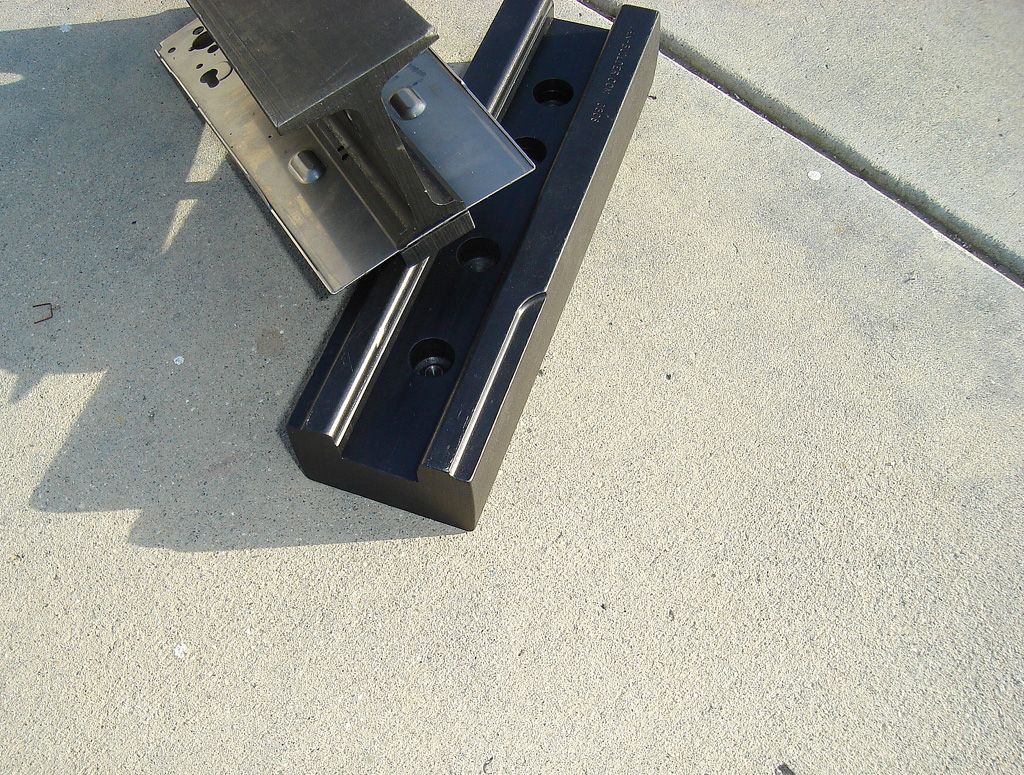
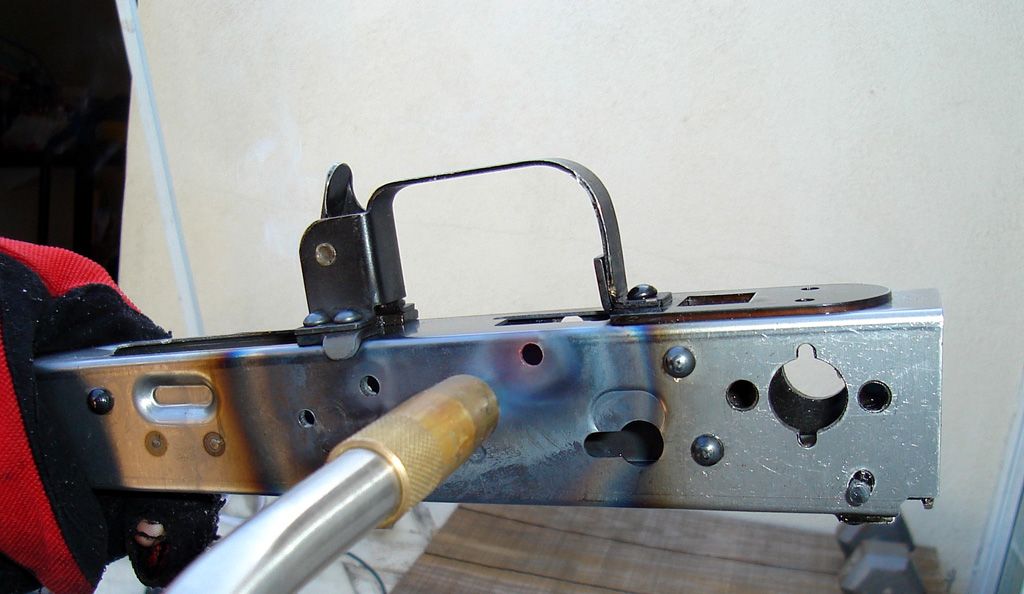
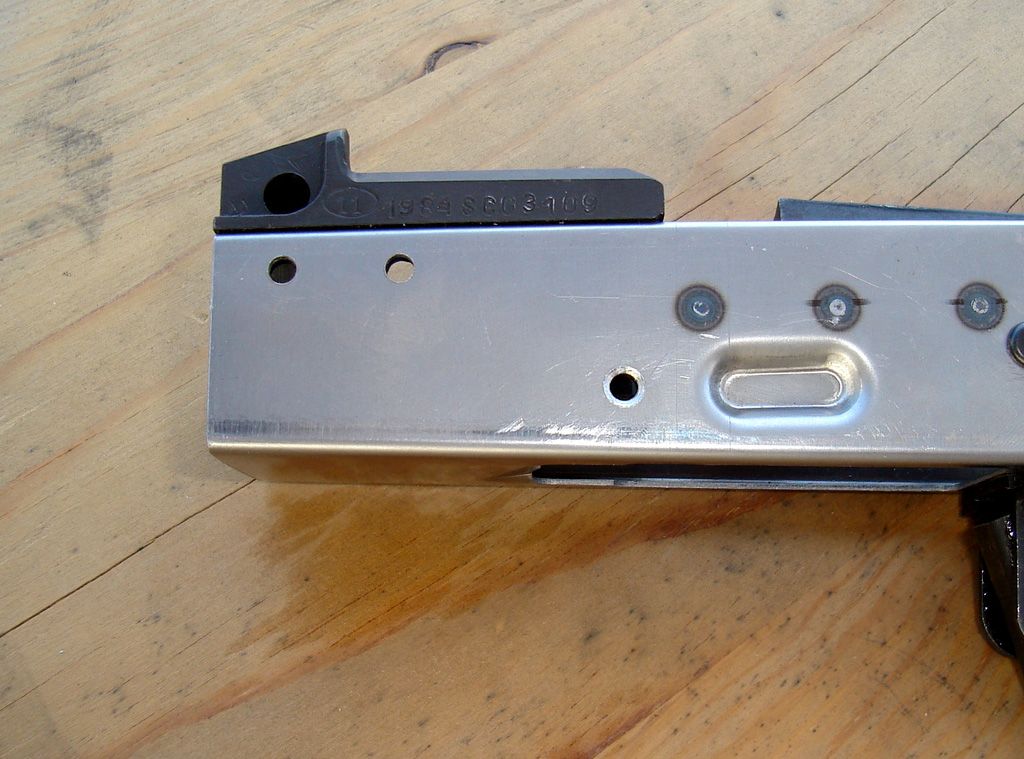
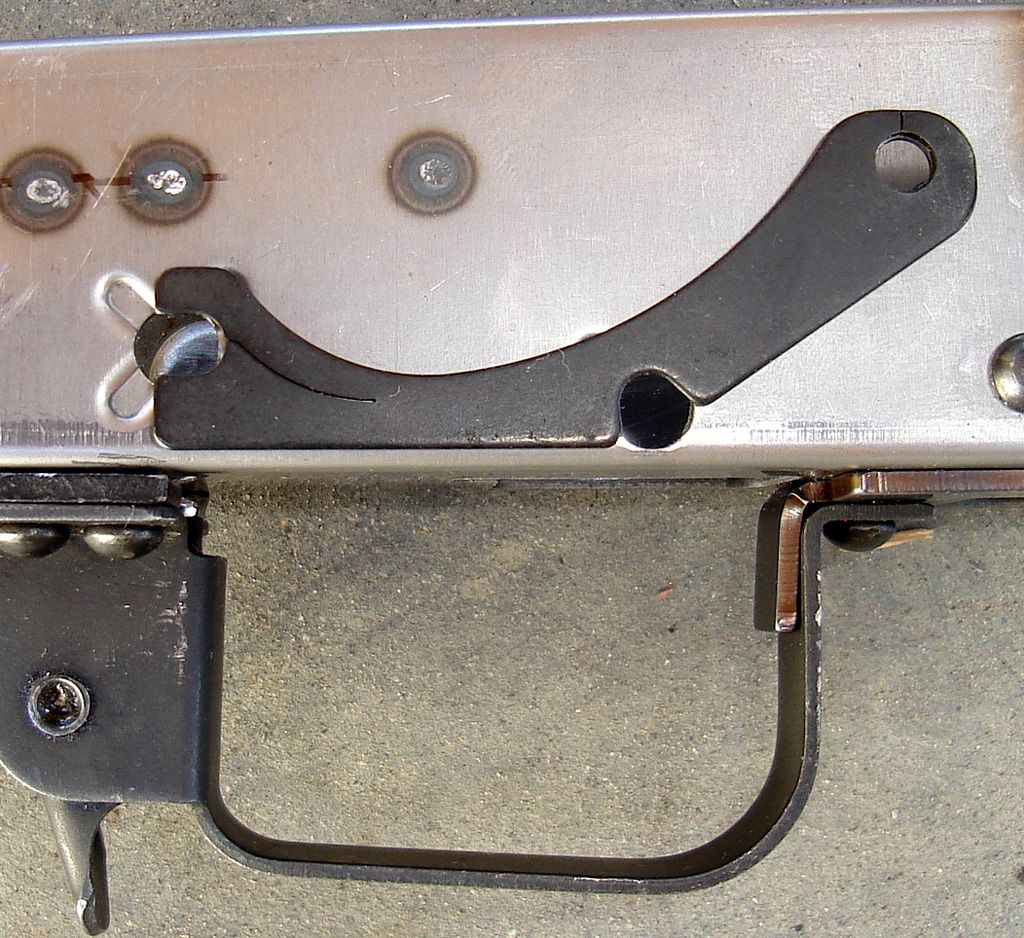
    Here is a fixed stock rear trunnion with countersunk holes for the long rivets.


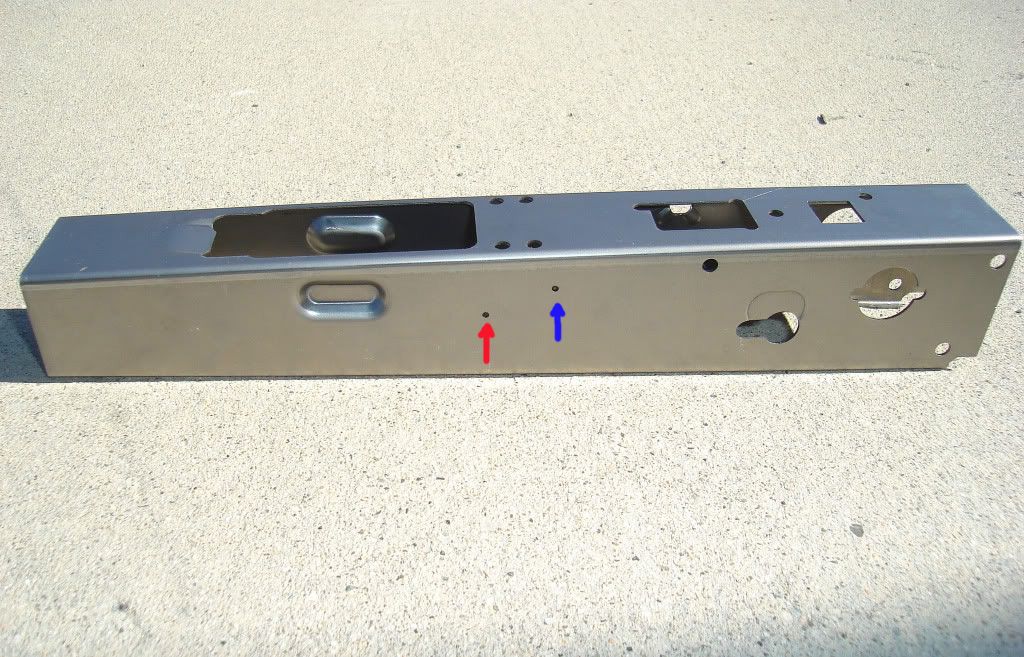
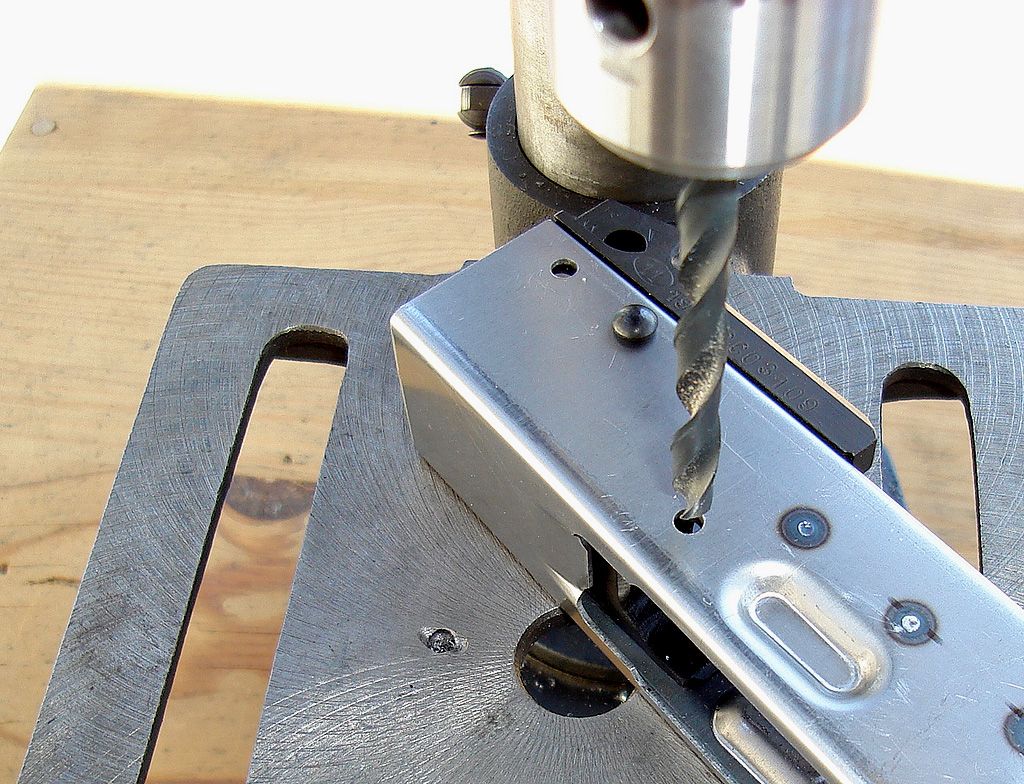
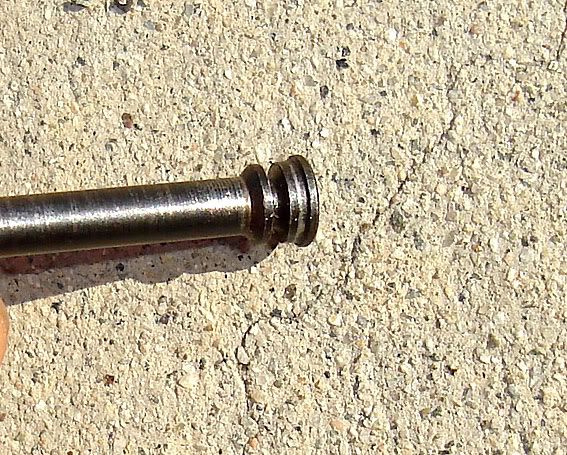
    To countersink the receiver holes for these trunnions and rivets, I like to use a 1/4 inch drill bit to open up and give the hole a taper.


    Federal 922r compliance.

    A stamped AKM has 16 listed parts in it for 922r. The Fed's want you to limit those parts to just 10 foreign ones to be legal. The parts only add up when everything is attached, including the magazine. Replace some of them with quality US made parts.

    1. Receiver
    2. Barrel
    3. Front Trunnion
    4. Bolt
    5. Bolt Carrier
    6. Gas Piston
    7. Trigger (fire control group)
    8. Hammer (fire control group)
    9. Disconnector (fire control group)
    10. Buttstock
    11. Handguard (upper and lower counts as 1)
    12. Pistol Grip
    13. Magazine Body
    14. Magazine Floorplate
    15. Magazine Follower
    16. Muzzle Device (Muzzle Brake or Flash Hide that's not welded on)


    The greatest source for getting AK building supplies. Flats, rivets, US made compliance parts, FCG, jigs, etc.
    AK-Builder.com makes tools, parts and supplies for rebuilding/repairing AK47 AK74 style rifles


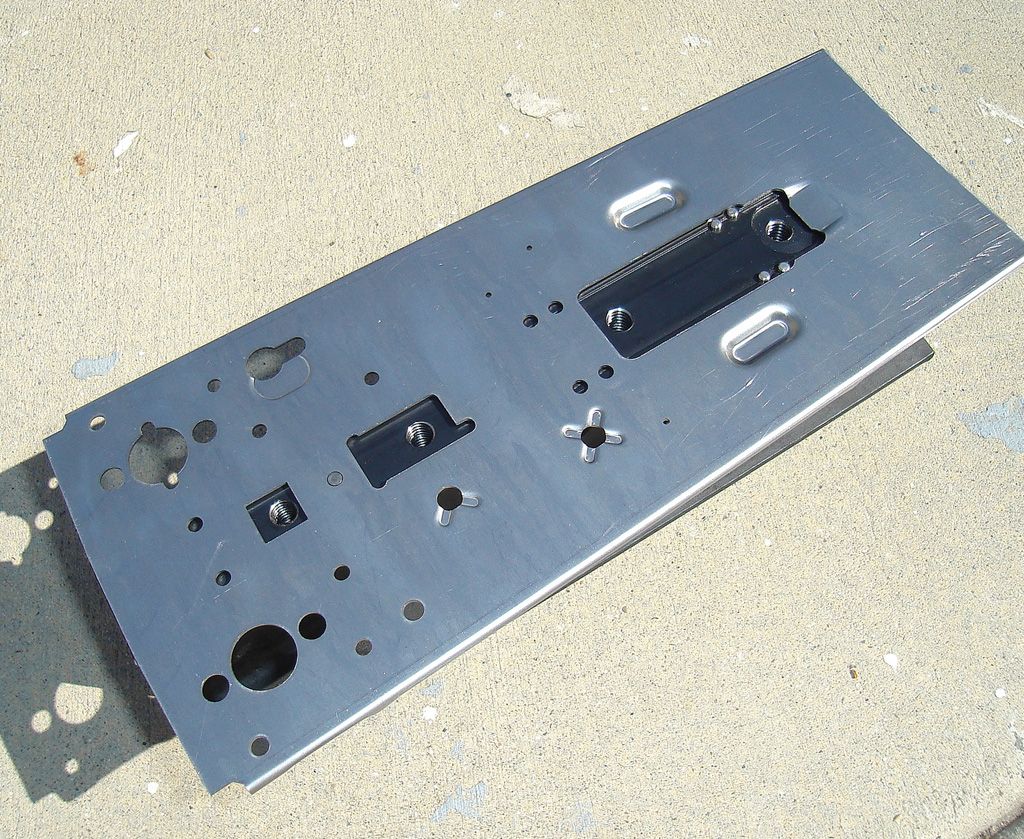
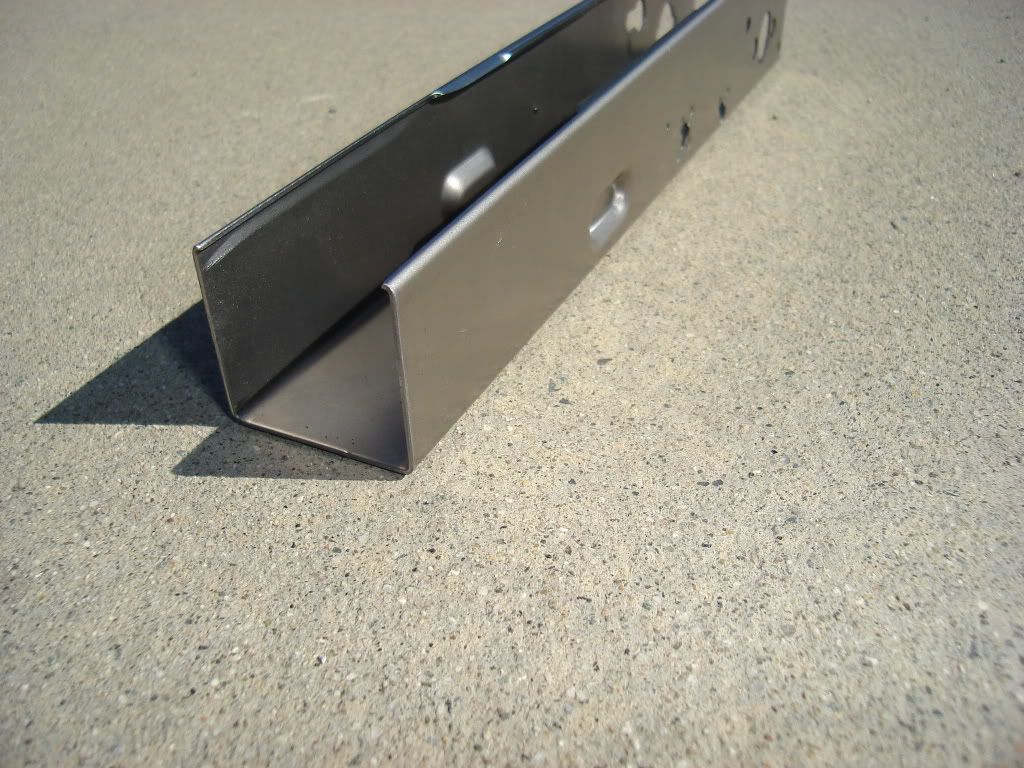
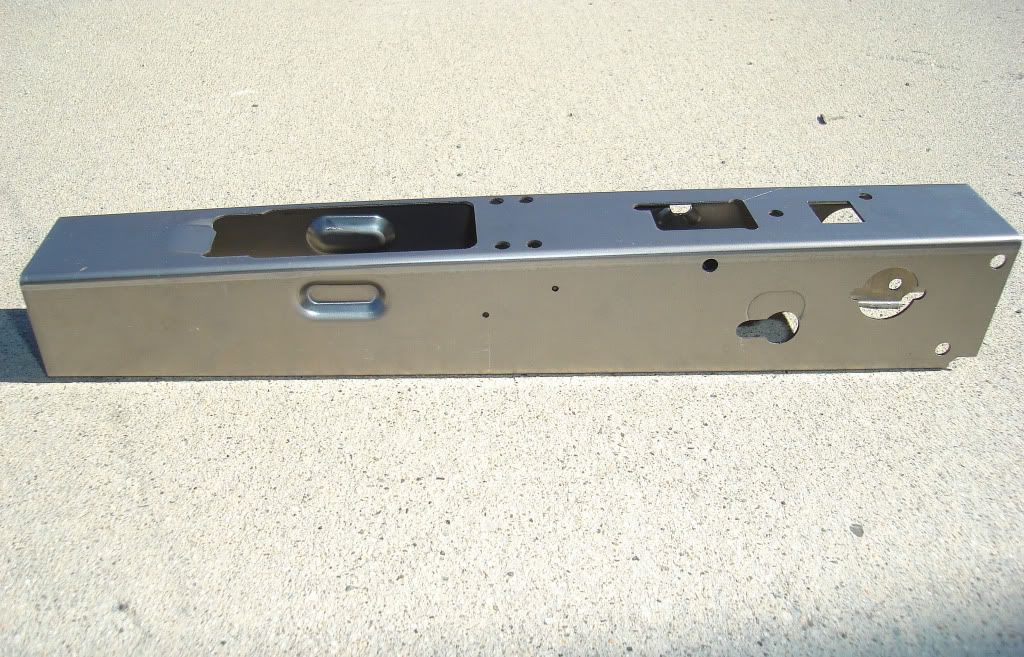
    Completely heat treated receivers from Nodak.


    One very important warning regarding the bad fire control group parts.
    Please leave them (two in the middle) at home or discard them when you get your kit. DO NOT BRING THOSE FULL AUTO FCG PARTS WITH YOU.


    The hammer, trigger, disconnector, axis pins, and various springs are OK, although since you need a new US made FCG anyway, leave them all at home. Bring the springs and axis/FCG pins though.
    Last edited by 69Mach1; 07-26-2010, 8:41 AM.
    sigpic
    69Mach1
    munkeeboi
    TURBOELKY
    antix2
    WTSGDYBBR
    tujungatoes
    jmpgnr24K
  • #2
    69Mach1
    Super Moderator
    CGN Contributor - Lifetime
    • Jan 2006
    • 15032

    .....
    Last edited by 69Mach1; 05-10-2010, 3:15 AM.
    sigpic
    69Mach1
    munkeeboi
    TURBOELKY
    antix2
    WTSGDYBBR
    tujungatoes
    jmpgnr24K

    Comment

    • #3
      69Mach1
      Super Moderator
      CGN Contributor - Lifetime
      • Jan 2006
      • 15032

      De-milling the parts kit.

      Removing the barrel pin and pushing out the barrel needs to be done defore de-milling the front trunnion.

      Front Trunnion.
      If the receiver stub is still attached, use your cutting wheel to grind down the rivets flush with the receiver, then go a little deeper to get as close to the trunnion underneath as possible. Next use at punch and hammer to punch out the old rivets. Take a couple of pliers and pull the sides of the receiver stub apart and slide the front trunnion out. If it's just the trunnion but the rivets are still in place, again use a punch and hammer to get them out. Don't drill them out.


      Trigger Guard.
      There is a trigger guard drill out jig for this. It mounts to the one side of the trigger guard rivets at a time and using a drill press, the rivets are drilled through. That makes it easier to punch or pry out. The selector stop may also still be attached. That has to be removed also. If there's no jig, simply grinding down the heads flat with your cutting wheel will work. You can then punch or drill them out.


      Rear Trunnion.
      Start with cutting the end of the old rivet flush with the rear trunnion stub. First try to push the old rivets out with a punch and hammer. If it won't budge, and usually Romanians won't, then you'll center punch the middle of the old rivets and drill about 3/4 of the way down with a 5/32" drill bit. Then use a punch to push them out. Using a center punch is essential to drilling a nice centered hole the first time.


      Additional information on de-milling the rear trunnion rivets. (Drilling them out) Courtesy of SJgunguy24.
      Last edited by 69Mach1; 06-23-2010, 10:52 PM.
      sigpic
      69Mach1
      munkeeboi
      TURBOELKY
      antix2
      WTSGDYBBR
      tujungatoes
      jmpgnr24K

      Comment

      • #4
        69Mach1
        Super Moderator
        CGN Contributor - Lifetime
        • Jan 2006
        • 15032

        Bending and building an AK flat.

        This is a tutorial for just the AK Builder trimmed and bent top rail AK flat, with the new flat bending jig. These tips and pictures are only for an AK 47 (7.62x39) build. I believe the AK 74 build may be slightly different.

        The new AK Builder flat bending jig. There are three main parts to this jig. The base (die), the ram (punch), and the bracket to hold the flat in place. Even though it looks indestructible, you can damage it if you don't pay attention and somehow line it up incorrectly or forget to back out the screws that push the ram out of the base.

        The groove in the the base is an visual indicator that that is where the front of the receiver is placed on the base. The holes in the middle of the base is where the bolt heads that hold the bracket in place go into as the ram is pressed into the base. If the flat and ram are indexed backwards the bracket bolt heads will miss those holes and you will not be able to "bottom out" the ram.


        The bracket also only goes on in one direction, otherwise the holes for the bolts will not line up. You can't get that wrong because it only goes on in one direction. However, make sure that the bracket is placed with the relief cuts facing down on the flat. The bracket has a smooth side and a side with a relief cut on each edge.
        Grooved side of the bracket that goes on faced down:


        WARNING
        Here you can see the set screws on the bottom of the base that's used to push out the ram after bending is complete, with an allen wrench. PLEASE REMEMBER TO IMMEDIATELY BACK THE TWO SCREWS OUT FLUSH WITH THE BOTTOM OF THE BASE SO THAT IT DOES NOT DAMAGE THE JIG WITH THE NEXT PRESS BEND, AFTER YOU REMOVE THE RAM OFF OF THE BASE.


        The AK builder flat is indexed onto the ram via the rear triggerguard rivet hole and the magazine well. Notice the two sets of pins on both sides of the magazine well. The furthest front pins are used to index an AK 47 magazine well. The two pins back from those are used for AK 74 magazine wells. Be sure to separate your AK 74 flats from your AK 47 flats and let the person helping with the flat bends know you're switching to the AK 74 flat. The pins in front can be pushed down flat and out of the way for the AK 74 flat. If not, the AK 74 flat will be ruined. If the front pins are not pushed back up for an AK 47 flat, then the AK 47 flat will be ruined. Also be sure when mounting the flat, that in this position the rails should be pointed down so that they fold to the inside.
        Last edited by 69Mach1; 05-10-2010, 3:15 AM.
        sigpic
        69Mach1
        munkeeboi
        TURBOELKY
        antix2
        WTSGDYBBR
        tujungatoes
        jmpgnr24K

        Comment

        • #5
          69Mach1
          Super Moderator
          CGN Contributor - Lifetime
          • Jan 2006
          • 15032

          Jig in action.

          Just place the jig into the press and center the ram in the middle. Just press once until the ram on the jig bottoms out in the base. Remember to add a small amount of lube or oil to the bottom section of the flat prior to bending.


          What the finished flat should look like. This new jig produces a clean flat surface on the bottom of the reciever. No trimming is necessary on the top rails.


          Next, drill out your center support holes on each side (RED), and one of the axis (fire control group) pin holes on the right side of the reciever (BLUE) with a 5/32 inch drill bit. AK builder flats do not have these holes predrilled. In addition, the FCG holes must also be finished reamed prior to heat treating them.
          Last edited by 69Mach1; 05-10-2010, 3:28 AM.
          sigpic
          69Mach1
          munkeeboi
          TURBOELKY
          antix2
          WTSGDYBBR
          tujungatoes
          jmpgnr24K

          Comment

          • #6
            69Mach1
            Super Moderator
            CGN Contributor - Lifetime
            • Jan 2006
            • 15032

            Riveting the trigger guard.

            Next step is the trigger guard, done before welding of the side rails. Unless the jig for riveting the rear trunnions does not have enough clearance with the trigger guard on. Then it can be done after the rear trunnion is riveted.

            Just a reminder. Don't forget to install the selector stop, and to install it in the correct way, and the shortest rivet is used for riveting the back of the trigger guard.

            This is the selector stop, the part on top. It fits between the receiver and the trigger guard. It's purpose is to stop the safety selector at the bottom of its swing down.


            The extension coming out of the selector stop should be on the same side as the safety selector for obvious reasons.
            Last edited by 69Mach1; 05-10-2010, 3:26 AM.
            sigpic
            69Mach1
            munkeeboi
            TURBOELKY
            antix2
            WTSGDYBBR
            tujungatoes
            jmpgnr24K

            Comment

            • #7
              69Mach1
              Super Moderator
              CGN Contributor - Lifetime
              • Jan 2006
              • 15032

              Trimming and heat treating the ejector tip.

              Trim the ejector prior to heat treating it. Grind it down about 1 milimeter with a hand file. This is so you won't have to cut too much later on for the final fitting of the bolt/bolt carrier. Also sand down the black finish that was applied so that you can see the color change. Do it again prior to the second heat treat.


              When heat treating, you only want to treat the ejector tip. Once with a torch until it turns a bright red, then dip in oil. And then again to a get a blue/grey color, then air cool.

              Preparation of the side rails for welding.

              Trimming the magazine stabilizer lower rail.
              This step can actually be done at anytime before welding or heat treating. Place both rails up against the inside of the flat/receiver and scribe a line just above the top of the magazine well dimple. This is the lower rail, not the top rail. Use your cutting wheel to cut along that line. Because some wheels are thicker than others, start your cut, back a little bit from that line. You want the rail to be just a little higher than the top of the mag well dimple on the inside.


              You will come back to those rails after it's been welded on, and the front trunnion on to check for magazine fit. Using the drum type grinder, you make adjustments to the height of those rails to fit your magazine in properly.


              Before welding, sand down the inside of the receiver where the rails will be welded onto, and the inner and outer side of the rails, as well as on the outside of the receiver where the welding tip makes contact. By the way, looking down the rifle/receiver from the rear, the rail with the ejector is welded onto the left side.
              Last edited by 69Mach1; 03-12-2012, 9:06 AM.
              sigpic
              69Mach1
              munkeeboi
              TURBOELKY
              antix2
              WTSGDYBBR
              tujungatoes
              jmpgnr24K

              Comment

              • #8
                69Mach1
                Super Moderator
                CGN Contributor - Lifetime
                • Jan 2006
                • 15032

                Welding on the side rails.

                With the new AK Builder flat and rails, we have been able to use a 15/64 inch drill bit to line up the rails with the front trunnion perfectly. However, you can use a different bit if it's not lining up. You can see it line up with the ledge on the rear of the trunnion. Caution: Hungarian front trunnions seem to need a 1/4 inch bit. For some reason the ledge on the AMD 65 sits lower.


                Make sure the front trunnion is flush with the front of the reciever, and push the rails right up against the front trunnion. That prevents the trunnion from moving when you rivet that together. It's important that the front trunnion doesn't move so it won't effect your magazine fit. Then clamp the rail down with a "C" clamp through the magazine well.


                When welding. Use a 1 to 1.5 second hold. That's just a guide however. It can vary with different equipment. Have a firm grip on the welders lever, but don't put too much pressure on it. These are 1 second hold welds. 5 to 6 on each side. I count "one one thousand" and then release the switch. This also saves the lower welding tip from abuse.
                Last edited by 69Mach1; 06-16-2010, 11:20 AM.
                sigpic
                69Mach1
                munkeeboi
                TURBOELKY
                antix2
                WTSGDYBBR
                tujungatoes
                jmpgnr24K

                Comment

                • #9
                  69Mach1
                  Super Moderator
                  CGN Contributor - Lifetime
                  • Jan 2006
                  • 15032

                  Install your center support.
                  There is a jig to install the center support. First you'll have to drill out the rails you've just welded on, through the center support holes in the receiver. It's up to you to decide on which side the head of the center support rivet goes. I like to have it on the same side as the FCG pin heads (left side). That way if the crushed side isn't as cosmetically good as you would like it to be, the safety selector will cover it. If you are going to install a side scope rail, then the head can be placed on the right side, and the rail will cover the crushed side. Slip in your front and rear trunnions for support while you install it. If there's no jig, use a hammer to flatten and shape the head as best you can.


                  Reaming the axis (fire control group) pin holes.

                  After the rails have been welded on and the center support installed, you can now drill through the axis pin hole (5/32" bit) and into the side rail. The rail is not pre-drilled.


                  Then ream the small holes on the right with a 5mm reamer.


                  Then the larger holes on the left with a 7mm reamer.


                  Heat treating the axis pin holes.

                  Only the 4 axis pin holes need to be heat treated. Two on each side.

                  Once with a torch until it turns bright red, then dunk in oil. Second time until it turns a grey/blue, then air cool. Make sure to move the tip around the holes. Finished receiver:

                  Last edited by 69Mach1; 05-12-2010, 1:35 AM.
                  sigpic
                  69Mach1
                  munkeeboi
                  TURBOELKY
                  antix2
                  WTSGDYBBR
                  tujungatoes
                  jmpgnr24K

                  Comment

                  • #10
                    69Mach1
                    Super Moderator
                    CGN Contributor - Lifetime
                    • Jan 2006
                    • 15032

                    Using the rivet hole drilling jig.

                    To use it for drilling out the rear trunnion rivets on a drill press, mount the rear trunnion on the jig and use a center punch to put a divit as close to center as possible in the rivet. Then align the 5/32 inch drill bit on the drill press, and clamp the entire jig down for drilling. Those are adj. shims on the bottom for support.


                    To use it for drilling the front trunnion rivet holes in the receiver, just lock the demilled front trunnion into the red collar (for 7.62 front trunnions only, blue collar for 5.45) and center the 5/32 inch bit over the holes on the drill press. Then run the bit down into the hole and clamp the jig down to determine where to drill.
                    WARNING: PLEASE BE CAREFUL NOT TO DRILL INTO THE COLLAR. YOU ONLY NEED TO DRILL THROUGH 1mm.


                    Next, slide the receiver onto the trunnion, use oil, and drill out the rivet holes. The same steps apply to the rear trunnion holes.


                    Clean up any excess metal with a small hand file so that the rivet sits flush.
                    Last edited by 69Mach1; 04-29-2010, 12:15 AM.
                    sigpic
                    69Mach1
                    munkeeboi
                    TURBOELKY
                    antix2
                    WTSGDYBBR
                    tujungatoes
                    jmpgnr24K

                    Comment

                    • #11
                      69Mach1
                      Super Moderator
                      CGN Contributor - Lifetime
                      • Jan 2006
                      • 15032

                      Countersink your rivet holes.

                      Rivet hole (lower right) before countersinking. See how high the "swell neck" rivet sits up above the receiver?


                      Use a 1/4 inch drill bit to open up the rivets holes that need to be countersunk. Give it a taper until the "swell neck" rivet almost touches the receiver.


                      Rivet hole after countersinking. The rivet head is now about flush with the receiver.

                      Last edited by 69Mach1; 04-28-2010, 11:55 PM.
                      sigpic
                      69Mach1
                      munkeeboi
                      TURBOELKY
                      antix2
                      WTSGDYBBR
                      tujungatoes
                      jmpgnr24K

                      Comment

                      • #12
                        69Mach1
                        Super Moderator
                        CGN Contributor - Lifetime
                        • Jan 2006
                        • 15032

                        Using a riveting jig or a bolt cutter riveter, rivet your front and rear trunnions on. Then reinstall the barrel and barrel pin, and check headspace. Install your bolt and bolt carrier to check and trim the ejector rail. Fit the magazine.

                        At this time, you can either install the FCG to check for proper function, and disassemble for the blasting and parkarizing, or wait until after those processes to install the FCG.

                        Then it goes to the blast cabinet, get's a shot of brake cleaner to degrease and then the whole thing goes into the park tank. When it comes out, spray off the parts with water, dry, and then apply oil and let it soak in for awhile.
                        Last edited by 69Mach1; 05-10-2010, 3:46 AM.
                        sigpic
                        69Mach1
                        munkeeboi
                        TURBOELKY
                        antix2
                        WTSGDYBBR
                        tujungatoes
                        jmpgnr24K

                        Comment

                        • #13
                          69Mach1
                          Super Moderator
                          CGN Contributor - Lifetime
                          • Jan 2006
                          • 15032

                          .......
                          sigpic
                          69Mach1
                          munkeeboi
                          TURBOELKY
                          antix2
                          WTSGDYBBR
                          tujungatoes
                          jmpgnr24K

                          Comment

                          • #14
                            69Mach1
                            Super Moderator
                            CGN Contributor - Lifetime
                            • Jan 2006
                            • 15032

                            Fitting the magazine.

                            After the trunnions are in, magazine fitting may be required. Adjust the area (red/bottom arrow) just behind the magazine with a diamond bit. Check with multiple magazines to ensure that the back clears that part of the receiver, and magazine fully seats. If it does and the magazine latch does not lock in, then the top of the mag latch needs adjustment (blue/top arrow).
                            Last edited by 69Mach1; 05-12-2010, 1:34 AM.
                            sigpic
                            69Mach1
                            munkeeboi
                            TURBOELKY
                            antix2
                            WTSGDYBBR
                            tujungatoes
                            jmpgnr24K

                            Comment

                            • #15
                              69Mach1
                              Super Moderator
                              CGN Contributor - Lifetime
                              • Jan 2006
                              • 15032

                              Installing the Fire Control Group.
                              The FCG is made up of the trigger, disconnector, hammer, hammer spring, disconnector spring, and axis pins.

                              Fire Control Group retaining pins, plates, and C-clips. Avoid using the "sheppards hook" on the top. Get a retaining plate, but an E-clip or hair pin cotter will work just fine.

                              Here's how the retaining plate is installed. Shown on the outside for illustration purposes.

                              All of the above retain the axis pins in the receiver by locking into the pin's groove.


                              Once the FCG is in and the axis pins retained. Perform a basic function test. (With and unloaded gun and pointed in a safe direction) Start by pulling the trigger back and holding it back. Push back the hammer until it locks onto the disconnector. Release the pressure off of the trigger. The hammer should come off of the disconnector and be caught by the trigger hook. Pull the trigger again and the hammer should fall.
                              Last edited by 69Mach1; 04-28-2010, 11:54 PM.
                              sigpic
                              69Mach1
                              munkeeboi
                              TURBOELKY
                              antix2
                              WTSGDYBBR
                              tujungatoes
                              jmpgnr24K

                              Comment

                              Working...
                              UA-8071174-1