Unconfigured Ad Widget

Collapse

Adding a DRO to an X2 Mini-mill

Collapse
X
 
  • Time
  • Show
Clear All
new posts
  • goober
    CGN/CGSSA Contributor
    CGN Contributor
    • Sep 2008
    • 4875

    Adding a DRO to an X2 Mini-mill

    Ok folks, I've been threatening to post this for a while now but finally have the time to do it. I've had all the parts in hand for months, but travel and RealLife™ got in the way there for a bit.
    This thread is a demonstration of one method for mounting scales and a DRO (Digital Read Out) on a mill. The mill in question is the Sieg X2 mini-mill clone sold by Harbor Freight (HF 44991), and also by Grizzly (G8689), ToolsNow/Cummins (7877), etc. See this comparison page for more info. It is an entry-level benchtop mill, costs about $350-500, and is about the smallest mill that is useful for most gunsmithing projects such as finishing 80% lowers, making custom parts, and such.
    Pretty much all the lower-end (< $1500) mills available are Chinese-made and as such leave a bit to be desired in the fit & finish and precision categories. They are typical of ChiCom products: cheap and serviceable, but a bit crude and rough. One of the biggest shortcomings of these mills out of the box concerns the control of the X & Y movement of the table and Z movement of the spindle head: the mechanisms involved are not of the highest quality, and high-precision movement is difficult. Backlash is pretty much a given when changing directions, and can be hard to account for. On top of this, lead screws that move the table sometimes have odd threads, so that one revolution of the turn crank may move the table 0.0625" or something, which can make it a pain to count turns in order to move the desired amount. These are all issues that can be dealt with/worked around to varying degrees, but the best way is to install a DRO. A DRO keeps track of where the cutter is in real XYZ space at all times. It allows one to move an exact amount in any or all dimensions, return back to the same spot again, etc. No more counting turns if the handle, and if there is backlash, it is accounted for. So if you have a mill, you want a DRO.
    OK, enough explanation and justification. Let's get on with the demo. Having made the decision to add a DRO to one's mill, one must choose a DRO. The available options range from complete packages including all scales, they display, mounting brackets, etc., to very DIY setups that require much more assembly and in some cases even electronics fabrication. As one would expect, prices vary accordingly, with some of the higher-end DROs costing in the thousands, and the very cheapest options a couple hundred. The DRO displays themselves range from simple 2- or 3-axis models that just show the current coordinates and can be zeroed, to actual small computers that can calculate the coordinates for round bolt patterns, take into account cutter diameter, and the like.
    In the spirit of not putting Recaro seats in a Hyundai, it seems silly to spend more on a DRO that the mill cost to begin with, so I opted to buy the parts individually. I purchased electronic scales from Shars & a simple DRO display from CDCO.
    Parts list:
    Shars
    12" Horizontal Digital Machine Scale 303-9307 1 $49.00
    8" Horizontal Digital Machine Scale 303-9305 1 $39.00
    12" Vertical Digital Machine Scale 303-9308 1 $56.00
    Shipping cost $43.72
    Total $187.72
    CDCO
    Item Number: 30011
    Item Name: 3 - Axis DRO Display Unit ( Scales not included)
    Price Each: $189.00
    Quantity: 1
    Order Sub-Total: $189.00
    Shipping Cost: $15.00
    Total Cost: $204.00

    Here are the scales and display (the cables that connect the scales to the display are not shown):

    From bottom to top, the scales will be used for the X, Y, and Z axes, respectively.
    Last edited by goober; 10-27-2009, 9:48 AM.
    Live between Santa Cruz and SLO? Want to get involved?
    Check out the Central Coast Calguns Community Chapter
    And join the Central Coast Region Social Group!
    sigpic
    NRA Life Member - CRPA Life & Board Member - SAF Life Member - Monterey County Carry Initiative Sponsor
    Statements posted here are the sole opinions of the author and not those
    of CGN, CGF, CRPA, or any other institution or agency unless otherwise noted.
  • #2
    goober
    CGN/CGSSA Contributor
    CGN Contributor
    • Sep 2008
    • 4875

    Mounting plans &amp; fabrication of mounts

    The scales will need to be mounted onto the mill such that the movable part will slide as its respective axis is moved. This will require some engineering, as the mill itself does not have any existing brackets or even dedicated locations for scale mounting. Rather than reinventing the wheel, I chose to use already proven mounting plans available on the interwebs. I'm using the fignoggle.com plans for mounting a DRO on an X2 clone mini-mill ($8.95). The plans include parts lists, drawings for the various mounts required, as well as installation instructions. As these plans are copyrighted, I will not show the drawings or any great detail regarding the mounts themselves, but you should get the idea anyway.

    Most of the mounts are made from 2" x 0.5" 6061 aluminum bar stock. Here I'm cutting the stock on my ChiCom bandsaw:


    And milling the brackets to shape according to the drawings. Needless to say, a bit of chicken-egg syndrome exists here; one can't help lamenting how much easier it would be to make these mounts if one had a DRO.... )
    In this case one of the X-axis mounts:


    and one for the y-axis:


    And here are the finished mounts (one is made from aluminum angle stock):
    Last edited by goober; 10-25-2009, 2:11 PM.
    Live between Santa Cruz and SLO? Want to get involved?
    Check out the Central Coast Calguns Community Chapter
    And join the Central Coast Region Social Group!
    sigpic
    NRA Life Member - CRPA Life & Board Member - SAF Life Member - Monterey County Carry Initiative Sponsor
    Statements posted here are the sole opinions of the author and not those
    of CGN, CGF, CRPA, or any other institution or agency unless otherwise noted.

    Comment

    • #3
      goober
      CGN/CGSSA Contributor
      CGN Contributor
      • Sep 2008
      • 4875

      Mounting the X scale

      Once the mounting brackets are completed, we can attach the scales to the 3 axes of the mill. This will require some drilling and tapping for bracket attachment. First, remove the bellows-like chip guard on the front of the mill. (this is there to keep chips out of the y-axis ways; we will replace it once we get our brackets installed). There are a couple screws to be removed underneath the bellows:


      Now, locate, punch, and drill 2 holes for the right side x-axis scale bracket:


      And tap for 10-24 socket-head cap screws (SHCS):


      Mount the right-side bracket on these holes and attach the middle bracket (the one made from angle stock) using the bellows attachment screws (replacing bellows):


      Now the x-axis scale can be mounted up:


      Note that the scale is only anchored to the table (moving part) on one end, and the sliding parts of the scale is attached to the main body of the mill (non-moving part). The reason for only attaching one end (instead of both) is to prevent binding or flexing should the scale/mill alignment be off just slightly.
      Last edited by goober; 10-25-2009, 1:27 PM.
      Live between Santa Cruz and SLO? Want to get involved?
      Check out the Central Coast Calguns Community Chapter
      And join the Central Coast Region Social Group!
      sigpic
      NRA Life Member - CRPA Life & Board Member - SAF Life Member - Monterey County Carry Initiative Sponsor
      Statements posted here are the sole opinions of the author and not those
      of CGN, CGF, CRPA, or any other institution or agency unless otherwise noted.

      Comment

      • #4
        goober
        CGN/CGSSA Contributor
        CGN Contributor
        • Sep 2008
        • 4875

        Y &amp; Z axes

        To mount the Y axis brackets, the X axis turn crank handle must be removed, and holes drilled/tapped for 10-24 SHCSs in the table assembly behind its location:


        And in front of it on the base of the mill:


        For the Z-axis, holes must be drilled/tapped near the base of the mill column:


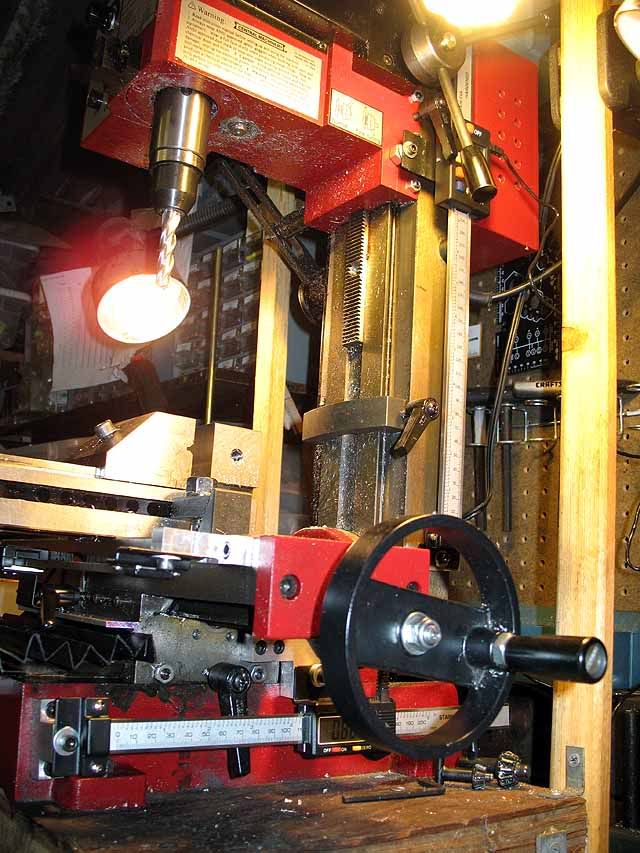
        And up on the spindle head assembly. Here are the Y & Z axis scales mounted up:


        Plug in the DRO display and the installation is completed:

        I've just temporarily "mounted" the display back there on the pegboard... I'll build a more functional mount for it, possibly on a flex/swing arm, eventually...:P
        Next step will be to test the accuracy/precision of the readout in all axes, and then begin enjoying the benefits. I am really looking forward to not only how much easier this is going to make pretty much every operation, but also the improvement in the quality of my work, as well as the decreased anxiety that comes along with really knowing where one is.
        Woohooo!
        Last edited by goober; 10-25-2009, 1:45 PM.
        Live between Santa Cruz and SLO? Want to get involved?
        Check out the Central Coast Calguns Community Chapter
        And join the Central Coast Region Social Group!
        sigpic
        NRA Life Member - CRPA Life & Board Member - SAF Life Member - Monterey County Carry Initiative Sponsor
        Statements posted here are the sole opinions of the author and not those
        of CGN, CGF, CRPA, or any other institution or agency unless otherwise noted.

        Comment

        • #5
          ar15barrels
          I need a LIFE!!
          • Jan 2006
          • 57143

          Are you using a grinding vise for milling?
          Those vises were not really meant to take that kind of force.
          Randall Rausch

          AR work: www.ar15barrels.com
          Handguns: www.handgunbarrels.com
          Bolt actions: www.700barrels.com
          Foreign Semi Autos: www.akbarrels.com
          Most work done while you wait on a scheduled shop visit.

          Comment

          • #6
            goober
            CGN/CGSSA Contributor
            CGN Contributor
            • Sep 2008
            • 4875

            Originally posted by ar15barrels
            Are you using a grinding vise for milling?
            Those vises were not really meant to take that kind of force.
            Those screwless vises are really the best fit on the mini-mill. I've tried many different kinds, and the small screwless works best. They don't lift when tightened, hold well, and are pretty square and true.

            The forces in involved on a mini-mill are really not like those experienced on a Brdigeport or something, anyway.
            Live between Santa Cruz and SLO? Want to get involved?
            Check out the Central Coast Calguns Community Chapter
            And join the Central Coast Region Social Group!
            sigpic
            NRA Life Member - CRPA Life & Board Member - SAF Life Member - Monterey County Carry Initiative Sponsor
            Statements posted here are the sole opinions of the author and not those
            of CGN, CGF, CRPA, or any other institution or agency unless otherwise noted.

            Comment

            • #7
              ar15barrels
              I need a LIFE!!
              • Jan 2006
              • 57143

              Originally posted by goober_0
              The forces in involved on a mini-mill are really not like those experienced on a Brdigeport or something, anyway.
              I suppose you don't run a 3/4" endmill at 1100rpm 1" deep in a single pass huh...
              Randall Rausch

              AR work: www.ar15barrels.com
              Handguns: www.handgunbarrels.com
              Bolt actions: www.700barrels.com
              Foreign Semi Autos: www.akbarrels.com
              Most work done while you wait on a scheduled shop visit.

              Comment

              • #8
                goober
                CGN/CGSSA Contributor
                CGN Contributor
                • Sep 2008
                • 4875

                Originally posted by ar15barrels
                I suppose you don't run a 3/4" endmill at 1100rpm 1" deep in a single pass huh...
                LMAO Noooooooooooo!!!

                3/4" is about the biggest i'd even think about running on this little toy (OK maybe i've tried a 1" ), and with that we're talking very light cuts.
                even with a 1/2" or 7/16" EM i feel like i'm being daring if a take a few tenth's at a bite...
                someday.... someday, i will have a big boy mill. and when i do, i'll use a nice big 5" or 6" Kurt vise, and the chips will really fly.
                but on the mini-mill, the liddo screwless vises work just great.
                Live between Santa Cruz and SLO? Want to get involved?
                Check out the Central Coast Calguns Community Chapter
                And join the Central Coast Region Social Group!
                sigpic
                NRA Life Member - CRPA Life & Board Member - SAF Life Member - Monterey County Carry Initiative Sponsor
                Statements posted here are the sole opinions of the author and not those
                of CGN, CGF, CRPA, or any other institution or agency unless otherwise noted.

                Comment

                • #9
                  ar15barrels
                  I need a LIFE!!
                  • Jan 2006
                  • 57143

                  Originally posted by goober_0
                  LMAO Noooooooooooo!!!

                  3/4" is about the biggest i'd even think about running on this little toy (OK maybe i've tried a 1" ), and with that we're talking very light cuts.
                  I have a 5" shell mill with 10 staggered inserts on it.
                  It's supposed to be able to take a 1/4" deep cut in cast iron in one pass.
                  I don't have a piece of cast iron that big to try it...
                  Randall Rausch

                  AR work: www.ar15barrels.com
                  Handguns: www.handgunbarrels.com
                  Bolt actions: www.700barrels.com
                  Foreign Semi Autos: www.akbarrels.com
                  Most work done while you wait on a scheduled shop visit.

                  Comment

                  • #10
                    goober
                    CGN/CGSSA Contributor
                    CGN Contributor
                    • Sep 2008
                    • 4875

                    Originally posted by ar15barrels
                    I don't have a piece of cast iron that big to try it...
                    but how awesome is it that if you did, you could?!?
                    Live between Santa Cruz and SLO? Want to get involved?
                    Check out the Central Coast Calguns Community Chapter
                    And join the Central Coast Region Social Group!
                    sigpic
                    NRA Life Member - CRPA Life & Board Member - SAF Life Member - Monterey County Carry Initiative Sponsor
                    Statements posted here are the sole opinions of the author and not those
                    of CGN, CGF, CRPA, or any other institution or agency unless otherwise noted.

                    Comment

                    • #11
                      savs2k
                      Senior Member
                      • Jan 2007
                      • 1807

                      i love machining talk. I'm going to be playing on some manual mills tomorrow. Hows that mill working out for you? I was thinking of getting one but for the money i'm trying to save up a little more for something better. Are you on cnczone as well? I'm still in my lurking phase over there =P

                      Comment

                      • #12
                        50BMGBOB
                        Senior Member
                        • Dec 2005
                        • 1738

                        Looks good. I just got my first lathe (an Atlas 10F) and a mill is next on my list. I just need a bigger shop now.
                        sigpic50BMGBOB aka 50BMGLAZARUS aka 50BMGZOMBIEBOB aka the UN- DEAD!

                        Comment

                        • #13
                          goober
                          CGN/CGSSA Contributor
                          CGN Contributor
                          • Sep 2008
                          • 4875

                          Originally posted by savs2k
                          i love machining talk. I'm going to be playing on some manual mills tomorrow. Hows that mill working out for you? I was thinking of getting one but for the money i'm trying to save up a little more for something better. Are you on cnczone as well? I'm still in my lurking phase over there =P
                          The mini-mill is a bit limiting but it's a great "My First Mill", allowing one to get into the game for not too much money, learn the basics, do some cool projects (such as finishing 80% receivers), and decide how much deeper one wants to get into it. I'm yearning for a bigger (real) mill but this one will keep me happy and occupied until I can acquire one.
                          I haven't really spent much time over at cnczone, although I've heard it is a great resource and good group. May have to join up there as well, thanks for the tip. I do see a CNC mill in my future, eventually
                          Live between Santa Cruz and SLO? Want to get involved?
                          Check out the Central Coast Calguns Community Chapter
                          And join the Central Coast Region Social Group!
                          sigpic
                          NRA Life Member - CRPA Life & Board Member - SAF Life Member - Monterey County Carry Initiative Sponsor
                          Statements posted here are the sole opinions of the author and not those
                          of CGN, CGF, CRPA, or any other institution or agency unless otherwise noted.

                          Comment

                          • #14
                            krazy
                            Member
                            • Mar 2009
                            • 162

                            goober, you talk like your mill is sooo small. my sherline is TINY compared to that thing! i wouldnt have been able to do my 80% without the DRO though, thank goodness for that.

                            Comment

                            • #15
                              goober
                              CGN/CGSSA Contributor
                              CGN Contributor
                              • Sep 2008
                              • 4875

                              Originally posted by krazy
                              goober, you talk like your mill is sooo small. my sherline is TINY compared to that thing! i wouldnt have been able to do my 80% without the DRO though, thank goodness for that.
                              hehe yes the sherline and HF "micro-mill" and the like are reeeeaaaallly small
                              kudos to you for being able to finish an 80 on one, i'd have thought they wouldn't quite be up to it...
                              Live between Santa Cruz and SLO? Want to get involved?
                              Check out the Central Coast Calguns Community Chapter
                              And join the Central Coast Region Social Group!
                              sigpic
                              NRA Life Member - CRPA Life & Board Member - SAF Life Member - Monterey County Carry Initiative Sponsor
                              Statements posted here are the sole opinions of the author and not those
                              of CGN, CGF, CRPA, or any other institution or agency unless otherwise noted.

                              Comment

                              Working...
                              UA-8071174-1