 Tweet
Tweet
Hi everyone
I just wanted to post up what the final pistol looks like. Unfortunately I'm not allowed to post in a thread that's more than 113 days old, so I've no recourse but to begin a new one.
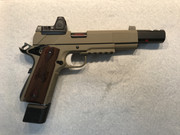
Here's the end product. Overall I'm quite happy with the end product, and very glad for what I've learned along the way. This pistol started life as a Springfield Armory MilSpec in .45 ACP.
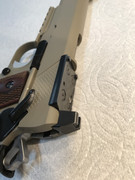
I did some hand checkering of the front strap, with moderate results. I did learn a *lot* about the process, hopefully the next one will go better. I hand fitted the grip safety, smoothed out the trigger components and did a careful trigger job. I used a jig, studiously adhered to the directions, and have a trigger that is about like breaking glass. A 5 shot average yields a trigger weight of 4 pounds 2 ounces. I like it this way, plenty light for my purposes.
I milled a circular recess into the vertical impact surface to yield the "bow tie" feature that relieves stress on the barrel legs. I inked the barrel legs and checked the fit to ensure the bottoms of the legs indeed clear the vertical impact surface. My first effort was insufficient; I am constantly worried about removing too much material. A little more work and the fit was fine.
I also hand fitted and silver soldered the picatinny rail to the dust cover.
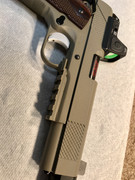
From Caspian arms, it jutted out past the front of the dust cover as received from the maker. So I spent some patient hours with hand files carefully contouring both the sides and the element that wraps around the trigger guard. The final fit is... Not bad. I'm pretty happy with my file work, but still have much to learn about silver soldering. Fortunately I was able to cover it all with paint! Brownells' Alumahyde in Magpul flat dark earth for the body, and semigloss black for the accents.
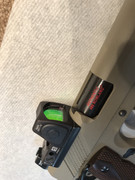
The Trijicon RMR sight is CNC milled into the slide. I'm really happy with how this came out.
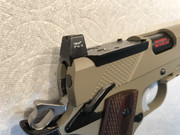
I took some time in both CAD and CAM to make sure everything was just right. I gave a couple thousandths of an inch for clearance, and only had to do some very light file work to get the adapter to slide in like a glove. The front sight of course had to be installed as well, a simple dovetail. I was a bit nervous when filing the front sight to fit, removing too much material seems super easy to do. Fortunately I think I got it right, it slid in with modest effort with my sight tool.
And yes, it's chambered in .460 Rowland. Probably the most straight forward part of the conversion as it's all drop in. I like how the compensator looks, this pistol is quite imposing in appearance and in heft.

My next pistol is also a Springfield Armory MilSpec, this one in Stainless Steel. I want to do some more learning about silver soldering before I start in on this project. Hopefully it'll turn out even better than what I've done with the first.
Thanks for looking!
I just wanted to post up what the final pistol looks like. Unfortunately I'm not allowed to post in a thread that's more than 113 days old, so I've no recourse but to begin a new one.
Here's the end product. Overall I'm quite happy with the end product, and very glad for what I've learned along the way. This pistol started life as a Springfield Armory MilSpec in .45 ACP.
I did some hand checkering of the front strap, with moderate results. I did learn a *lot* about the process, hopefully the next one will go better. I hand fitted the grip safety, smoothed out the trigger components and did a careful trigger job. I used a jig, studiously adhered to the directions, and have a trigger that is about like breaking glass. A 5 shot average yields a trigger weight of 4 pounds 2 ounces. I like it this way, plenty light for my purposes.
I milled a circular recess into the vertical impact surface to yield the "bow tie" feature that relieves stress on the barrel legs. I inked the barrel legs and checked the fit to ensure the bottoms of the legs indeed clear the vertical impact surface. My first effort was insufficient; I am constantly worried about removing too much material. A little more work and the fit was fine.
I also hand fitted and silver soldered the picatinny rail to the dust cover.
From Caspian arms, it jutted out past the front of the dust cover as received from the maker. So I spent some patient hours with hand files carefully contouring both the sides and the element that wraps around the trigger guard. The final fit is... Not bad. I'm pretty happy with my file work, but still have much to learn about silver soldering. Fortunately I was able to cover it all with paint!
Brownells' Alumahyde in Magpul flat dark earth for the body, and semigloss black for the accents. The Trijicon RMR sight is CNC milled into the slide. I'm really happy with how this came out.
I took some time in both CAD and CAM to make sure everything was just right. I gave a couple thousandths of an inch for clearance, and only had to do some very light file work to get the adapter to slide in like a glove. The front sight of course had to be installed as well, a simple dovetail. I was a bit nervous when filing the front sight to fit, removing too much material seems super easy to do. Fortunately I think I got it right, it slid in with modest effort with my sight tool.
And yes, it's chambered in .460 Rowland. Probably the most straight forward part of the conversion as it's all drop in. I like how the compensator looks, this pistol is quite imposing in appearance and in heft.
My next pistol is also a Springfield Armory MilSpec, this one in Stainless Steel. I want to do some more learning about silver soldering before I start in on this project. Hopefully it'll turn out even better than what I've done with the first.
Thanks for looking!


Comment