Unconfigured Ad Widget

Collapse

2011 1911 double stack .40/10mm ongoing build with pics

Collapse
X
 
  • Time
  • Show
Clear All
new posts
  • repoman1984
    Senior Member
    • Jun 2009
    • 1051

    2011 1911 double stack .40/10mm ongoing build with pics

    For years I've wanted a monolithic 1911 with the full dust cover I had a decent year financially and decided I needed a winter stay busy project. My goal is a CA compliant 2011 double stack in .40 S&W I chose this caliber because most of my autoloading pistols are .40 and I like the idea of fitting a .40 and a 10mm barrel and swapping barrels and springs to have both calibers. The compatibility between 10mm and .40 would make this extremely easy (at least in theory)

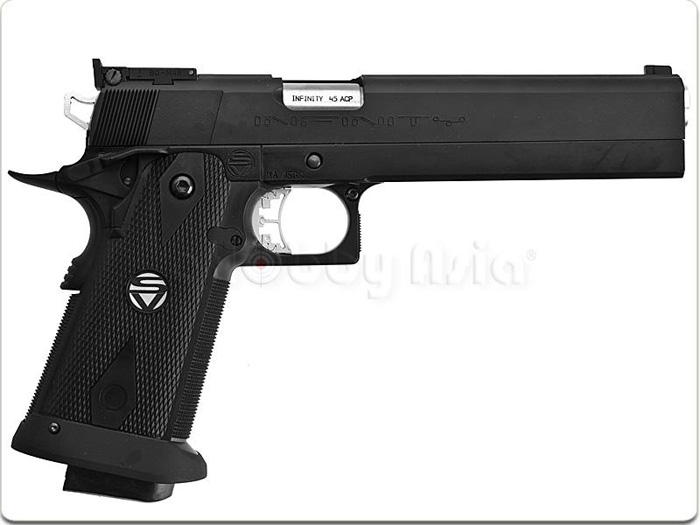
    The goal is to get as close to this as possible, inspired by the pistol Vincent Volaju carries in the "cowboy bebop" film.


    The grip/trigger/mag release were a great deal thanks to a a calgunner getting rid of a NIB set for a great price, the frame was a limited 10 Heavyweight 1911 80% - Carbon Steel, Eric was was nice enough to hook me up with a 1" dust cover piece I planned to weld onto the frame.

    The 10mm barrel and slide were a budget priced matched set which required some fitting of the hood, as of right now the lockup is ridiculously tight, might require even more filing of the hood but, I feel its better to be safe and leave extra materials. The .40 barrel I have not attempted to fit yet, as I'm saving that as towards the end for highest accuracy and tightest fit the 10mm I see as more important to be reliable and if that means loosening some tolerances at the cost of accuracy so be it.

    mock up of extended slide piece/frame grip slide and barrel obviously uncut rails and needs bead blasting and a cerekote to match.

    [IMG][/IMG]


    The frame rails were cut using matrix jig, and the slide was driven over the rails back and forth with a soft blow rubber mallet and a steel sledge and a block of wood 400 grit was used for final lapping, there is a light play I am not happy with but I am not concerned it will affect accuracy or fit.

    a makeshift jig was made from a flat piece of bar stock I had and the frame and dust cover were beveledat the meeting point and slowly fill-welded and then ground flush with a dremel and sanding drum.


    AL foil protects from welding spatter


    starting to look like a real 1911


    I realize I am probably going to have to cut approximately 1/8" off the dust cover where the slide stop naturally stops this is going to be probably the last thing I do before bead blast/cerekote


    like an idiot I ordered a BUSHING style spring cap when I should have ordered a REVERSE cap. considering how long I waited for the parts I decided to make one on my lathe at least till a factory made stainless/heat treated quality part arrives and hold off on ordering anything till I realize 100% what I need. (reverse cap, barrel link kit guide rod buffers etc etc) I will update the project as I go along.

    Sapper Morton: How does it feel? Killing your own kind?

    K: I don't "retire" my own kind, because we don't run...
  • #2
    mtenenhaus
    Veteran Member
    • Jul 2007
    • 3416

    I love it!!!!

    Comment

    • #3
      Old Marine
      Senior Member
      • Aug 2016
      • 789

      Trying to understand the use of the word

      Monolithic....

      Comment

      • #4
        repoman1984
        Senior Member
        • Jun 2009
        • 1051

        Originally posted by Old Marine
        Trying to understand the use of the word

        Monolithic....
        Something that looks like it was carved from a single piece of granite. A seamless slab of rock.

        firing pin retainer filed and stoned to fit, a lot of material was removed


        I was not happy with the extractor seemed VERY loose and would not reliably grip a 10mm cartridge, I bent it inward using a vise, center punch and drill bit cranking it down a little and test fitting. It holds a 10mm very snugly, possibly too tight but it can be adjusted back.


        Much more blending, hopefully this will completely dissapear after the beadblast and cerekote


        Unfortunately my pin jig did not fit the wider frame I purchased so I opted to clamp the frame to the jig's side and drill 4 holes from the exterior THROUGH THE JIG TWICE, it seems in spec I'll find out when its time to play with the trigger group, I used a basic hand held drill.


        Sapper Morton: How does it feel? Killing your own kind?

        K: I don't "retire" my own kind, because we don't run...

        Comment

        • #5
          repoman1984
          Senior Member
          • Jun 2009
          • 1051

          Blending the beaver tail using a electrical tape, started with a coarse dremel sanding drum, to a light grit sanding drum, finished with 100 grit sandpaper.


          before sandpaper


          The extractor appears far to aggressive, I am experiencing feeding issues, I'm going to remove it and check feeding and then possibly adjust spring less and stone to accept brass. I am noticing it actually cuts the rim of the brass just enough create a burr. I Believe I probably need to cut the feet back as well to give more "running room" from mag to feed ramp.

          Lockup is still extremely tight running a test 14 lb (NOT RECOMMENDED FOR A 10MM)

          Ejector needs a 3/32 bit to cut for a roll-pin I'm not happy with how my ejector currently fits, probably going to purchase a new one and start fresh they are only $25. I might leave the one I have through first test round for R&D purposes.
          Sapper Morton: How does it feel? Killing your own kind?

          K: I don't "retire" my own kind, because we don't run...

          Comment

          • #6
            repoman1984
            Senior Member
            • Jun 2009
            • 1051

            pins seem ok, they were countersunk with a slightly larger bit I ran the sear bit through the frame for a bit fit was TIGHT without any sear parts.


            ambi safety was cut/filed/stoned on both sides as it had interference with the frame. Something is wrong it is NOT self retaining on the Left handed side, falls out even with slide attached I think I may have purchased the wrong size/shape. add another item to the list of stuff to buy.


            Need to cut a big chunk of material out of the barrel feet on the 10mm and probably the .40 barrel, I noticed the minor cutter is exactly the same as a 5mm end mill, I'm wondering if I can use a metric end-mill and my baby mill to machine the barrel without buying a slide pin fitting kit. I already made a barrel holding fixture that pins the barrel into the lugs in battery for the fun of it.


            LOT of material probably needs to be blended down after the final barrel fit


            getting closer.... keeping me busy during the slow season for my work.

            Sapper Morton: How does it feel? Killing your own kind?

            K: I don't "retire" my own kind, because we don't run...

            Comment

            • #7
              Romeo_alpha01
              Senior Member
              • Jan 2017
              • 2029

              I was thinking of this exact same setup on the same Vincent Volaju SV pistol. I have the other two noteworthy cowboy bebop guns already, but this is something I’d love to have sometime.

              Comment

              • #8
                repoman1984
                Senior Member
                • Jun 2009
                • 1051

                I've been looking for Spike's jericho 941 for a while now, the price on those things seems to be rising every year; for a surplus military issue gun I'm kinda surprised how valuable they are. I'd love to get one thats seen a few year duty with holster wear and scuffs everything.
                Sapper Morton: How does it feel? Killing your own kind?

                K: I don't "retire" my own kind, because we don't run...

                Comment

                • #9
                  BBShot
                  Member
                  • Feb 2010
                  • 136

                  Looks like a cool project. Keep us posted. Can’t wait to see how it turns out.

                  Comment

                  • #10
                    ar15barrels
                    I need a LIFE!!
                    • Jan 2006
                    • 57171

                    The Ceracoat job will tighten up the 400 grit lapped fit between frame and slide.
                    Beware that you might need to re-fit the barrel after the frame and slide are finished.
                    How much link swing travel do you have beyond 90 degrees? It looks like the slide needs to be let back another 0.020” or more for the safety notch in the front to better fit the thumb safety.
                    Get that right before you blend the back or trim the dust over to finish length!
                    The extractor foot that sets the engagement might need to be trimmed to get a proper grip before you set the tension to 24 ounces with the little brass pull-put gauge. Don’t over-trim though. You only want about 0.005” or so of extra engagement or you create problems with the extractor coming over the rim and you have to deepen the extractor clearance.
                    Last edited by ar15barrels; 12-27-2018, 1:46 PM.
                    Randall Rausch

                    AR work: www.ar15barrels.com
                    Handguns: www.handgunbarrels.com
                    Bolt actions: www.700barrels.com
                    Foreign Semi Autos: www.akbarrels.com
                    Most work done while you wait on a scheduled shop visit.

                    Comment

                    • #11
                      repoman1984
                      Senior Member
                      • Jun 2009
                      • 1051

                      Thank you for the input I am a bit concerned the cerakote is gonna tighten things up a bit I'm going to avoid the underside of slide completely to mitigate changing the surfaces.

                      Thats a good question, I've been racking my brain trying to figure that one out, how to measure that link angle during full battery. At the moment I am only goofing around with the 10mm barrel and I've got to change the feet engagement quite a bit as far as I can tell the slide stop is not even resting against the true current rounded spot only the beginning of the feet cut, its at least .125" forward than it should be. As I said earlier I have a barrel holding jig but I might set up a baby mill and shave .001-002" at a time on a small mill and stone/polish.

                      Oh I know, everything slide to frame cosmetic fit is going to be the last of the last on this thing, I'm going to put 50 reliable rounds through it, work out all the bugs before that, I don't want to have to blend the muzzle or even the hammer area twice.
                      Sapper Morton: How does it feel? Killing your own kind?

                      K: I don't "retire" my own kind, because we don't run...

                      Comment

                      • #12
                        ar15barrels
                        I need a LIFE!!
                        • Jan 2006
                        • 57171

                        Originally posted by repoman1984
                        I've been racking my brain trying to figure that one out, how to measure that link angle during full battery. At the moment I am only goofing around with the 10mm barrel and I've got to change the feet engagement quite a bit as far as I can tell the slide stop is not even resting against the true current rounded spot only the beginning of the feet cut, its at least .125" forward than it should be. As I said earlier I have a barrel holding jig but I might set up a baby mill and shave .001-002" at a time on a small mill and stone/polish.
                        I use a Weigand fitting jig to cut the barrel feet like this:


                        This allows you to indicate the centerline of the pin hole for the lug pin and then know how far back your cut is where the barrel will seat against the slide stop pin.
                        Weigand's instructions give you this dimension.

                        That distance is actually cut at 1.5 degrees and is what gets that lovely CLICK when the barrel locks up.
                        I use a 5mm carbide endmill to cut that angle and the final radius ends up about 0.002" tight, but that's quite close enough to the 0.200" slide stop pin diameter.

                        Even without the Weigand jig, you can setup the barrel in the mill, indicate to the center of the link pin hole in the feet, then move straight down by your link length and measure back with a 0.200" gauge pin in the spindle until it touches the stop surface.
                        Last edited by ar15barrels; 12-29-2018, 10:50 PM.
                        Randall Rausch

                        AR work: www.ar15barrels.com
                        Handguns: www.handgunbarrels.com
                        Bolt actions: www.700barrels.com
                        Foreign Semi Autos: www.akbarrels.com
                        Most work done while you wait on a scheduled shop visit.

                        Comment

                        • #13
                          repoman1984
                          Senior Member
                          • Jun 2009
                          • 1051

                          I love that jig design, considering I'm going to be shaving .002" a time I think I can whip up a crude jig out of some 1018 mild steel that uses a stud through the link pin hole as a reference point and a simple clamping setup with some basic trigonometry to get that sweet 1.5 degree slope final lockup. Then stone, and probably a dremel with a cotton buffer wheel and some polish paste, I'm thinking.
                          Sapper Morton: How does it feel? Killing your own kind?

                          K: I don't "retire" my own kind, because we don't run...

                          Comment

                          • #14
                            repoman1984
                            Senior Member
                            • Jun 2009
                            • 1051

                            Using a trig calculator a span of 6" @ 1.5 degrees would mean the height different should be exactly .160" if I'm doing my math right.

                            the jig mock up, the barrel sits on a bit turned to slightly below .154 Dia and a thickness of .164" bringing the feet aligned with the base flat and level, the end is turned down to .136" dia so it can be tapped for 6-32 thread and a giant nut can hold barrel against the jig with great repeatability for the "cutting-checking-cutting-checking cutting-checking" process. obviously I'll be using some C clamps during the actual cuts.


                            needs to be threaded and welded to the jig base.


                            spacer, .152 boss, threaded portion (not yet)

                            Sapper Morton: How does it feel? Killing your own kind?

                            K: I don't "retire" my own kind, because we don't run...

                            Comment

                            • #15
                              repoman1984
                              Senior Member
                              • Jun 2009
                              • 1051

                              work has been running me ragged lately 70 hours a week. Barly any time to mess around in the shop. Artists depiction below.


                              threaded 6-32 for a big 6-32 nut to squeeze the barrel onto the "jig-sinebar", I might use a lug cutter, debating this one back and forth....


                              Fitting the ambi saftey


                              using the very best equipment imaginable to file the edge, a 60 year old vise I welded together after it broke and a dirty rag.


                              I think I effed-up the firing pin retainer the hammer will not lock back when drawing the slide to the rear only true single action, I'm not certain but I think I should have left more "meat" on the lower portion to force the hammer down.

                              Sapper Morton: How does it feel? Killing your own kind?

                              K: I don't "retire" my own kind, because we don't run...

                              Comment

                              Working...
                              UA-8071174-1