 Tweet
Tweet
**I'm no pro - I'm farrrrrr from it. IF you see better ways, have suggestions, or I'm just doing it wrong please tell me.**
Backstory: I've always liked the 1911 platform. I started with a Sig 1911 (which I liked), but soon found that I was looking for ways to tweak/upgrade/customize it. CA's "safe" handgun roster really made it difficult to find something off the shelf that would meet my desires.
This is where I stumbled upon 80% builds and it got me thinking.
MosinVirus's youtube videos really sold me. Seeing his work and being able to use it as a visual guide/tutorial really got me into it. THANKS MOSIN!
I'm a value/budget oriented person, so I'll try to share my costs as precisely as possible. I figure that there's a plethora of 80% builds, but not too many that mention costs. Maybe I can help contribute to this area and those who are looking to take the plunge can gain something.
Here are some progress pictures of what I've completed so far:
Build 1: 1911builders STI kit & StealthArms Aluminum Tactical frame - 45 ACP
No photos were taken (thought I had some) and now it's currently being canabalized for parts for future builds.
Fun facts:
Build 2: 1911builders STI kit w/ carbon steel frame - 45 ACP
Rear blending, general cleanup all around, clean up under cut, final finish (thinking parkerizing - then possibly cerakote over).
On this build, I chose to change it up a little since it started as a STI/1911builder kit just like build 1 just with 1911builder's steel frame. I wanted more customized parts, wanted to refine my serrations from build 1, and to fit a barrel. I wasn't quite ready for a full gunsmith fit barrel (didn't have the barrel fitting kit) so I opted to go with KARTs EZ fit.
Fun facts:
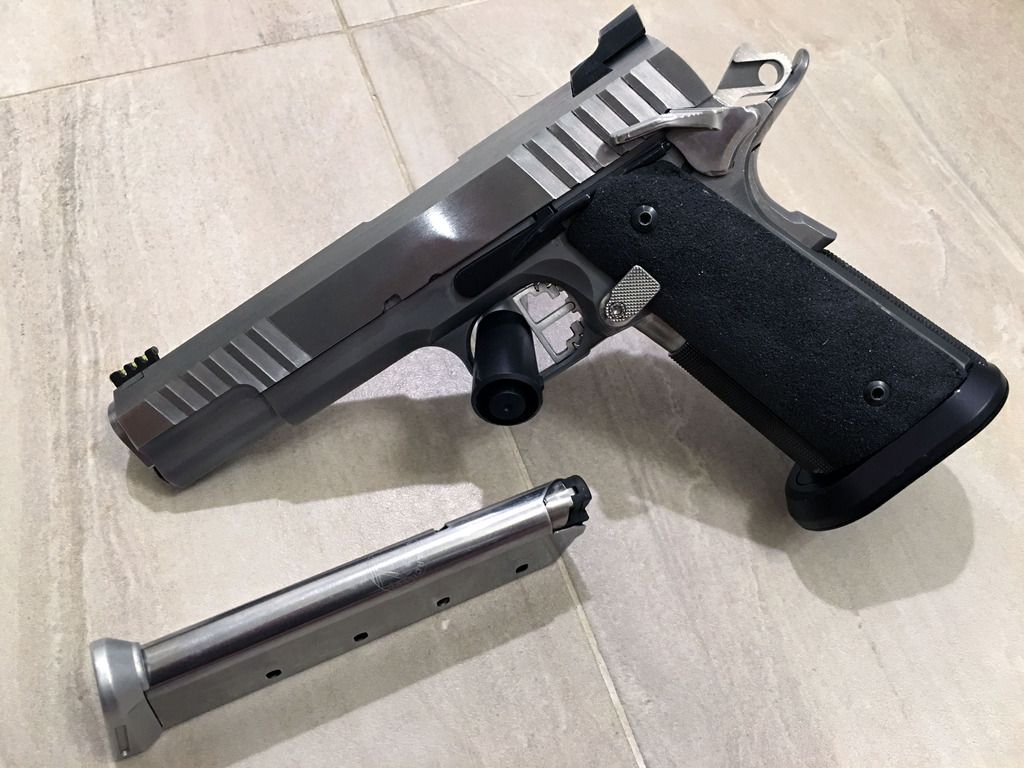
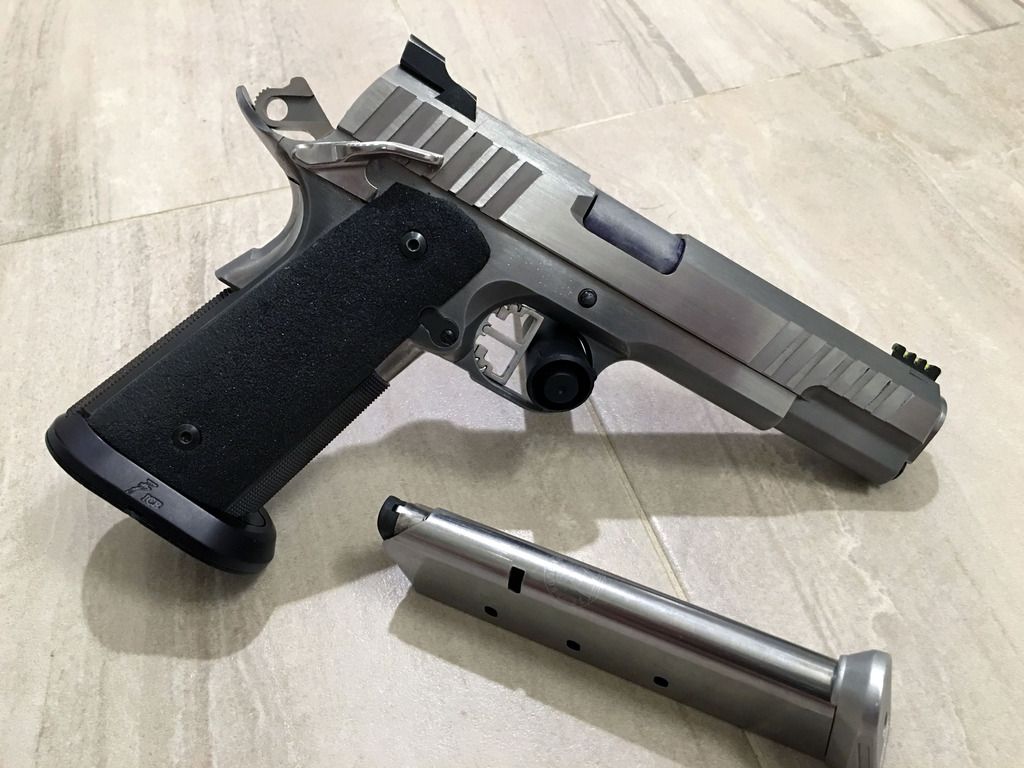
Build 3: 2011 L10 Steel - 40 S&W
Recently switched the grip to SVI's SS grip - blending in the rear still needs to be completed, as well as slide overhang to frame. Dust cover needs to be cut back/finished. Obviously some sort of finish needs to be applied (thinking hard chrome or nitride).


Fun facts/interesting things to note during the build:
Build 4 & Build 5 in the works. A 1911 in 9mm or 40S&W and a 2011 setup as a Open USPSA gun or a Sighttracker style limited gun.
Backstory: I've always liked the 1911 platform. I started with a Sig 1911 (which I liked), but soon found that I was looking for ways to tweak/upgrade/customize it. CA's "safe" handgun roster really made it difficult to find something off the shelf that would meet my desires.
This is where I stumbled upon 80% builds and it got me thinking.
- Building my own will satisfy my itch for performance and personalization.
- Possible cost savings when building with "high end" in mind.
- Knowledge/challenge - it has been a very fun experience learning about the platform.
MosinVirus's youtube videos really sold me. Seeing his work and being able to use it as a visual guide/tutorial really got me into it. THANKS MOSIN!
I'm a value/budget oriented person, so I'll try to share my costs as precisely as possible. I figure that there's a plethora of 80% builds, but not too many that mention costs. Maybe I can help contribute to this area and those who are looking to take the plunge can gain something.
Here are some progress pictures of what I've completed so far:
Build 1: 1911builders STI kit & StealthArms Aluminum Tactical frame - 45 ACP
No photos were taken (thought I had some) and now it's currently being canabalized for parts for future builds.
Fun facts:
- I screwed up my first frame. Rails cut nicely, started on the barrel seat/bed and didn't realize I was indexing off of the rails ahead of the barrel bed. Because there's a space for the barrel lugs before the bed, this allows the curved barrel seat cutter to index too low. I cut this area too deep. I realized my mistake early enough where I was ablet to correct and cut the bed to the right depth, but it was till too late for the front rails. Possibly could have still used it, but would have had to worry about cracking. Took SA up on their one frame screw up policy.
- Used the phantom jig on this one - zero horizontal play in the rails. However, the cutter on the phantom jig cut the rails ~.12 wide and resulted in some vertical play... In comparison to my old sig I would say play was equal. Everything fit together relatively easily. No real quirks. Biggest issue here was, upon completion and test firing, I was getting inertial feeds causing 3 point jams. The light weight aluminum frame coupled with an old 15 lb recoil spring seemed to cause such a violent crash at the end of the cycle that it was bouncing rounds out of the magazine prematurely. (usually, you'd check the magazine springs first, but these were brand new and happening across a number of quality magazines). Fixed the issue with a 18 lb recoil spring.
- Bald slide - hand cut sights, hand cut front and rear cocking serrations (tried to mimic MosinVirus's Build2 serrations - came out okay but I spaced too wide apart and needed to be deeper - poor grip), hand cut a flat top (indexing off a flat surface w/ top of slide down onto another flat surface gets you started)
- Had a small and annoying issue with the ejector pin. I probably should have opened up the hole in SA frame but instead thought that more force would do the trick. I basically smashed/broken the roll pin in there. The ejector's secure but it broke/bent with part of the pin protruding into the rail way. Chose to fix this by simply throwing it back in SA's jig and shaving the pin down... Beginning to really loathe roll pins. I hop online to see what other solutions are out there... some of the premium pin kits provide a solid ejector pin. I order one of these for a future build.
Build 2: 1911builders STI kit w/ carbon steel frame - 45 ACP
Rear blending, general cleanup all around, clean up under cut, final finish (thinking parkerizing - then possibly cerakote over).
On this build, I chose to change it up a little since it started as a STI/1911builder kit just like build 1 just with 1911builder's steel frame. I wanted more customized parts, wanted to refine my serrations from build 1, and to fit a barrel. I wasn't quite ready for a full gunsmith fit barrel (didn't have the barrel fitting kit) so I opted to go with KARTs EZ fit.
Fun facts:
- Slide was bald - Hand cut sights, hand cut front and rear cocking serrations, hand cut tritop slide (honestly think I went a little aggressive on the angled flats)
- 2.5 lb trigger pull - the TR sear jig is magical. Initially dropping in the STI parts, trigger pull was ~6+lbs. Polishing everything up dropped it to ~5.25 lbs. Using the Ed Brown Sear Jig, I dropped it to 4.25 lbs but felt like I had some creep. I'm not familiar enough with the geometry behind the trigger so I left it there until I came across a good deal for a new TR Jig. BAM! TR Jig cleans up the break, after checking sear/hammer contact I start to play with the sear spring and drop it down to a crisp 2.5 lbs. I'm confident it could go lighter and still be reliable and safe, but I'm going to run the gun more before I do.
- Used Matrix's Precision Rail Cutter. Fantastic results! Zero horizontal play, a tiny bit of vertical play (could be the cutters .118, could be me). Significantly tighter than my Sig...
- Dreaded ejector pin. It comes time to try to install. I've got another roll pin and I can already tell that the 1911builders frame is better. It seems to allow the roll pin to start better. Begin to install... half way in, it snaps. IS IT JUST ME? I end up punching it out from the other side, and pulling the SOLID ejector pin from my EGW kit and it installs perfectly... last time I ever use an ejector roll pin. I don't know what's wrong with me.
- From knowledge gained in build 3, I return to this build to perform the schuemann barrel timing tests. I discover that the barrel is not linking down enough to achieve the desired clearance. Being a GI cut barrel, the procedure is a little different. First, without the slide stop in, I tested the clearance between hood and slide when the barrel is freely resting on the barrel bed of the frame. It's not enough, I proceed to hand file file the barrel bed where contact is being made until .02 clearance is achieved. Second, with slide stop in, I use a steel rod wrapped in electrical tape placed into the barrel to test hood and slide clearance just as the barrel unlocks. Not enough! According to the tests, I have to remove material from the VIS to allow the barrel to, once again, travel further rearward which allows the link to pull the barrel farther down and out of the way. This is completed and I'm fairly happy with the results. I'm a little sad because I had to remove the nice VIS bowtie that 1911builders machined.
Build 3: 2011 L10 Steel - 40 S&W
Recently switched the grip to SVI's SS grip - blending in the rear still needs to be completed, as well as slide overhang to frame. Dust cover needs to be cut back/finished. Obviously some sort of finish needs to be applied (thinking hard chrome or nitride).
Fun facts/interesting things to note during the build:
- This build is built off of one of Limited 10's steel full length wide frames (not tactical obviously, no rail). I cut took a hacksaw to the dustcover to cut it back (still have to finish it but I just wanted it close). I'm planning on putting a slight angle on the dust cover to kind of mimic the lines it's got. I'm thinking I'll also change the Enos trigger (which came with the grip) to maybe the one with the curve up top so it too will mimic that line...(i'm surprised at how much I like the Enos curve).
- Learned a ton fitting the schuemann barrel. Going from a KART EZ fit to this is definitely taking it to the next level and I feel that I have a pretty good understanding of what it takes to make the 1911 platform a precision hole puncher. KART only required fitting of the hood and adjustment of their tabs for lockup engagement (some fitting of the bushing too). On the schuemann bull barrel, I had to cut the hood, adjust the engagement, cut the lower lugs. After fitting the hood and testing initial lockup/engagement I experienced barrel springing. Something that I don't often see discussed/mentioned (I'm not sure if I was just unlucky). Even in Schuemann's basic instruction manual I didn't see anything mentioned. Basically, as I firmly pushed the barrel into engagement, I was getting varying measurements of engagement. I could tell that if I forced it, I'd get more engagement and if I used the barrel lifter from the brownell lug kit I was getting the same reading but if I only firmly locked up I wasn't getting nearly as much. Turned to 1911forum and quickly got responses about barrel springing. From there, I had to lightly sand just behind the conical portion at the muzzle/front of the barrel. Checking every little bit, I saw noticeable improvement on the required force to get full engagement. Now, the barrel with thumb pressure locks up at .045 matching the measurement I get when using the barrel lifter. Checking for alignment, I'd say that I probably could have gotten away with .043 for a directly center primer strike, I appear to be hitting a little high now, but I'm not too worried.
- Schuemann's installation manual also addresses the frame. I'm running a para/clark cut frame. From the inside of the slide stop to the furthest curved spot on the VIS they recommend .600". I had ~.59. This becomes important as you perform the schuemann barrel timing tests. Reading up, I decided to buy some shim stock and create my own shims to accurately read my clearance. Upon first measurements, I'm not getting the recommended clearance between hood and slide. I proceed to sand the para/clark cut back, thereby allowing the barrel to travel a little further rearward and down as the link pulls it out of the way. Funny part is, learning this here and performing the barrel timing tests allows me to discover that build 2 barrel is NOT getting the proper clearance.
- 2.25 lb trigger pull
- Used Matrix's precision rail cutter w/ .117 cutters. Chose to fit slide and frame without any lapping compound... just a ton of dykem, measuring, remeasuring, checking, filing/stoning, and checking again. Have zero play both vertically and horizontally. ~300 rounds through so far and still no play... very pleased by this (I know slide/frame fit is of little importance but it's nice to feel the results).
- Slide cuts - Being that this is a 6" build, I was a little worried about weight, especially weight out front of the gun. I decided that I would lighten the slide. I had Brad from BDG perform the work. Brad tri-topped it, cut ports/lightening cuts, highpower-style cut to remove STI's front cocking serations, and cut the recoil spring tunnel. The recoil spring tunnel allowed me to also a run a normal 5" guide rod and removed weight from the very front along with the highpower cut. From what I can gather, (I'll hopefully update with actual weight when I breakdown for finish) I think the slide's weight is down to a standard 5" unique profile STI slide.
Build 4 & Build 5 in the works. A 1911 in 9mm or 40S&W and a 2011 setup as a Open USPSA gun or a Sighttracker style limited gun.


Comment