Unconfigured Ad Widget

Collapse

DIY LED lights for Dillon XL650.

Collapse
X
 
  • Time
  • Show
Clear All
new posts
  • milw50717
    Senior Member
    • Jan 2006
    • 740

    DIY LED lights for Dillon XL650.

    The initial intent was to make a light that I could place down the centre hole on the Dillon toolhead.


    Image linked from this thread

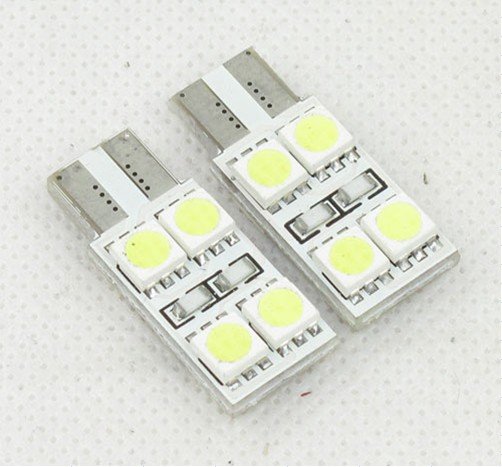
    I found some LED T10 lights on a well known auction site - $6 for 10 including shipping. They take 12V DC, measure approx 1 cm in diameter and 3cm in length and feature 7 mini-LEDs clustered together. As can be seen, the bulb can be removed from the case to reduce the dimensions a little.


    I cut some 3/4" diameter copper pipe and expoxied it into a plastic bushing scrounged from the spares box. The length of the pipe and the seating of the LEDs is a little critical as, if they are too long, they run the risk of getting hit by the shellplate bolt.


    On top of the bushing sits the power connector that is wired directly to the wires of the T10. In this case the bulb can be left in it's case. Heat shrink and hot glue was used as insulation as necessary.


    This nicely fits in the centre hole of the tool head and offers nice central and overhead illumination. However, it didn't quite throw light down the cases to allow you to see powder level. I then wondered if I could make a light that fits down the smaller hole between station 3 and 4. It turns out that a spent .303 British brass fits nicely into this hole stopping a short distance above the rim of the cartridge.

    I drilled out the berdan primer pocket of on case to make room for the wires. The case length was then trimmed so it sits flush to the base of the toolhead. The bare bulb fits nicely into the trimmed end of the .303 brass. I had a spare circular power connector in the spares box and cut a section from another .303 brass. The connector fits nicely into this and then is expoxied to the rim of the other case for a fairly neat finish. More work was required to insulate the wires, but it wasn't too bad (tm).


    Both lights are powered by a 12V DC wall wart. I could have hard-wired the wal wart to the lights, I had the connectors, so decided to use them.


    Last edited by milw50717; 05-06-2013, 7:17 PM.
  • #2
    bruceflinch
    I need a LIFE!!
    • Jan 2006
    • 40141

    Where's the "after" pic?
    Actually I only started collecting Milsurps 3 years ago. I think I might own about 24...They're cheaper than guns that will most likely never get the opportunity to kill somebody...

    I belong to the group that uses firearms, and knows which bathroom to use.

    Tis better to have Trolled & lost, Than to never have Trolled, at all.

    Secret Club Member?.

    Comment

    • #3
      milw50717
      Senior Member
      • Jan 2006
      • 740

      Originally posted by bruceflinch
      Where's the "after" pic?
      As requested some images of the lights in use. All photos taken at 10am in California. Lights will appear brighter when it is darker. Photos taken from the left side only, but centre light does illuminate the right hand side equally.

      No lights


      Center Light


      Offset Light - Between Stations 3 and 4


      Both Lights


      Comment

      • #4
        CEDaytonaRydr
        Veteran Member
        • Feb 2010
        • 4141

        Love this! Thanks man...

        Comment

        • #5
          Lead Waster
          I need a LIFE!!
          • Sep 2010
          • 16650

          Nice! I use a flexible Ikea LED lamp and just put the head over where I need it, otherwise I think I'd just strap a cheapo LED flashlight to the press somewhere.
          ==================

          sigpic


          Remember to dial 1 before 911.

          Forget about stopping power. If you can't hit it, you can't stop it.

          There. Are. Four. Lights!

          Comment

          • #6
            MulePacker
            Senior Member
            • Feb 2013
            • 836

            Nice work! Im already using that space though. I plan on getting some lights that will give me a TAN when Im loading.. =)

            Comment

            • #7
              SantaCabinetguy
              I need a LIFE!!
              • Feb 2011
              • 15137

              Can you snap a few pics of how you have it wired up?
              Hauoli Makahiki Hou


              -------

              Comment

              • #8
                Revoman
                Senior Member
                • Dec 2007
                • 2393

                Very nice. What's all that powder doin' layin' under the shellplate?

                Comment

                • #9
                  milw50717
                  Senior Member
                  • Jan 2006
                  • 740

                  Originally posted by Ubermcoupe
                  Can you snap a few pics of how you have it wired up?
                  Haven't finalised that as yet. Pretty easy to do though as this is on the top of the toolhead that doesn't move. I'm sure it will involve some zipties.

                  Originally posted by Revoman
                  Very nice. What's all that powder doin' layin' under the shellplate?
                  I knew I should have cleaned up before taking the pictures. I haven't quite solved the powder flicking problem with .223. I'm going to have to trim the spring a bit more.

                  Comment

                  • #10
                    Solus
                    Senior Member
                    • Dec 2011
                    • 548

                    I was thinking of taping the center and installing a small socket and bulb and connecting it to the wall
                    On the blue side

                    Comment

                    • #11
                      milw50717
                      Senior Member
                      • Jan 2006
                      • 740

                      Originally posted by Solus
                      I was thinking of taping the center and installing a small socket and bulb and connecting it to the wall
                      There are quite a few options for sockets that fit the T10 bulbs. I'm waiting for some of the top ones to arrive before finalising how to light my 650.


                      There are also some other options for T10 bulbs that might work well for this application:


                      Comment

                      • #12
                        Revoman
                        Senior Member
                        • Dec 2007
                        • 2393

                        Originally posted by milw50717
                        Haven't finalised that as yet. Pretty easy to do though as this is on the top of the toolhead that doesn't move. I'm sure it will involve some zipties.


                        I knew I should have cleaned up before taking the pictures. I haven't quite solved the powder flicking problem with .223. I'm going to have to trim the spring a bit more.
                        There is a bearing fix that is supposed to work from what has been stated here. I don't have a 650, but it sounds like it's a good fix for little bucks. Do a search for '650 bearing' and see if it comes up.

                        Comment

                        • #13
                          milw50717
                          Senior Member
                          • Jan 2006
                          • 740

                          Originally posted by Revoman
                          There is a bearing fix that is supposed to work from what has been stated here. I don't have a 650, but it sounds like it's a good fix for little bucks. Do a search for '650 bearing' and see if it comes up.
                          Thanks for the response. I have a set installed - 2 plain washers + a thrust washer under the toolhead bolt - which can be seen in the below image. Works perfect on the larger calibres - 303 and 308 - but I still get a powder flick with 223. I snipped the indexing spring 1/3rd of a turn and will likely need to trim it a little more. I may have been blessed with an extra strong spring

                          Dillon have sent me a couple of replacement springs in case I ever need them.

                          Last edited by milw50717; 05-08-2013, 8:42 PM. Reason: typo

                          Comment

                          • #14
                            Bro KV
                            Senior Member
                            • Jun 2011
                            • 625

                            I bought my lighting system from Inline Fabricators. It has the skylight in the tool head and lighting strip up the forward wall.


                            Although I would of had fun building it myself.


                            Sent from my iPad using Tapatalk HD

                            Comment

                            • #15
                              milw50717
                              Senior Member
                              • Jan 2006
                              • 740

                              Originally posted by Bro KV
                              I bought my lighting system from Inline Fabricators. It has the skylight in the tool head and lighting strip up the forward wall.
                              That was my inspiration. I bought some T10 LED lights and sockets for another purpose and decided to see if I could make something for the 650

                              The LED strip should not be too difficult. The only issue there will be the clearance against the moving toolhead.

                              Comment

                              Working...
                              UA-8071174-1