

 Tweet
Tweet
Hello folks... I'm back with another home build project. Within the next week I'll be testing my new homemade 3-stage IR ballistic chronograph. I don't have all the pictures together yet, so I'm trying to gauge the interest in posting more information about it. I can even go into a detailed description of the whole build similar to my other projects. I have to say that this project is not for the faint of heart. I found it extremely challenging, but in was fun and allowed me to bring a lot of my mechanical, electrical, electronic and computing experience into it. Based on some simple calculations, the chronograph should be able to handle well above 4000fps.
Here are a couple of teaser pics.
The screens:


The controller box:
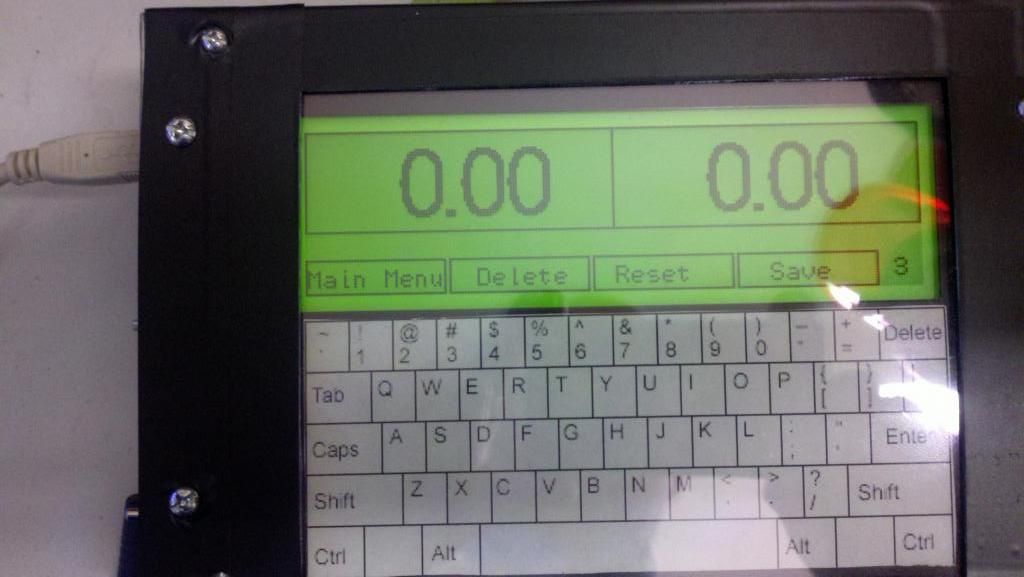
An earlier photo during development showing some test code running for the touch keyboard driver:

And the final UI main screen, shot capture screen and shot series stats and review:


My cave is a little cluttered... Hey! You can see the just lubed cast boolits drying behind the chronograph screens. And there is also a bunch of cardboard I use as a back stop for testing with a .177 pellet/BB air rifle (Shhh!!! don't tell the wife that I took some of her fabric bolt forms). In fact the stats in the last photo are from testing with the air rifle. Yes, the screens are sensitive enough to regularly detect the passing of a BB. I think a 230gr .45 LRN will be easily "seen" ;-).
The controller code will handle up to 32 shots in a series and can be stored in eeprom. I can also save the shot data to the on-board 4gb SD card or send the data out the serial port to the computer directly. It will calculate the min/max, extreme spread, average and standard deviation for each series. Given the graphic display I could even add some code to show charts and graphs ;-).
Here's a quick rundown of the spec's:
For the screens:
o 4 950nm IR emitter LEDs & 4 950nm PIN photodiode for each screen.
o Detection amplifiers right at each screen to minimize noise and interference.
o Lightweight aluminum "U" channels and angle brackets for screen support.
o 3/16" steel rods hold the plastic "U" channel with the detectors 1' above emitters.
o Steel rods just slip into threaded and drilled steel spacers as a quick-disconnect. Detector channels and rods all come apart for transport.
Controller box:
o Main microcontroller - OSEPP Arduino Mega2560 - Frys
o Mass storage - Seeed Studios SD Card Shield - modified to work with Mega2560 - 4gb SD card - Radio Shack
o T6963 based 240x64 graphic LCD with parallel interface & LED backlight
o Fujitsu 6.4" N010-0554-T048A-TW resistive touch panel - Half of panel over display and half over keyboard template
o Surplus aluminum box found at HSC.
o Custom written software along with custom code for touch panel keyboard and on-screen buttons.
For folks in the SF Bay area, the display and touch panel are from Halted Specialties Co. You can find them on their website. The touch panel is only $8 on sale (I paid $12.50).
I shamelessly copied the detector amplifier circuitry from this project: http://nutsvolts.texterity.com/nutsv...?folio=36#pg36... however that is where the similarties ended.
I'll be happy to go into more detail if folks are interested. I think folks main question will be how does it work at the range with "real" bullet velocities? Like I mentioned from the outset, depending on the weather, I plan on trying it within the week. I already know it works perfectly fine in my cave detecting BBs and .177 pellets. This is even with the room being filled with florescent fixtures and several LCD computer monitors. I placed the detectors in the upper plastic "U" channel facing down so that ambient interference is eliminated. I also added some extra "baffling" to keep reflected light at a minimum. I'm getting about a 70-80% detection rate for BBs. I don't have any clue how well the commercial units detect the smaller projectiles since I've never actually used one before. If I had one why would I build one, right? ;-).
I'd be interested in hearing from folks about how well their commercial chronograph works and how reliable the detection is.
If you've already made it this far... I'd say I've piqued your interest ;-).
Here are a couple of teaser pics.
The screens:
The controller box:
An earlier photo during development showing some test code running for the touch keyboard driver:
And the final UI main screen, shot capture screen and shot series stats and review:
My cave is a little cluttered... Hey! You can see the just lubed cast boolits drying behind the chronograph screens. And there is also a bunch of cardboard I use as a back stop for testing with a .177 pellet/BB air rifle (Shhh!!! don't tell the wife that I took some of her fabric bolt forms). In fact the stats in the last photo are from testing with the air rifle. Yes, the screens are sensitive enough to regularly detect the passing of a BB. I think a 230gr .45 LRN will be easily "seen" ;-).
The controller code will handle up to 32 shots in a series and can be stored in eeprom. I can also save the shot data to the on-board 4gb SD card or send the data out the serial port to the computer directly. It will calculate the min/max, extreme spread, average and standard deviation for each series. Given the graphic display I could even add some code to show charts and graphs ;-).
Here's a quick rundown of the spec's:
For the screens:
o 4 950nm IR emitter LEDs & 4 950nm PIN photodiode for each screen.
o Detection amplifiers right at each screen to minimize noise and interference.
o Lightweight aluminum "U" channels and angle brackets for screen support.
o 3/16" steel rods hold the plastic "U" channel with the detectors 1' above emitters.
o Steel rods just slip into threaded and drilled steel spacers as a quick-disconnect. Detector channels and rods all come apart for transport.
Controller box:
o Main microcontroller - OSEPP Arduino Mega2560 - Frys
o Mass storage - Seeed Studios SD Card Shield - modified to work with Mega2560 - 4gb SD card - Radio Shack
o T6963 based 240x64 graphic LCD with parallel interface & LED backlight
o Fujitsu 6.4" N010-0554-T048A-TW resistive touch panel - Half of panel over display and half over keyboard template
o Surplus aluminum box found at HSC.
o Custom written software along with custom code for touch panel keyboard and on-screen buttons.
For folks in the SF Bay area, the display and touch panel are from Halted Specialties Co. You can find them on their website. The touch panel is only $8 on sale (I paid $12.50).
I shamelessly copied the detector amplifier circuitry from this project: http://nutsvolts.texterity.com/nutsv...?folio=36#pg36... however that is where the similarties ended.
I'll be happy to go into more detail if folks are interested. I think folks main question will be how does it work at the range with "real" bullet velocities? Like I mentioned from the outset, depending on the weather, I plan on trying it within the week. I already know it works perfectly fine in my cave detecting BBs and .177 pellets. This is even with the room being filled with florescent fixtures and several LCD computer monitors. I placed the detectors in the upper plastic "U" channel facing down so that ambient interference is eliminated. I also added some extra "baffling" to keep reflected light at a minimum. I'm getting about a 70-80% detection rate for BBs. I don't have any clue how well the commercial units detect the smaller projectiles since I've never actually used one before. If I had one why would I build one, right? ;-).
I'd be interested in hearing from folks about how well their commercial chronograph works and how reliable the detection is.
If you've already made it this far... I'd say I've piqued your interest ;-).


 So i should be able to pick one up at Wally world soon


Comment