 Tweet
Tweet
Some of us really, really, really, die hard BP enthusiasts have taken up a new hobby of home manufacturing our own Black Powder, which isn't as difficult as one might think, but, it isn't all that simple either.
The Basics...
The most typical Black Powder Formula, used for BP guns/cannons/mortars, is very simple. 75% Saltpeter (Potassium Nitrate), 15% Charcoal, and 10% Sulphur, with a binding agent such as Gum Arabic, or Dextrin (Powdered Sugar) added into the mix to bind the powder once it is dried. The formula can be varied somewhat, within limits, to yield powders with a little more, or a little less potentcy, but why bother? The old tried and true formula works just fine, and, if you want variances, vary the load, not the powder.
This is where the simplicity ends, and the messy preparations begin.
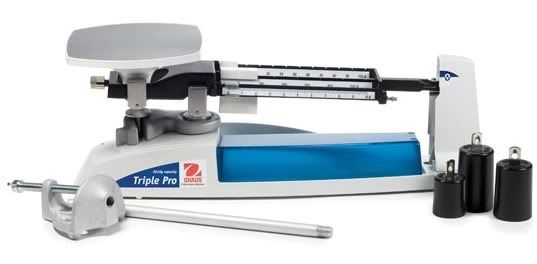
Using a triple beam scale, which can be mail ordered from various online suppliers, weigh out the ingrediants for the batch of Black Powder you wish to make. What this will mean, is that you will be generally limited to your maximum batch size, by the maximum batch size of the ball mill you have in your home work shop. In my case, I have a 16lb Ball Mill, which is the weight of the balls, in the mill chamber, NOT the weight of the product it can mill. My 16lb ball mill can handle a maximum batch size of a 5lb batch of Black Powder.
What is a ball mill you ask?
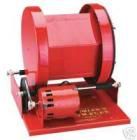
A ball mill, is a mixing/grinding mill generally used for the preparation and mixing of fine powders, generally, explosive or pyrotechnic powders. In the case of ball mills, used for the purpose of producing Black Powder, the ball mill rotating drum chamber, is filled 1/2 full, with lead balls, generally, in a small home mill, such as mine, that would be .490 round lead balls, the exact same lead balls I fire out of my 50 Caliber flintlock rifle. In my home mill, that works out to 16lbs of lead balls being tossed around the rotating chamber, knashing, grinding and mixing the chemicals of the Black Powder together into an ever finer, and finer powder dust and mixing the components together thoroughly.
We start by measuring out the ingrediants, by weight, to the specifications of the formula of 75% Saltpeter, 15% Charcoal, and 10% Sulphur. For a 5lb batch of Black Powder, the maximum capacity of my ball mill, that would be 3.75 lbs of Saltpeter, 12 ounces (English) of Charcoal, 8 ounces (English) of Sulphur, and 8 ounces (English) of Gum Arabic.
Take the Charcoal, Sulphur, and Gum Arabic, and place it inside the ball mill chamber. DO NOT ADD IN THE Saltpeter at this time. Close and seal the ball mill chamber, and turn the ball mill on, setting the speed of rotation to about 60 RPM, One (1) rotation per second. Let this mixture mill, or rotate, for 3 to 5 hours. The longer the mixure mills, the finer the powder will be, and the more potent the powder will be. I mill mine, at this step, for 6 hours. The result will be, a very finely ground powder, nearly a dust, that is medium dark grey, not black, like the charcoal, but grey.
Stop the mill when the desired fineness of powder granulation has been achieved. Add in the Saltpeter to the mill, also, at this time, add in 3 cups of clean, clear, distilled water. The final mixing phase of Black Powder, is done with a wet compound, to prevent the powder from accidentally igniting, which can happen inside the ball mill. Turn the mill on, again checking the speed of rotation, which will need to be adjusted since the thick wet slurry will have a tendency to drag on the ball mill motor, and slow the aparatus down a bit, adjust for this differential. Allow the mill to run, for 8 to 12 hours, checking the mill about every 2 hours to make sure the slurry is still wet, and adding in clear, clean, distilled water, from time to time, to replace the water lost in the mixing chamber due to evaporation. Never run the ball mill dry, with this mixture, as you risk a rather great risk of accidental ignition.
After 8 to 12 hours of final milling, turn the ball mill off. open up the ball mill chamber, and dump the entire contents of the mill chamber, mixing balls and all, onto a large cookie sheet, carefully, by hand, remove each of the balls from the ball mill mixture, pulling off as much of the wet black powder off of the surface of each ball, and dropping the black powder paste back onto the cookie sheet pile, and dropping the mixing balls, back into the ball mill chamber, separating the mixing balls, from the Wet Black Powder paste.
Once all of the balls have been removed from the wet black powder paste, rinse and clean the ball mill mixing chamber, and the balls in the chamber, with clear tap water, removing each of the rinsed balls, from the chamber one by one, and dropping them into a working bowl of some sort. perform the final rinse of the ball mill mixing chamber, dumping the water down the drain, and rinsing the ball mill mixing chamber several times, until no more black powder residue is present inside the chamber at all. Perform this step also, with the separated mixing balls, in the large working bowl. Dry the inside of the mixing chamber, with a towel, and allow the mixing chamber, and it's lid, to air dry overnight. lay out the damp mixing balls, on a second large cookie sheet, and allow the mixing balls to also air dry overnight.
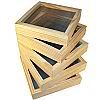
Take a third large cookie sheet, and lay out a #10 framed screen (FG) Granulation grid. Dump the wet powder paste mix onto the framed screen. Knead, like with bread dough, the wet powder mix through the screen, dropping the bits and chuncks of black powder paste onto the cookie sheet below the screen frame. When all of the powder paste, has been kneaded through the screen, and there is a large pile, of kneaded chunks and bits of black powder paste droppings on the coookie sheet, allow the kneaded black powder bits and chunks to air dry for one (1) to three (3) days, until the powder chunks are completely and thoroughly dry.
The next step is grain sizing, or silexing. A "silex" or grain size, is determined by the grid of the sizing and separating screens used in the next steps. We will start with a #20 mesh screen. that is being shaken, gently, onto a #30 mesh screen. The #20 mesh screen, is the sizing for the 2F black powder grain size. any chunks, or bits, of dried black powder that will not easily pass through the #20 Screen, are larger than 2f grain size, those that do pass through, are smaller. take the top screen, the #20 mesh screen, and dump, the powder bits and chunks that would not pass through the screen, into the bowl of a motar and pestle set. The motars used for black powder, are heavy porcellan mortars, with wooden pestles. Carefully and slowly grind the large chunks down, with the mortar and pestle, into smaller and smaller chunks, And repeat this step until all powder chunks pass through the #20 mesh screen without being forced through.
Repeat this process, using the #30 mesh screen as the separator, and a #60 mesh screen below it. All black powder grains that pass through the #30 mesh screen, will be smaller than 2f grain size, those that do not pass through, are now sized to the 2f granulation size. At this point, you can make a decision, as to how much, 2f, 3f and 4f powder you wish to produce from your 5lb batch of black powder. Generally, your 5 lb batch of black powder will granulate out to about 1lb of 2f, 3 lbs of 3f and 1 pound of 4f or smaller, powder. If you want more 2f powder than you produced, then you will need to re-wet, and re-knead the powder chunks, that are not sized to the 2f size, air dry from 1 to 3 days, and repeat these sizing steps again, and again, until the desired amount of 2f granulated powder is produced. if you are happy with the mix of 2f powder to the rest of the batch, set the 2f powder aside, and continue on.
With the remaining powder, now on top of the #60 mesh screen, again, gently shake the #60 mesh screen, dropping down the powder that passes through the #60 mesh screen, down onto a #100 mesh screen. Those grains of powder that pass through the #60 mesh screen are smaller than the 3f size grain, those that will not pass through, are now correctly sized to the 3f Black Powder silex. If you are happy, with the amount of 3f powder produced during this sizing step, then set the 3f powder aside, and proceed onto the next sizing step. If not, then, you need to re-wet, re-knead, and re-dry the other, smaller sized grains to coagulate them up into larger grains.
The final sizing screen step, is done with the #100 mesh screen. All powder grains that easily pass through the #100 mesh screen, are smaller than the 4f granulation. Those that will not easily pass through, are of the 4f Black Powder granulation size. There should be, very little, if any, powder that will pass through the #100 mesh screen size. In most cases, so little, that it isn't worth the time and trouble to re-wet, re-knead, and re-dry the powder for another sizing sequence. Most people just dispose of this powder, by igniting it safely in their back yard on an open tray of some kind. Others, because it is so little, just mix it into the 4f powder, which is generally only used for flintlock priming pan uses.
Now your 5lb batch of Black Powder is correctly sized into the various piles of 2f, 3f and 4f Black Powder granulation sizes.
The next, and final step, is to coat, the powders, with finely ground graphite dust. The purpose of this step is to protect the Black Powder from moisture contamination. Black powder is a mild desicant, which means, it has a tendency to absorb water from the air. Coating the powder, with finely ground graphite dust, will protect the powder from exposure to damp air, and keep the powder dry. It also aids, just a little bit, in the ignition of the powder.
To do this, to perform the graphite dust coating. place one of the piles of the sized black powders, back into the ball mill mixing chamber. DO NOT ADD THE BALLS into the ball mill chamber. add in a small quantity of graphite powder dust, about a half a cup or so. close the ball mill chamber, and turn the ball mill on. allow the powder to tumble, with the graphite dust, for 30 minutes in the chamber. After 1/2 hour of tumbling, turn the ball mill off, open the ball mill chamber, and dump the powder/graphite mixture back onto the sizing screen from where the powder came. Gently shake out the powder on the sizing screen. The excess graphite powder will, shake out of the mix, this graphite powder can be recovered, and re-used for other powder coatings in the future. Now you have your coated black powder of the correct sizing, ready for storage.
Repeat this proceedure, for each of the silex groupings of the Black Powders, 2f, 3f and 4f.
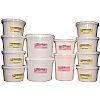
Your powder is now ready for storage. Many of the pyrotechical supply companies, that offer the base chemical supplies for making black powders, also offer storage canisters, either plastic or metal/tin containers. Either is fine, but the plastic ones tend to be alot less expensive. I prefer, personally, to store my home made black powders, in small wooden kegs, which I purchase online and have shipped to me. The kegs come in sizes that will hold, 5, 10 or 25 lbs of black powder. They are a little on the pricey side, but not as expensive as one might assume. They are attractive, and are, after all, the traditional method of Black Powder storage from days gone by. They make for an interesting bit of conversation on the shooting ranges. I mark my black powder kegs with my trade mark, three big red X's, for my home made brand name, of "Tripple Red-X Black Powder". I also mark, the kegs, also in red, with the powder granulation, 2f, 3f or 4f. I do not bother to record a date of manufacture at all. Black powder, when properly made, dried, sized and coated with graphite dust, will, keep for HUNDREDS of years, and keep perfectly in-tact, not loosing ANY of it's potency AT ALL, over periodes of HUNDREDS of YEARS.
There are many accountings, of old black powder, found in storage caves, that was as good when found, as when made.
I hope all of you enjoyed my little article, on, "How To", make your own home-made Black Powder.
Sincerely,
Elvin Warrior... aka... David
The Basics...
The most typical Black Powder Formula, used for BP guns/cannons/mortars, is very simple. 75% Saltpeter (Potassium Nitrate), 15% Charcoal, and 10% Sulphur, with a binding agent such as Gum Arabic, or Dextrin (Powdered Sugar) added into the mix to bind the powder once it is dried. The formula can be varied somewhat, within limits, to yield powders with a little more, or a little less potentcy, but why bother? The old tried and true formula works just fine, and, if you want variances, vary the load, not the powder.
This is where the simplicity ends, and the messy preparations begin.
Using a triple beam scale, which can be mail ordered from various online suppliers, weigh out the ingrediants for the batch of Black Powder you wish to make. What this will mean, is that you will be generally limited to your maximum batch size, by the maximum batch size of the ball mill you have in your home work shop. In my case, I have a 16lb Ball Mill, which is the weight of the balls, in the mill chamber, NOT the weight of the product it can mill. My 16lb ball mill can handle a maximum batch size of a 5lb batch of Black Powder.
What is a ball mill you ask?
A ball mill, is a mixing/grinding mill generally used for the preparation and mixing of fine powders, generally, explosive or pyrotechnic powders. In the case of ball mills, used for the purpose of producing Black Powder, the ball mill rotating drum chamber, is filled 1/2 full, with lead balls, generally, in a small home mill, such as mine, that would be .490 round lead balls, the exact same lead balls I fire out of my 50 Caliber flintlock rifle. In my home mill, that works out to 16lbs of lead balls being tossed around the rotating chamber, knashing, grinding and mixing the chemicals of the Black Powder together into an ever finer, and finer powder dust and mixing the components together thoroughly.
We start by measuring out the ingrediants, by weight, to the specifications of the formula of 75% Saltpeter, 15% Charcoal, and 10% Sulphur. For a 5lb batch of Black Powder, the maximum capacity of my ball mill, that would be 3.75 lbs of Saltpeter, 12 ounces (English) of Charcoal, 8 ounces (English) of Sulphur, and 8 ounces (English) of Gum Arabic.
Take the Charcoal, Sulphur, and Gum Arabic, and place it inside the ball mill chamber. DO NOT ADD IN THE Saltpeter at this time. Close and seal the ball mill chamber, and turn the ball mill on, setting the speed of rotation to about 60 RPM, One (1) rotation per second. Let this mixture mill, or rotate, for 3 to 5 hours. The longer the mixure mills, the finer the powder will be, and the more potent the powder will be. I mill mine, at this step, for 6 hours. The result will be, a very finely ground powder, nearly a dust, that is medium dark grey, not black, like the charcoal, but grey.
Stop the mill when the desired fineness of powder granulation has been achieved. Add in the Saltpeter to the mill, also, at this time, add in 3 cups of clean, clear, distilled water. The final mixing phase of Black Powder, is done with a wet compound, to prevent the powder from accidentally igniting, which can happen inside the ball mill. Turn the mill on, again checking the speed of rotation, which will need to be adjusted since the thick wet slurry will have a tendency to drag on the ball mill motor, and slow the aparatus down a bit, adjust for this differential. Allow the mill to run, for 8 to 12 hours, checking the mill about every 2 hours to make sure the slurry is still wet, and adding in clear, clean, distilled water, from time to time, to replace the water lost in the mixing chamber due to evaporation. Never run the ball mill dry, with this mixture, as you risk a rather great risk of accidental ignition.
After 8 to 12 hours of final milling, turn the ball mill off. open up the ball mill chamber, and dump the entire contents of the mill chamber, mixing balls and all, onto a large cookie sheet, carefully, by hand, remove each of the balls from the ball mill mixture, pulling off as much of the wet black powder off of the surface of each ball, and dropping the black powder paste back onto the cookie sheet pile, and dropping the mixing balls, back into the ball mill chamber, separating the mixing balls, from the Wet Black Powder paste.
Once all of the balls have been removed from the wet black powder paste, rinse and clean the ball mill mixing chamber, and the balls in the chamber, with clear tap water, removing each of the rinsed balls, from the chamber one by one, and dropping them into a working bowl of some sort. perform the final rinse of the ball mill mixing chamber, dumping the water down the drain, and rinsing the ball mill mixing chamber several times, until no more black powder residue is present inside the chamber at all. Perform this step also, with the separated mixing balls, in the large working bowl. Dry the inside of the mixing chamber, with a towel, and allow the mixing chamber, and it's lid, to air dry overnight. lay out the damp mixing balls, on a second large cookie sheet, and allow the mixing balls to also air dry overnight.
Take a third large cookie sheet, and lay out a #10 framed screen (FG) Granulation grid. Dump the wet powder paste mix onto the framed screen. Knead, like with bread dough, the wet powder mix through the screen, dropping the bits and chuncks of black powder paste onto the cookie sheet below the screen frame. When all of the powder paste, has been kneaded through the screen, and there is a large pile, of kneaded chunks and bits of black powder paste droppings on the coookie sheet, allow the kneaded black powder bits and chunks to air dry for one (1) to three (3) days, until the powder chunks are completely and thoroughly dry.
The next step is grain sizing, or silexing. A "silex" or grain size, is determined by the grid of the sizing and separating screens used in the next steps. We will start with a #20 mesh screen. that is being shaken, gently, onto a #30 mesh screen. The #20 mesh screen, is the sizing for the 2F black powder grain size. any chunks, or bits, of dried black powder that will not easily pass through the #20 Screen, are larger than 2f grain size, those that do pass through, are smaller. take the top screen, the #20 mesh screen, and dump, the powder bits and chunks that would not pass through the screen, into the bowl of a motar and pestle set. The motars used for black powder, are heavy porcellan mortars, with wooden pestles. Carefully and slowly grind the large chunks down, with the mortar and pestle, into smaller and smaller chunks, And repeat this step until all powder chunks pass through the #20 mesh screen without being forced through.
Repeat this process, using the #30 mesh screen as the separator, and a #60 mesh screen below it. All black powder grains that pass through the #30 mesh screen, will be smaller than 2f grain size, those that do not pass through, are now sized to the 2f granulation size. At this point, you can make a decision, as to how much, 2f, 3f and 4f powder you wish to produce from your 5lb batch of black powder. Generally, your 5 lb batch of black powder will granulate out to about 1lb of 2f, 3 lbs of 3f and 1 pound of 4f or smaller, powder. If you want more 2f powder than you produced, then you will need to re-wet, and re-knead the powder chunks, that are not sized to the 2f size, air dry from 1 to 3 days, and repeat these sizing steps again, and again, until the desired amount of 2f granulated powder is produced. if you are happy with the mix of 2f powder to the rest of the batch, set the 2f powder aside, and continue on.
With the remaining powder, now on top of the #60 mesh screen, again, gently shake the #60 mesh screen, dropping down the powder that passes through the #60 mesh screen, down onto a #100 mesh screen. Those grains of powder that pass through the #60 mesh screen are smaller than the 3f size grain, those that will not pass through, are now correctly sized to the 3f Black Powder silex. If you are happy, with the amount of 3f powder produced during this sizing step, then set the 3f powder aside, and proceed onto the next sizing step. If not, then, you need to re-wet, re-knead, and re-dry the other, smaller sized grains to coagulate them up into larger grains.
The final sizing screen step, is done with the #100 mesh screen. All powder grains that easily pass through the #100 mesh screen, are smaller than the 4f granulation. Those that will not easily pass through, are of the 4f Black Powder granulation size. There should be, very little, if any, powder that will pass through the #100 mesh screen size. In most cases, so little, that it isn't worth the time and trouble to re-wet, re-knead, and re-dry the powder for another sizing sequence. Most people just dispose of this powder, by igniting it safely in their back yard on an open tray of some kind. Others, because it is so little, just mix it into the 4f powder, which is generally only used for flintlock priming pan uses.
Now your 5lb batch of Black Powder is correctly sized into the various piles of 2f, 3f and 4f Black Powder granulation sizes.
The next, and final step, is to coat, the powders, with finely ground graphite dust. The purpose of this step is to protect the Black Powder from moisture contamination. Black powder is a mild desicant, which means, it has a tendency to absorb water from the air. Coating the powder, with finely ground graphite dust, will protect the powder from exposure to damp air, and keep the powder dry. It also aids, just a little bit, in the ignition of the powder.
To do this, to perform the graphite dust coating. place one of the piles of the sized black powders, back into the ball mill mixing chamber. DO NOT ADD THE BALLS into the ball mill chamber. add in a small quantity of graphite powder dust, about a half a cup or so. close the ball mill chamber, and turn the ball mill on. allow the powder to tumble, with the graphite dust, for 30 minutes in the chamber. After 1/2 hour of tumbling, turn the ball mill off, open the ball mill chamber, and dump the powder/graphite mixture back onto the sizing screen from where the powder came. Gently shake out the powder on the sizing screen. The excess graphite powder will, shake out of the mix, this graphite powder can be recovered, and re-used for other powder coatings in the future. Now you have your coated black powder of the correct sizing, ready for storage.
Repeat this proceedure, for each of the silex groupings of the Black Powders, 2f, 3f and 4f.
Your powder is now ready for storage. Many of the pyrotechical supply companies, that offer the base chemical supplies for making black powders, also offer storage canisters, either plastic or metal/tin containers. Either is fine, but the plastic ones tend to be alot less expensive. I prefer, personally, to store my home made black powders, in small wooden kegs, which I purchase online and have shipped to me. The kegs come in sizes that will hold, 5, 10 or 25 lbs of black powder. They are a little on the pricey side, but not as expensive as one might assume. They are attractive, and are, after all, the traditional method of Black Powder storage from days gone by. They make for an interesting bit of conversation on the shooting ranges. I mark my black powder kegs with my trade mark, three big red X's, for my home made brand name, of "Tripple Red-X Black Powder". I also mark, the kegs, also in red, with the powder granulation, 2f, 3f or 4f. I do not bother to record a date of manufacture at all. Black powder, when properly made, dried, sized and coated with graphite dust, will, keep for HUNDREDS of years, and keep perfectly in-tact, not loosing ANY of it's potency AT ALL, over periodes of HUNDREDS of YEARS.
There are many accountings, of old black powder, found in storage caves, that was as good when found, as when made.
I hope all of you enjoyed my little article, on, "How To", make your own home-made Black Powder.
Sincerely,
Elvin Warrior... aka... David


Comment