


|
|
|
|
|
|
|
|
|
 |
|
|||||||
| Gunsmithing & How To Pro, Amateur & WECSOG and Tutorials, Guides & OLL Build Instructions |
 |
|
|
Thread Tools | Display Modes |
|
#81
 08-18-2010, 7:29 PM
|
||||
|
||||
|
Quote:
Do they have a reflective black paint? THAT would be tacticool!
__________________
7 Billion people on the planet. They aint ALL gonna astronauts. Some will get hit by trains... Need GOOD SS pins to clean your brass? Try the new and improved model...  And remember- 99.9% of the lawyers ruin it for the other .1%... 
|
|
#83
12-28-2010, 7:22 PM
|
||||
|
||||
|
I got motivated and color-filled my first lower. I used a medium gray (should have gone a little darker, but tired of it at the moment). I used acrylic paint, applied it liberally over the marking I wanted filled, and almost immediately wiped off the excess with a paper towel with a little Rem-Oil. It worked extremely well for the "Safe" and "Fire", but I'm not satisfied with the roll mark.
The roll mark has VERY shallow engravings and I'm pretty sure this is causing me the problems. I'll keep it as is for the time being, but you can tell, especially with the "S" in "Sun". Hmmmm...any suggestions? *I'm too lazy to edit the serial number and too lazy to get up and put a piece of tape over it so I just used my finger... 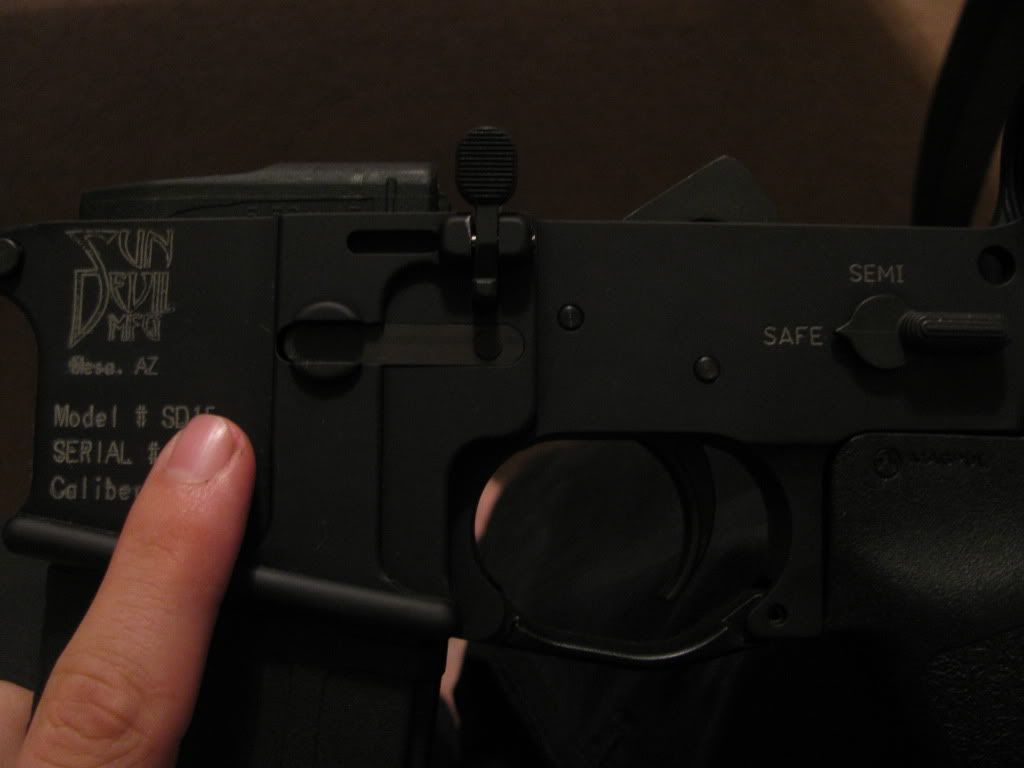
|
|
#84
12-28-2010, 7:37 PM
|
||||
|
||||
|
Quote:
__________________
Need A Realtor in SoCal? Shoot me a PM. 
|
|
#85
12-28-2010, 9:32 PM
|
||||
|
||||
|
Quote:
|
|
#86
12-29-2010, 1:28 AM
|
||||
|
||||
|
Quote:
__________________
Need A Realtor in SoCal? Shoot me a PM.
|
|
#90
02-25-2011, 5:57 PM
|
||||
|
||||
|
Quote:
Quote:
__________________
Saying people don't need guns because we have police is like saying we don't need fire extinguishers because we have firemen. Quote:
|
|
#91
03-09-2011, 8:36 PM
|
||||
|
||||
|
I guess i'm pretty much a Form follows Function guy, being I don't see the point for: 1. Pretty paint in the stamping of guns, and 2. White wall tires on cars, but hey that's just me. I did paint in the numbers on my Wilson Combat mags though, so I can tell which one is which, but that is Form following Function.
Last edited by 'ol shooter; 03-09-2011 at 8:39 PM.. Reason: Additional text entry
|
|
#92
04-16-2011, 10:32 PM
|
||||
|
||||
|
photos attached; used acrylic paint. thanks, OP and subsequent, for the ideas and advice to make my first build look nicer.
a few things i found out: * the acrylic is easier to use if it's applied in a watery mode. you wind up using less paint overall (just let it run into the grooves), and the surrounding area winds up with less paint caked on once it dries. * accordingly, use as small a brush as you can manage for getting the paint into those grooves. again, less initial mess means less to clean up. * if the surfaces around the engraving have been recently treated with solvent/cleaner/oil/CLP/whatever (i used hoppe's), the sheen left behind seems to make the paint much easier to wipe off. * water didn't seem to do the job of dissolving the paint on the surface, but a patch dampened with solvent did the trick. don't soak the patch, or the solvent will run into the engraving -- you'll wind up wiping them clean and starting over.
|
|
#93
04-20-2011, 6:12 PM
|
|||
|
|||
|
Thanks for this great sticky! I used the acrylic method after raiding my sisters art supplies. I just used a 2:1 paint to water mixture and applied using a bamboo skewer..the kind for kabobs. The needle point allowed me to minimize the mess. I allowed the paint to dry completely even if I applied too much and just rubbed the excess off after dry with a paper towel since acrylic likes to come off in large flakes after drying as opposed to wiping when wet. Any excess that wouldn't come off was easily removed with a q tip and some nail polish remover.
|
|
#94
07-04-2011, 3:49 PM
|
||||
|
||||
|
Last edited by monorailboy; 11-11-2011 at 6:13 AM..
|
|
#95
07-25-2011, 6:56 AM
|
||||
|
||||
|
SOLIDSNAKE i'm diggin your stag, also really diggin the JD machine logo in white. I used the crayon method on one of my glocks with good results but my Beretta 96 doesn't like it at all. Ill have to give the paint/h20 method a try. Thanks for the info.
|
|
#96
08-29-2011, 2:27 AM
|
||||
|
||||
|
Those are neat guys...But
What about krylon? lol
__________________
 www.MitchelArmory.com - CA Friendly - Mags, Rebuild kits, Muzzle Devices... www.GuniFieds.com/ - BUY, SELL & TRADE LOCALLY FOR FREE! “The only foundation of a free Constitution is pure Virtue, and if this cannot be inspired into our People in a greater Measure, than they have it now, they may change their Rulers and the forms of Government, but they will not obtain a lasting liberty.” John Adams June 21, 1776 READ: Beginners guide AK Platform
|
|
#99
10-27-2011, 7:49 PM
|
|||
|
|||
|
So I decided to give this a try and didn't like it. I tried a crayola crayon first then tried the lacquer pens from Brownells.
Now I have a white haze on my lower that will not go away. I tried removing it by scrubbing with a nylon brush and Hoppes, then CLP, then Remoil and nothing will get rid of the slight white haze. I wish I never tried this... Any ideas how to get it off? BTW, it's very faint but noticeable. Here is a pic...  You can see it over the Stag logo and around the selector marks, etc...
|
|
#106
01-13-2012, 5:02 PM
|
||||
|
||||
|
Did mine using testors paint. Top pic is from about a year and a half ago when I first did it, second pic was from tonight. White paint could use some touch up maybe, but overall, holding up great!
 
|
|
#108
02-15-2012, 3:12 AM
|
||||
|
||||
|
3 pages of discussion and advice on this topic and not one single video showing the process?
__________________
Proudly nestled all snugly and warm in Hillary's basket. She even made room for my bibles and guns! I've committed $10 a month to the CalGuns Foundation. Have you??? Join us and donate here!
|
|
#109
02-16-2012, 9:56 PM
|
||||
|
||||
|
Did you ever get around to it Sandeggo?
Erik, we've been saving the honor for you, can't wait to see your masterpiece and more importantly the video you come up with documenting the process 
|
|
#110
02-24-2012, 5:23 AM
|
||||
|
||||
|
Quote:
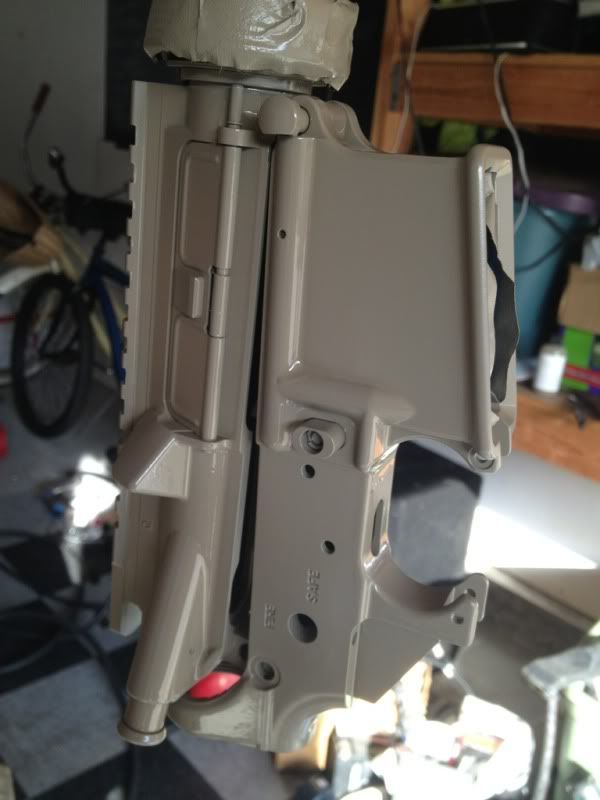 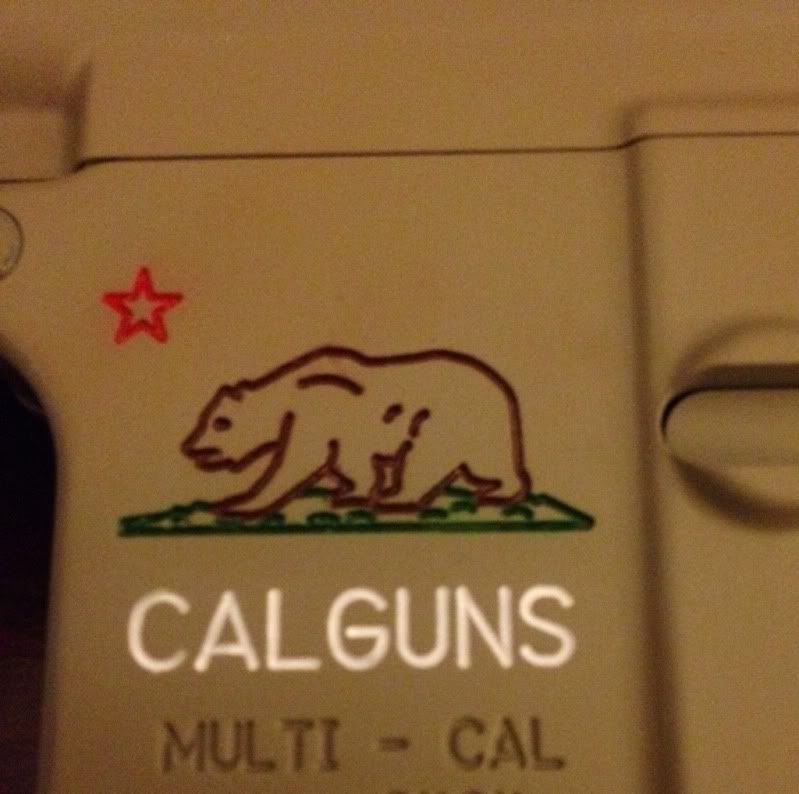 Here's the whole rifle 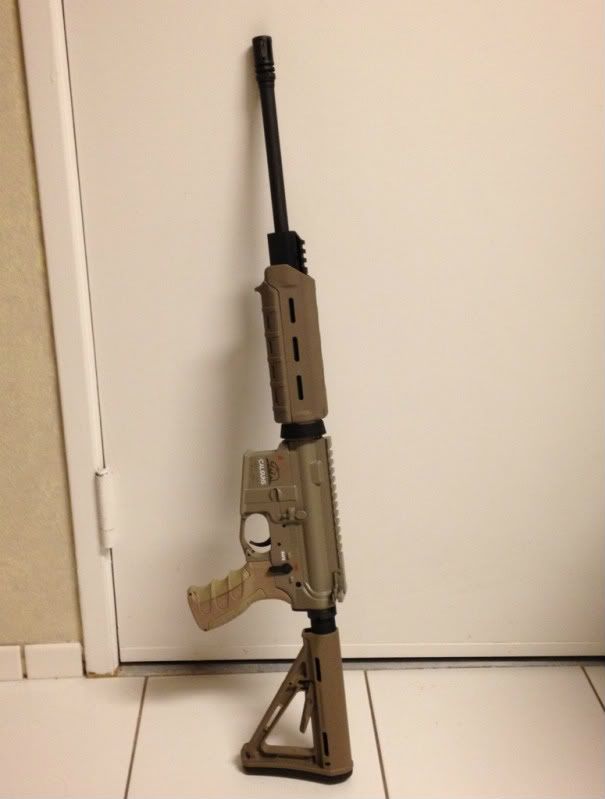
Last edited by sandeggo; 02-24-2012 at 5:37 AM..
|
|
#111
03-30-2012, 5:17 PM
|
||||
|
||||
|
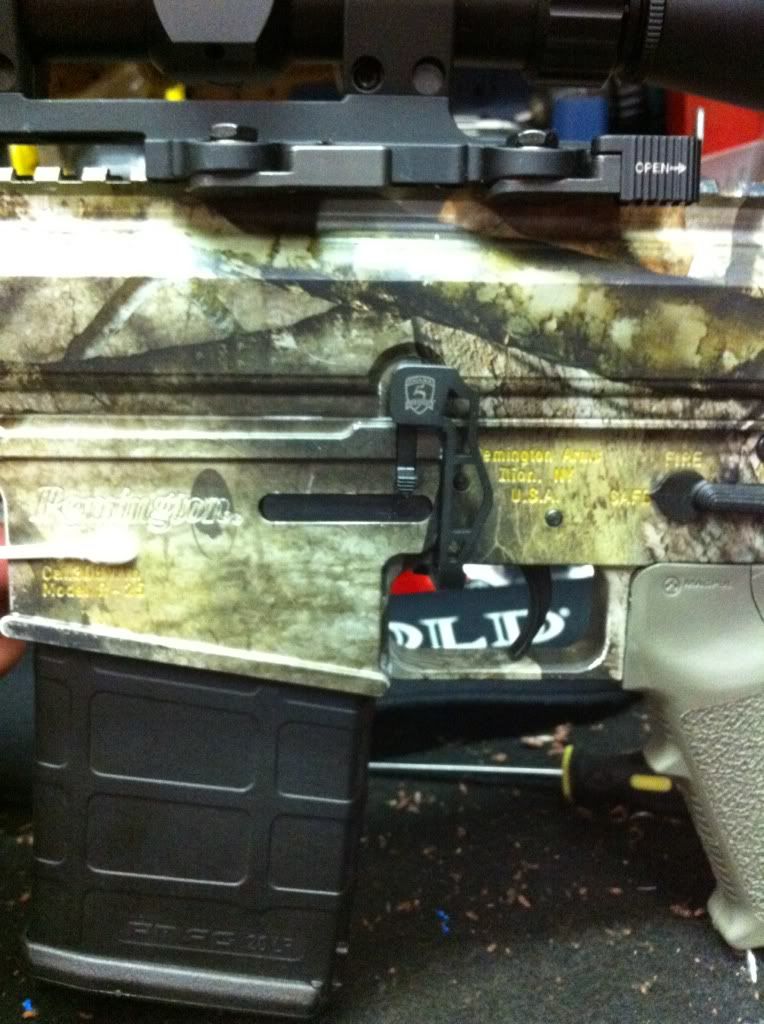
I used a Sharpie Poster paint pen on my Remington R-25 which is Mossy Oak which makes the roll marks almost unreadable. Not as bold as some but I think that is a function of the basecoat-there is a lot going on.
__________________
I support peace through superior firepower. "Para ser libre, un hombre debe tener tres cosas, la tierra, una educacion y un fusil. Siempre un fusil ! (To be free, a man must have three things; land, an education and a rifle. Always a rifle)" -Emiliano Zapata. Quote:
|
|
#112
06-05-2012, 2:30 PM
|
|||
|
|||
|
looks great ...thx for the info!!! I will give it a go!
|
|
#113
06-05-2012, 4:07 PM
|
||||
|
||||
|
Crayons win.
 Thanks for the tutorial. i had heard of this before, but the pictures made me take the plunge. Crayons, a blow dryer, and a microfiber towel! Last edited by AK all day; 06-05-2012 at 4:14 PM..
|
|
#115
08-13-2012, 12:39 PM
|
||||
|
||||
|
or have Blast of Color in Sacramento do it !!! Incredible work !!!
Crayon looks good until you go to clean the rifle. Blast of Color uses professional products that last !!
|
|
#116
08-13-2012, 1:24 PM
|
||||
|
||||
|
Quote:
|
|
#117
09-09-2012, 4:43 PM
|
||||
|
||||
|
Take it to a professional
|
|
#120
09-10-2012, 8:41 PM
|
||||
|
||||
|
Quote:
The only 2 reasons I can understand for someone to farm this out is if they have shaky hands or simply would rather not spend their own time doing it. It's really not too difficult.
|
|
| Thread Tools | |
| Display Modes | |
|
|
 |
 |
 |


 Linear Mode

