


|
|
|
|
|
|
|
|
|
 |
|
|||||||
| Gunsmithing & How To Pro, Amateur & WECSOG and Tutorials, Guides & OLL Build Instructions |
 |
|
|
Thread Tools | Display Modes |
|
#1
 07-13-2010, 11:41 PM
|
||||
|
||||
|
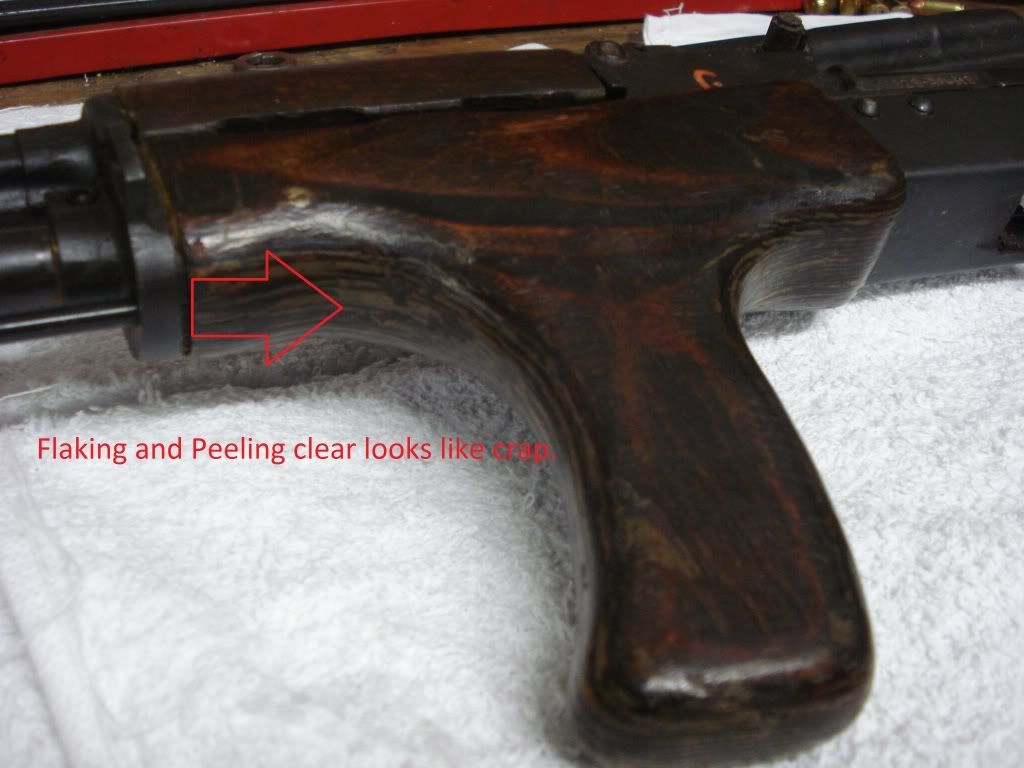
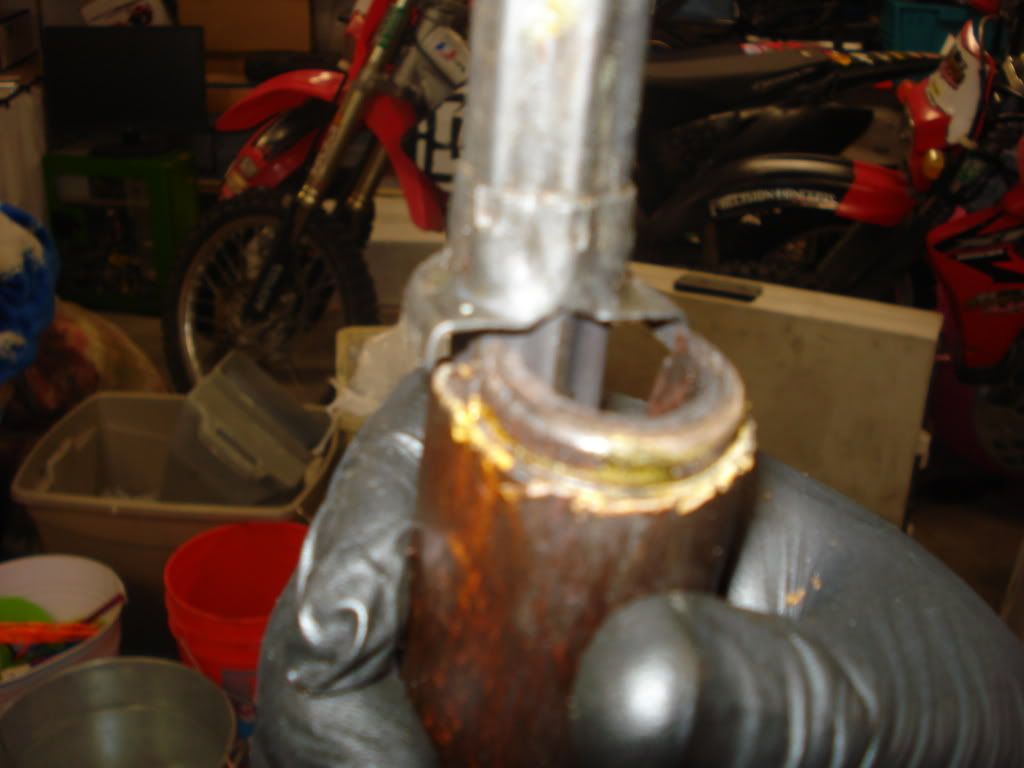
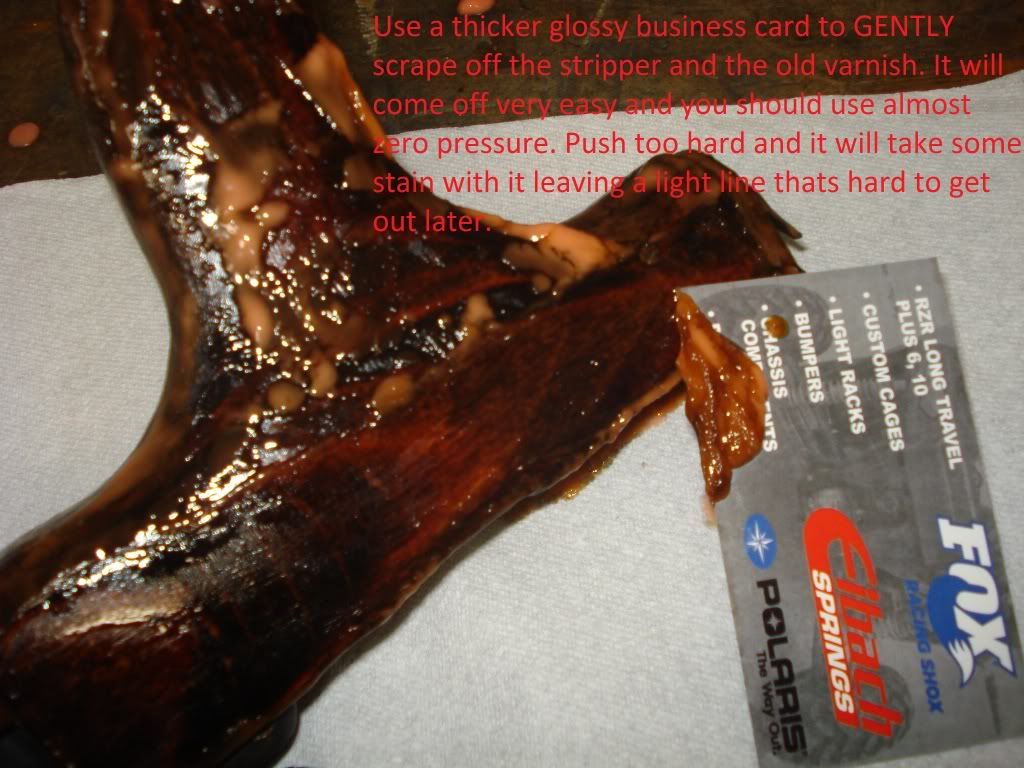
Ok guys, this is my first ever tutorial I've done on anything, ever so I hope it turns out ok and you guys are able to use some of the info provided here. This is only my second stock that I've refinished, the first one came out so nice I wanted to share with everyone so here goes.
Last edited by AIMSMALL; 07-13-2010 at 11:58 PM.. 
|
|
#2
07-13-2010, 11:42 PM
|
||||
|
||||
     It has been recomended by another member that you not use your wife or GF's toothbrush, do so at your own risk! Personally I like my wife when she's mad, it's kinda hot. 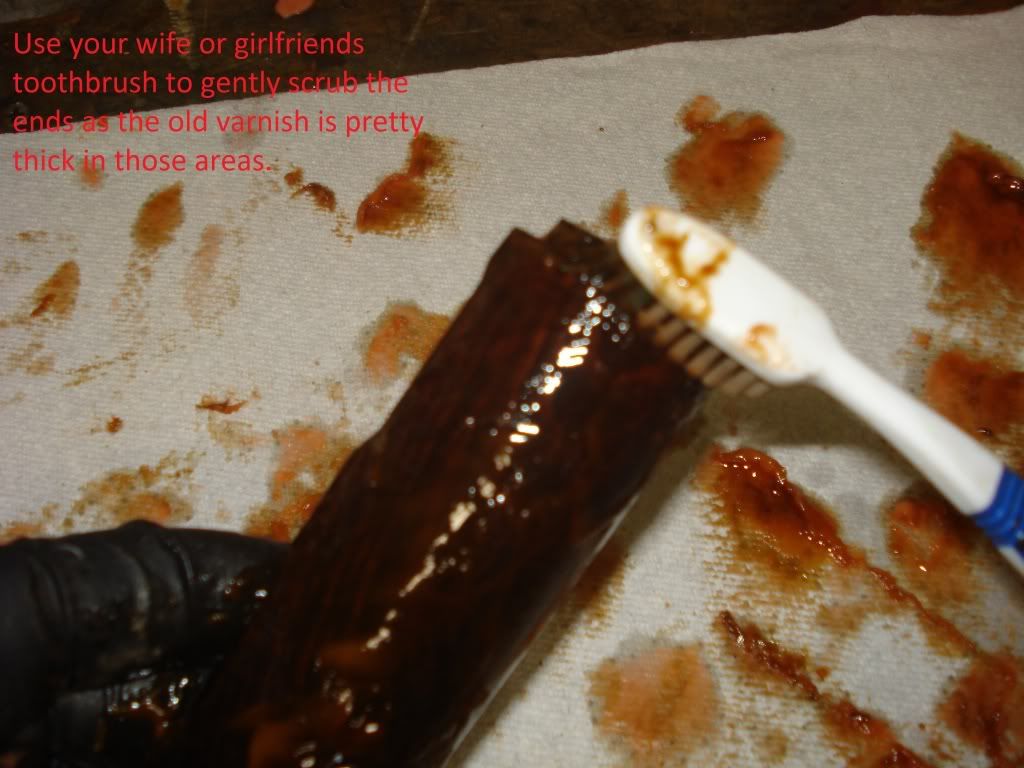
Last edited by AIMSMALL; 07-21-2010 at 12:06 PM..
|
|
#4
07-13-2010, 11:43 PM
|
||||
|
||||
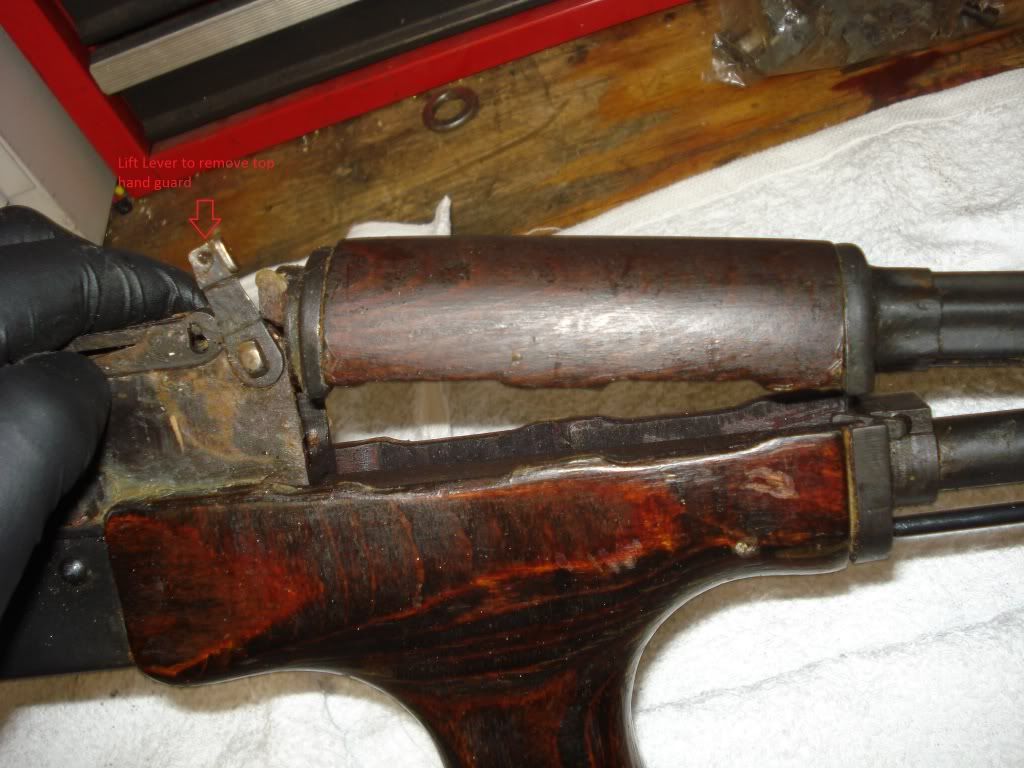
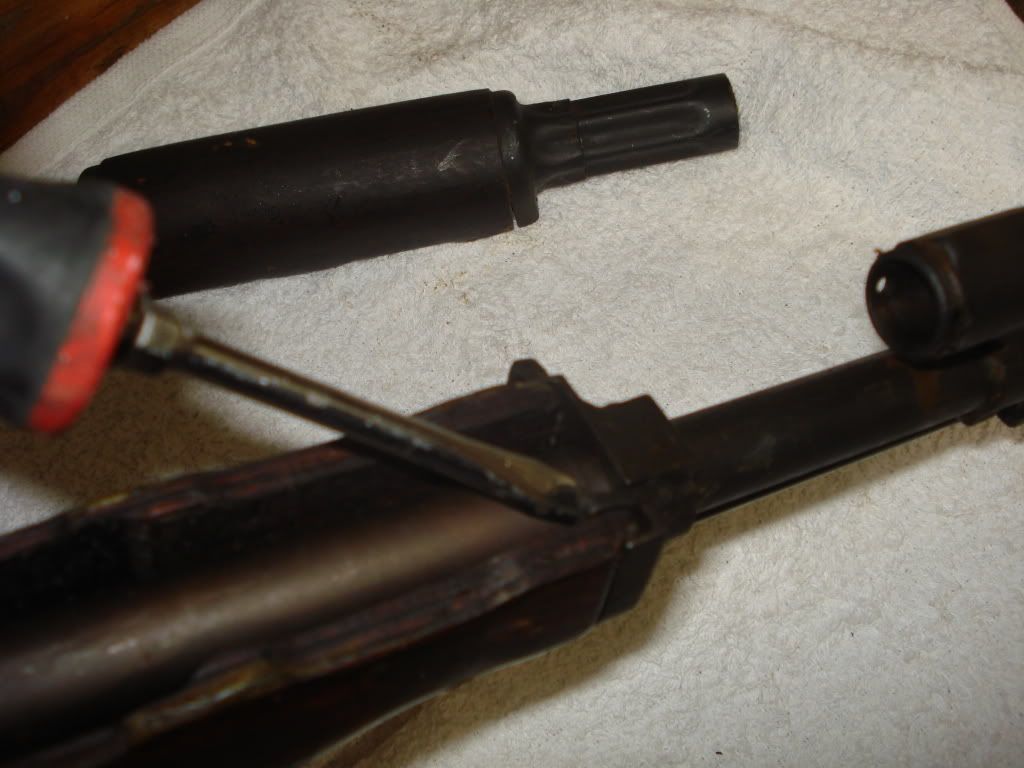
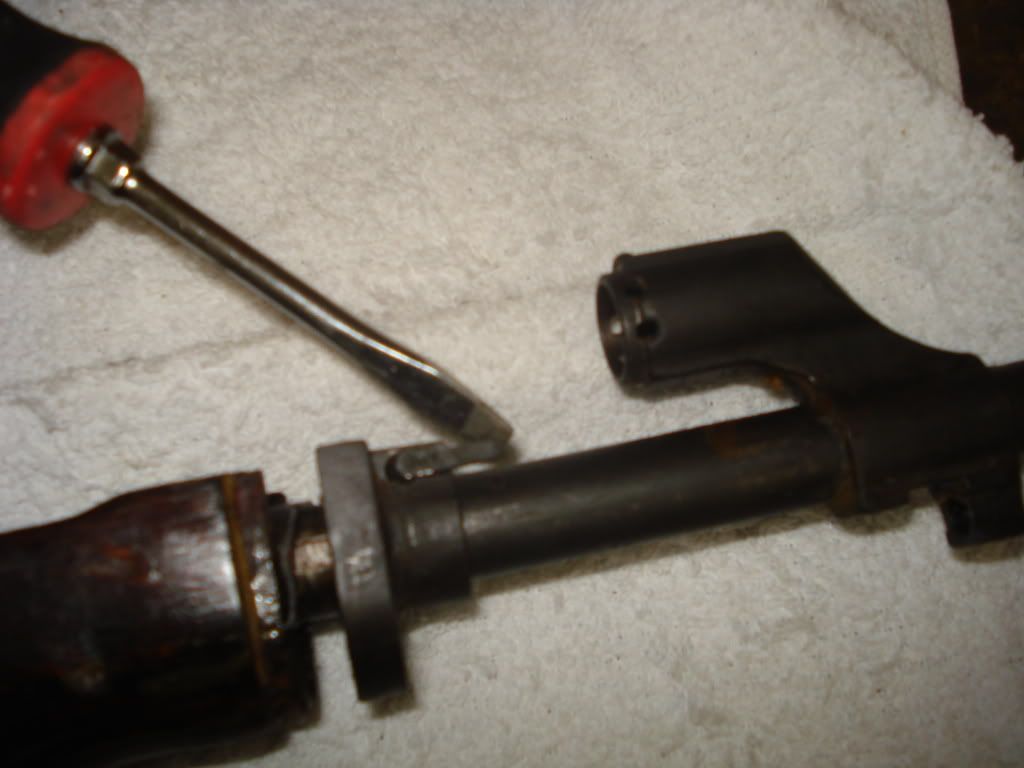
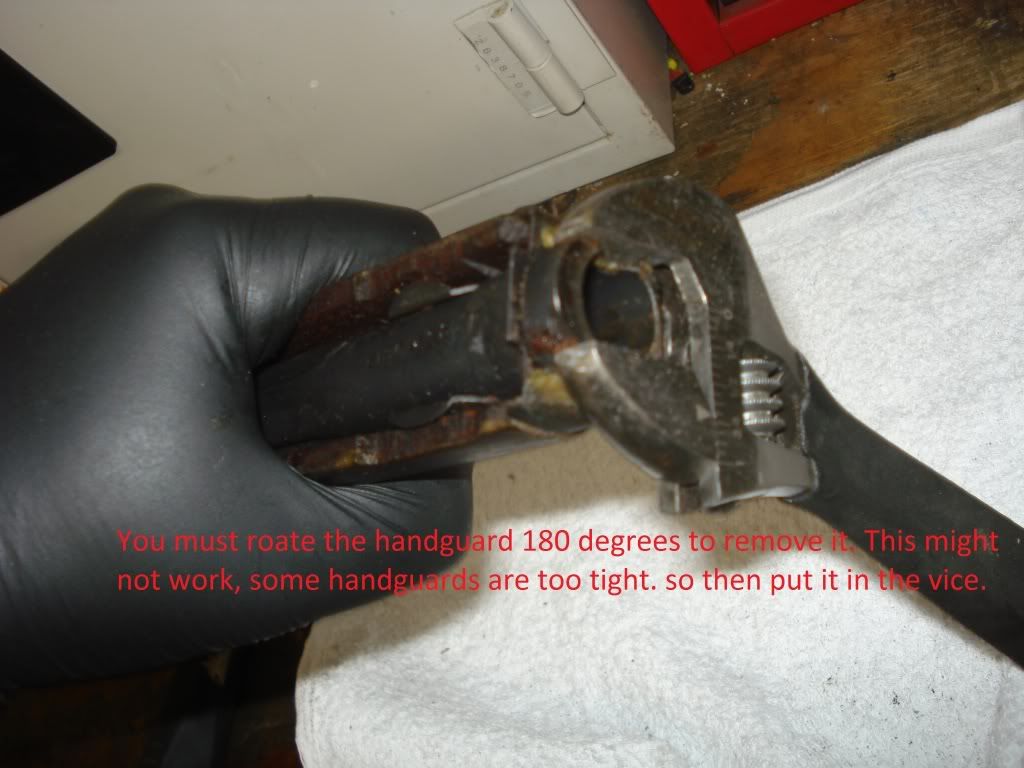
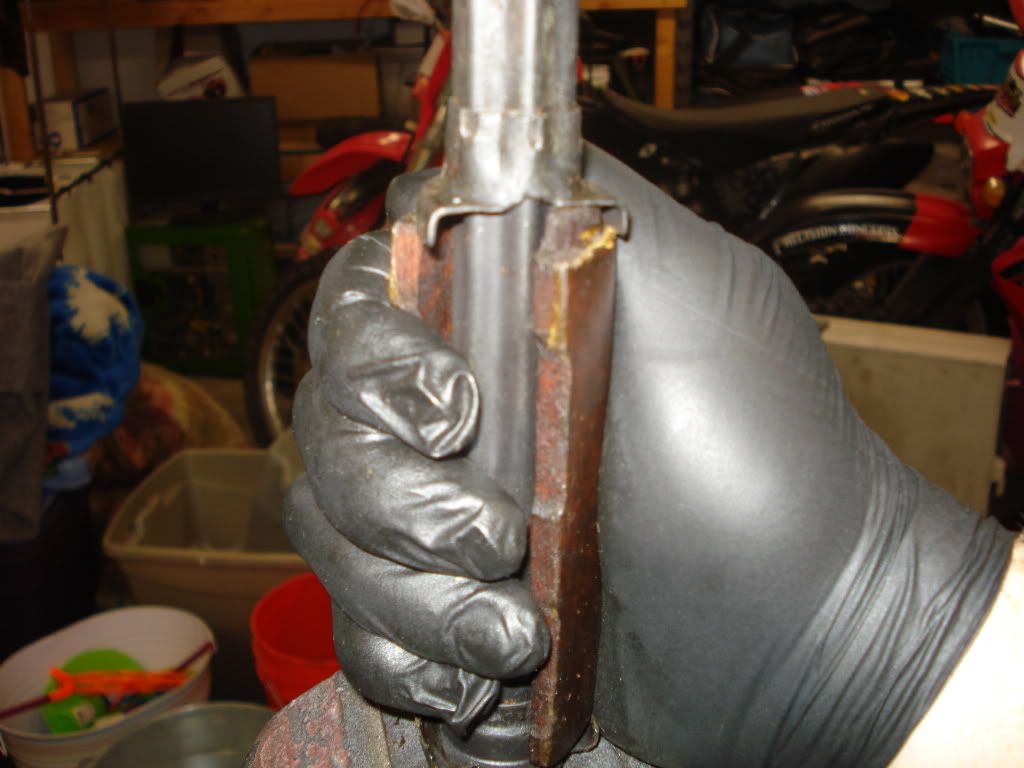
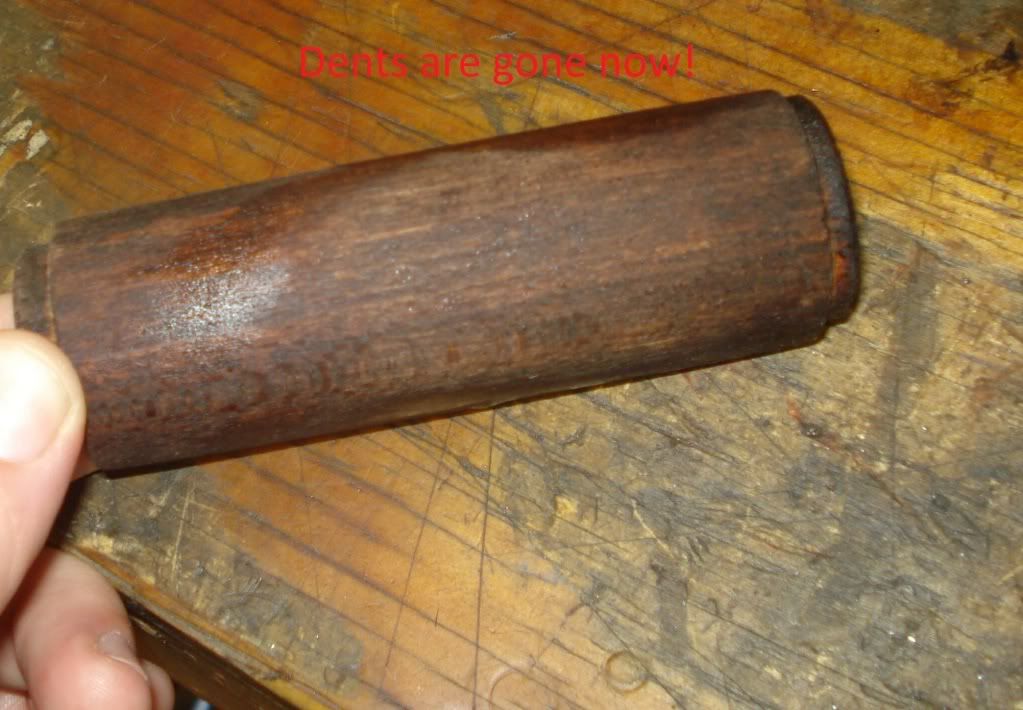
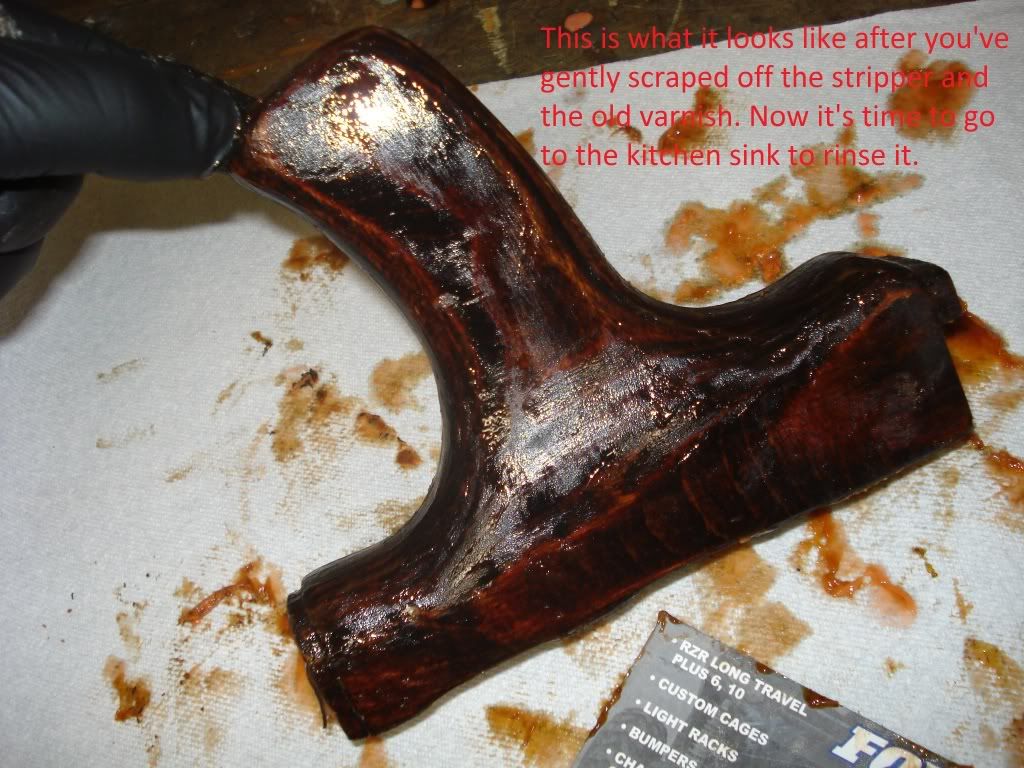
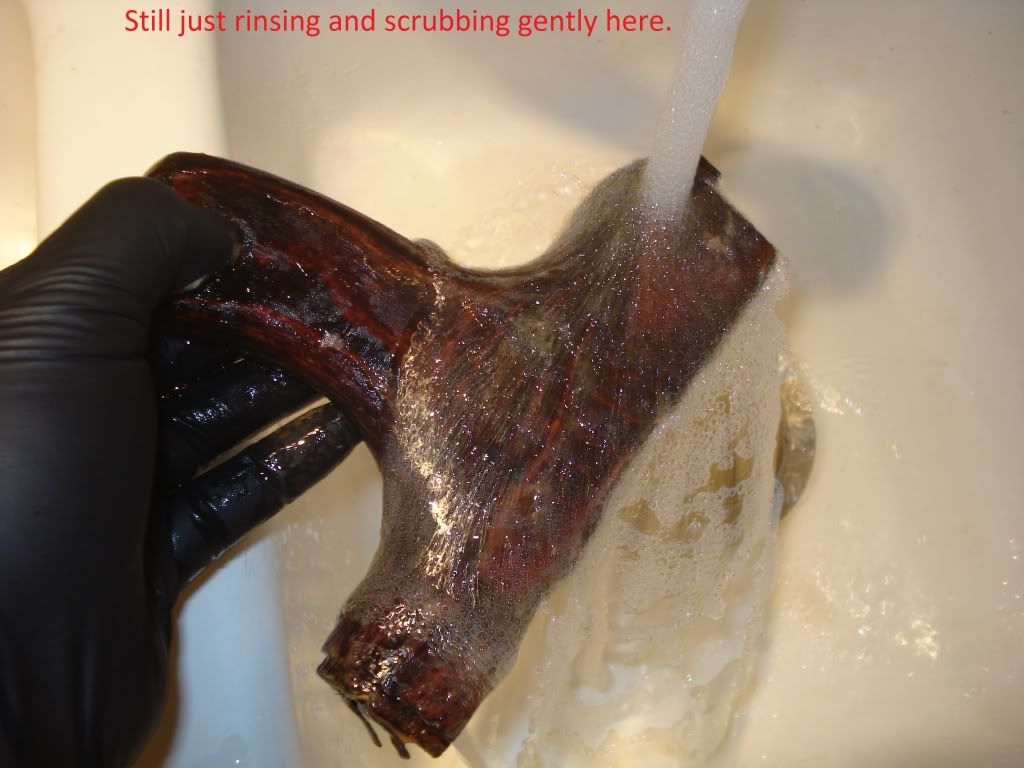
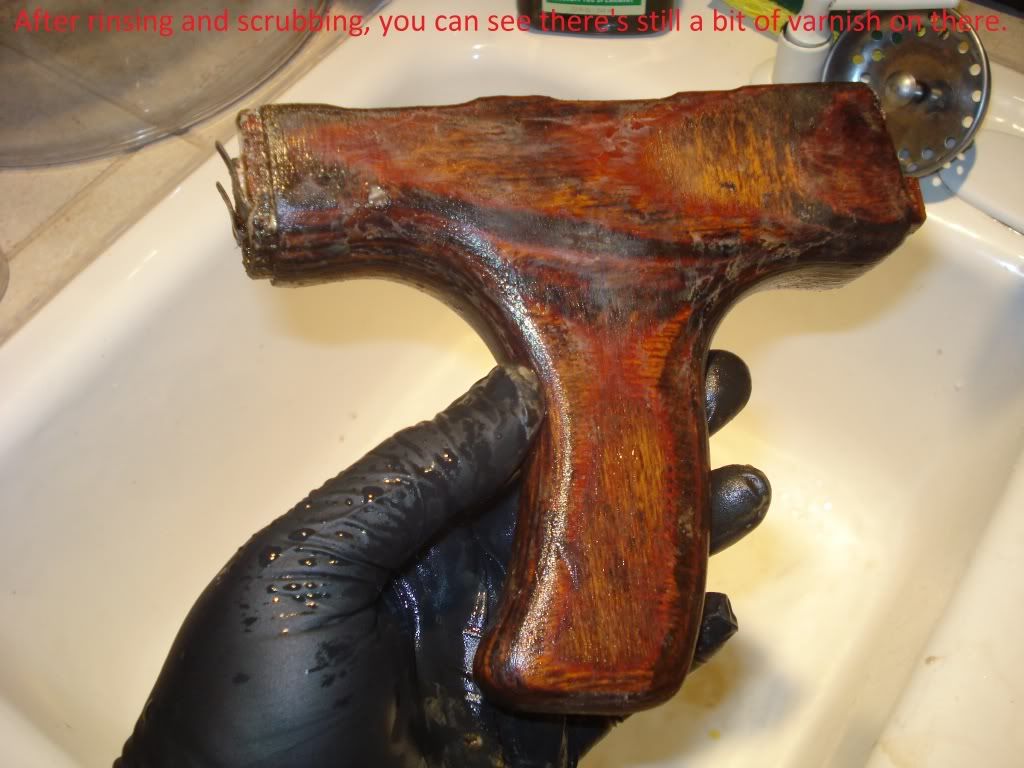
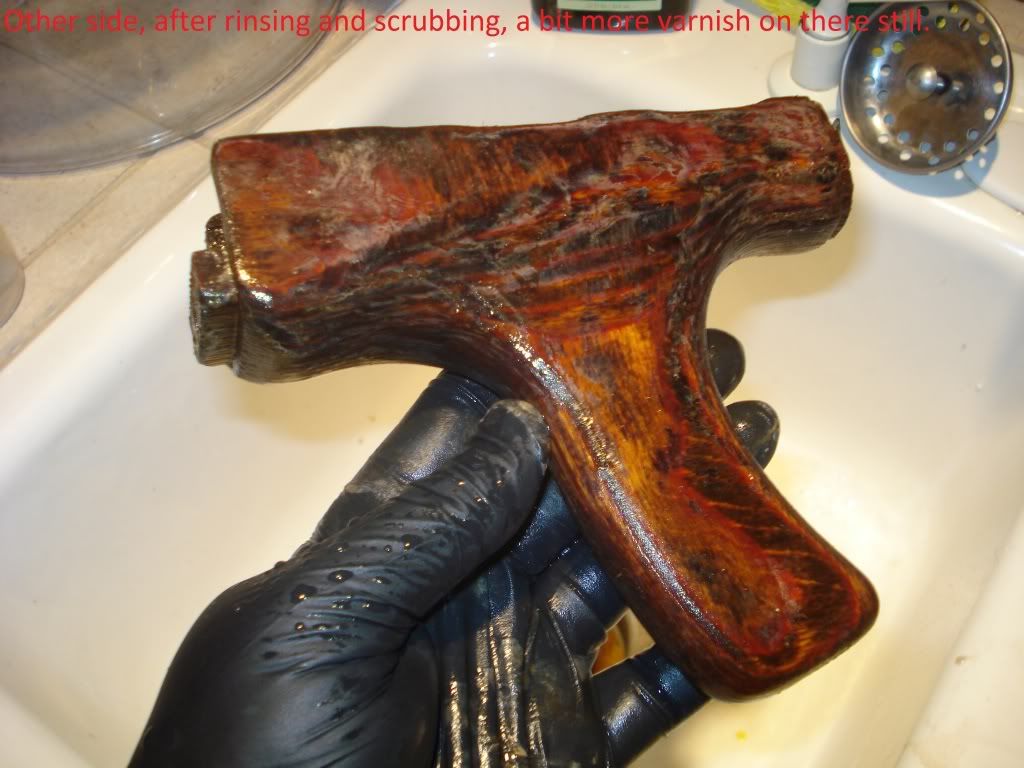  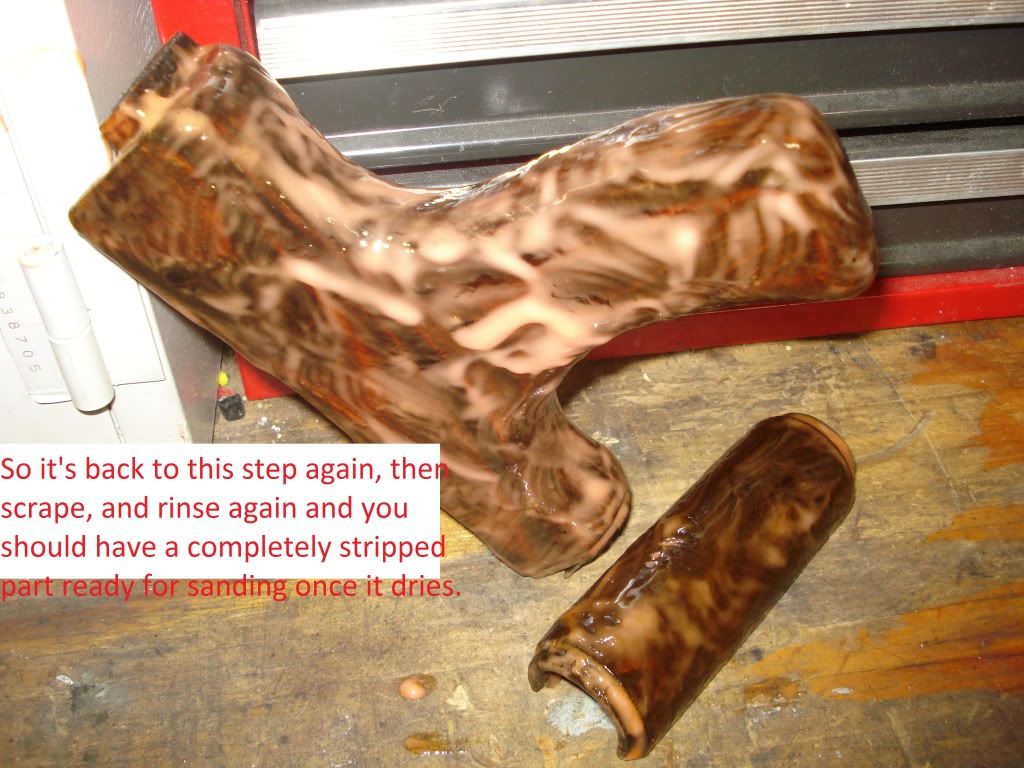 After this 30-40 minute "soak period" I recommend scrubbing the entire surface with the toothbrush to loosen up and remove any remaining varnish that didn't come off the first time around. THEN rinse with HOT water as before and the stock should be completely clean. If you have any dents in the wood this is the point where you would steam them out. Steaming is a simple process, you will need a bucket of water, a nice, clean, cotton rag (I use the ones from Costco), and an iron. Just completely soak the rag in the water and then fold the rag in half so you have two layers and set it right over the dent, press the hot iron onto the rag and hold it there for 20 seconds or so. Check your progress and repeat as needed untill all dents are lifted out. Remember to keep the rag wet so it will steam every time and set the iron to the highest setting too. Allow to dry for 24 hours after this step before sanding. Here's some pics of the process. 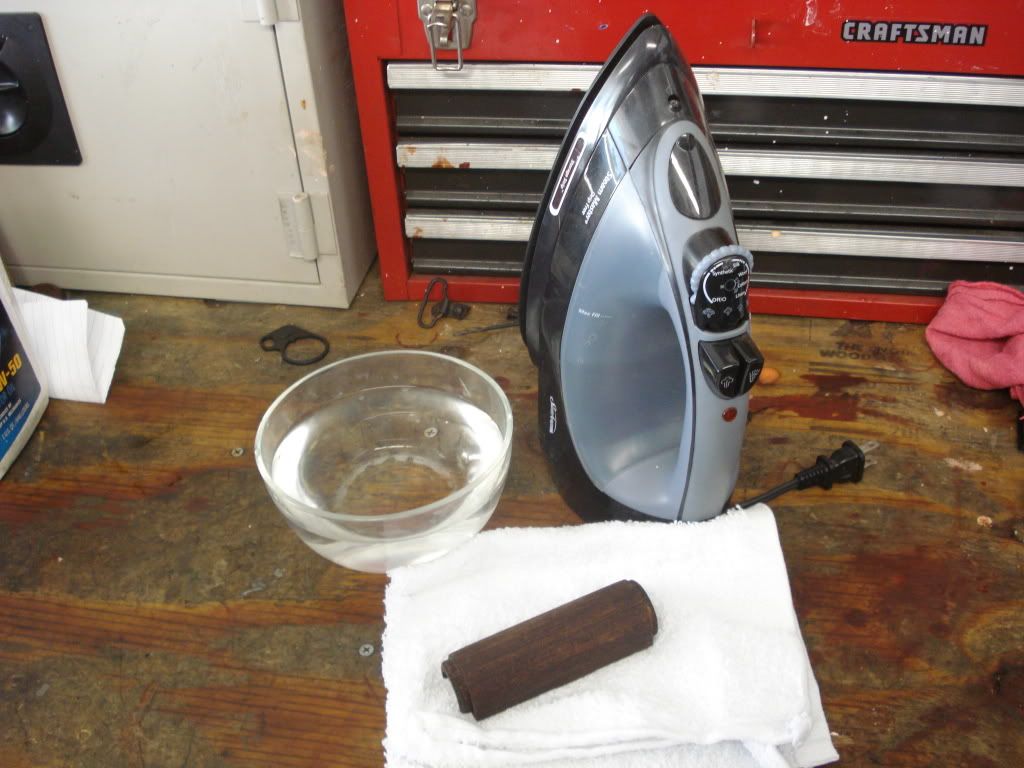 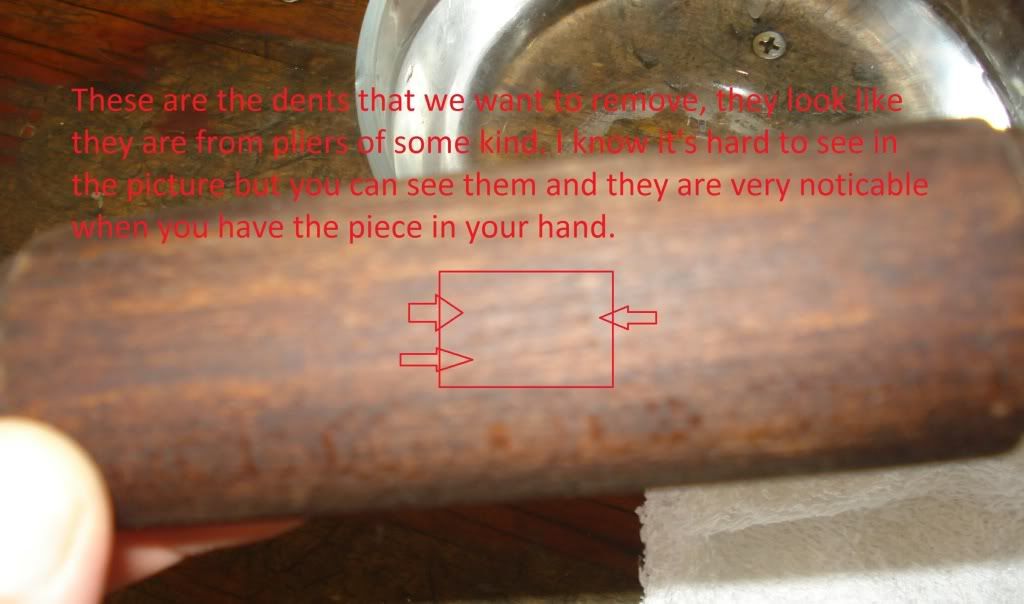 
Last edited by AIMSMALL; 08-07-2010 at 10:31 PM..
|
|
#5
07-13-2010, 11:52 PM
|
||||
|
||||
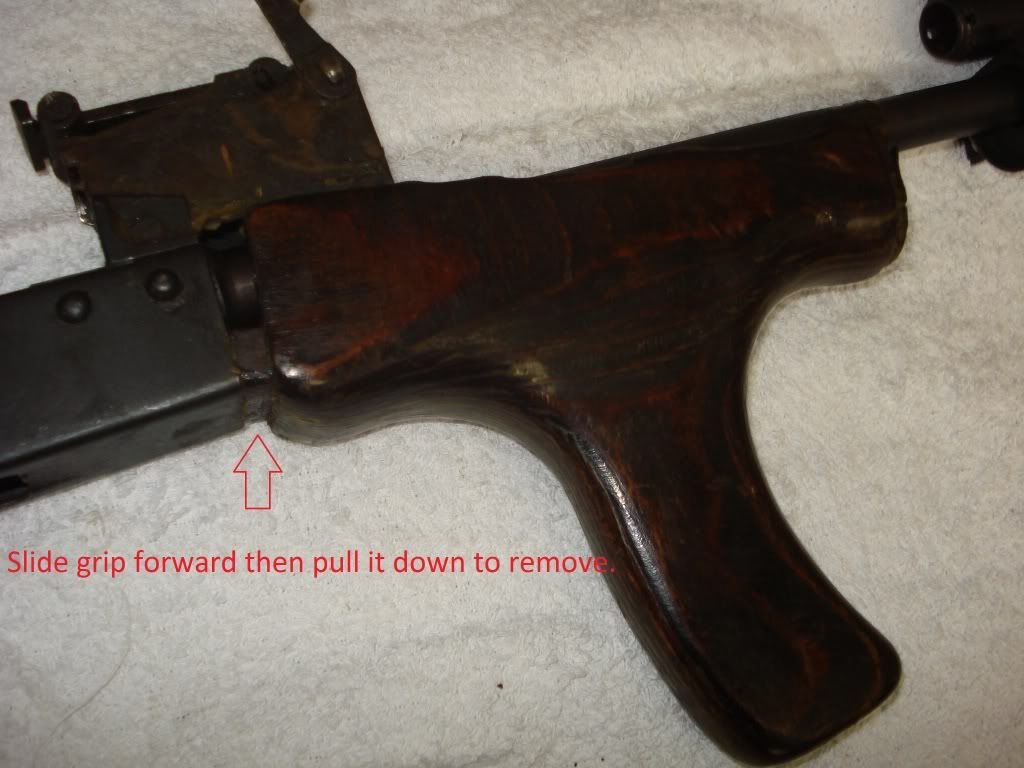
  Here it is after it has completely dried for 24 hours, it has not yet been sanded at this point. 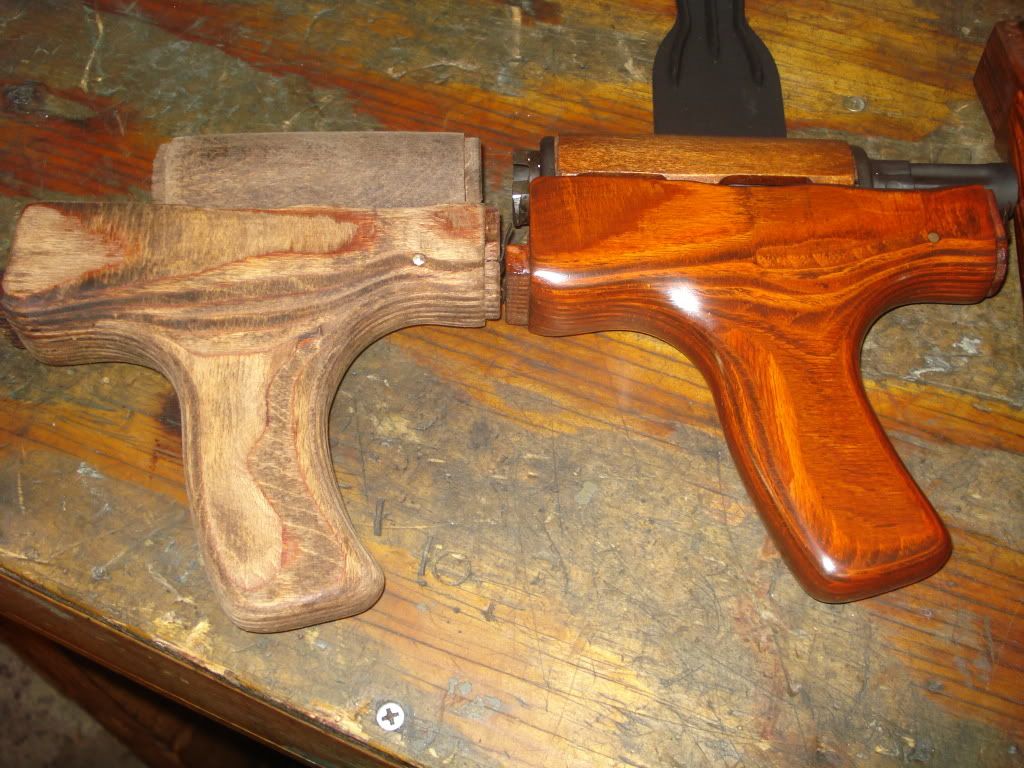 Here's a side by side with the first one I refinished. And another of the first one I did.  I should have taken pics while working on that one but didn't know how it would turn out so I didn't. Sand the entire stock going with the grain with 100 or 120 grit being very careful not to remove much wood near any edges where metal buts up against the wood and also near the vents of the handguards. If you aren't careful you could cause the wood to not line up nicely with the metal parts and it will be noticeable. If you are going to refinish the metal parts you may want to put them back on for the sanding stages but beware, they will need to be refinished if you do this. 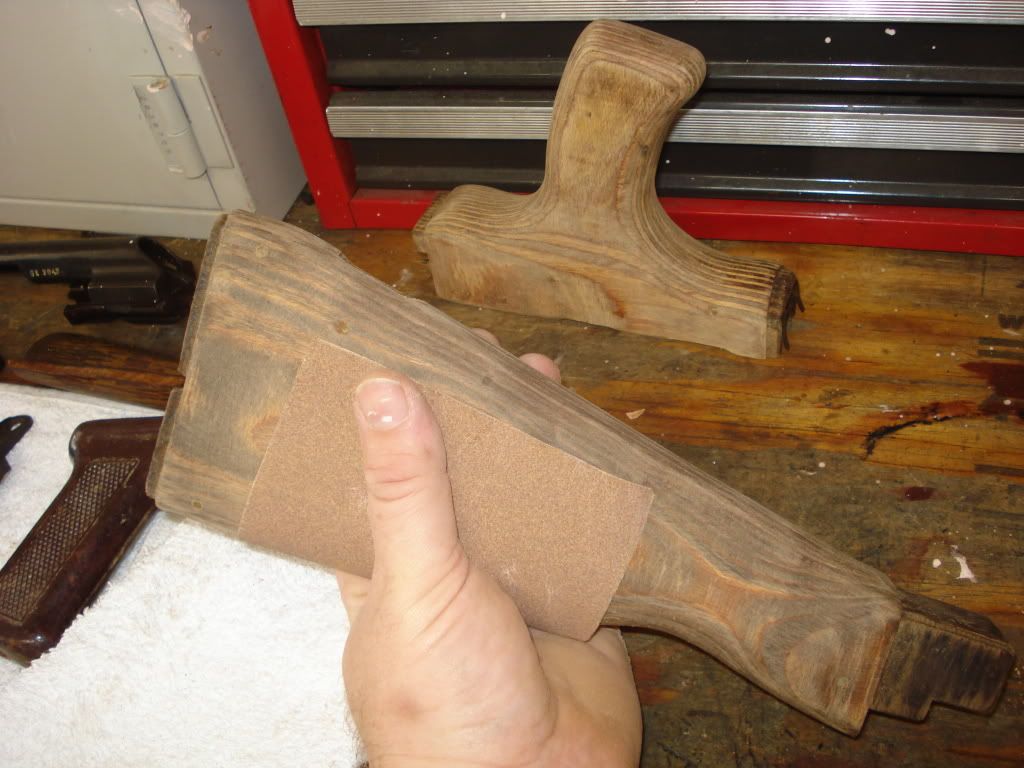 After sanding the entire stock with 100 to where the colors, grains and imperfections are how you want them switch to 220 grit and again sand the entire stock going with the grain as much as possible. If you try to just sand problem areas with 100 and then the entire stock with 220 it will not look as good when your done. Once sanding is done remove all dust with a clean rag or compressed air. 
Last edited by AIMSMALL; 08-07-2010 at 10:32 PM..
|
|
#6
07-13-2010, 11:53 PM
|
||||
|
||||
|
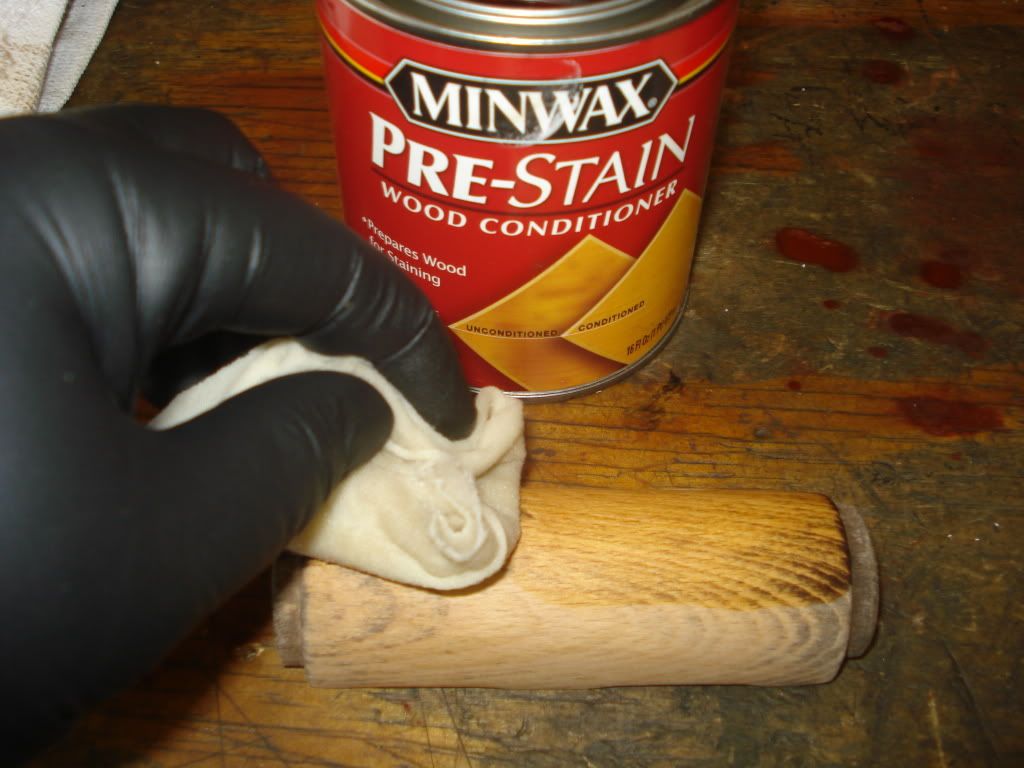
Next step is to pre treat the wood for staining, for this I used the Minwax wood conditioner. The idea is to make the wood absorb the stain more evenly. Apply with a strip of an old t shirt and let soak for at least 15-20 minutes and then apply the first coat of stain within 2 hours (directions on the can).
 For the stain I used minwax Gunstock #231 but there are lots of different shades available. I used another strip of the t-shirt to apply a nice heavy coat of stain to the entire stock.  After 20 minutes I used another clean strip of the shirt to wipe off the excess stain and then allow the stock to dry for 6 hours before the next coat of stain. 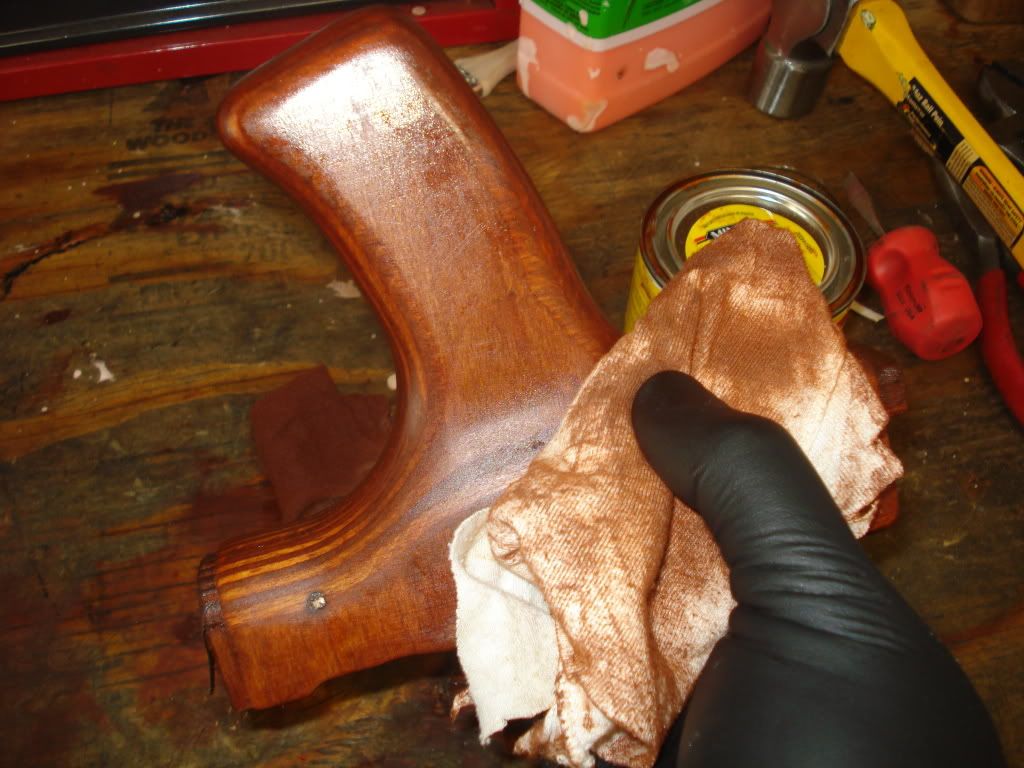 Just wanted to point out the numbers here, if you have numbers you want to preserve be very carefull around them while sanding or tape over them with painters tape. It is ok to sand over them a little but just be very gentle and only use the finest sandpaper you intend to use on the rest of the wood. I think the numbers are actually easier to see/read after the refinishing process. 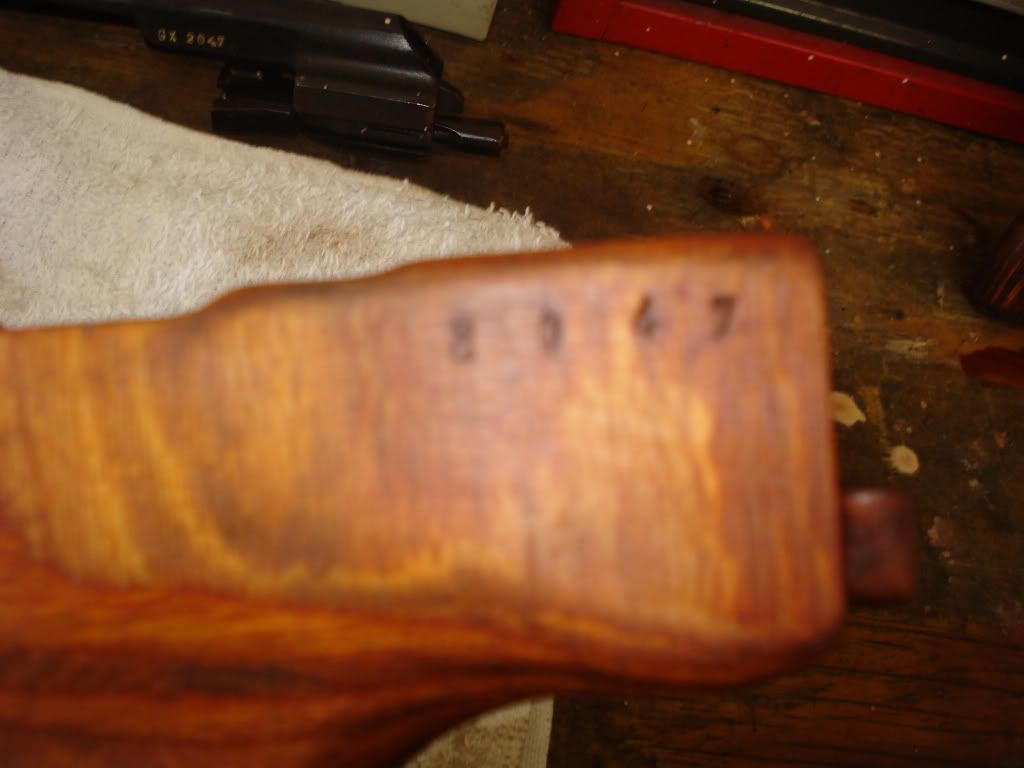
Last edited by AIMSMALL; 07-19-2010 at 2:25 PM..
|
|
#7
07-13-2010, 11:54 PM
|
||||
|
||||
|
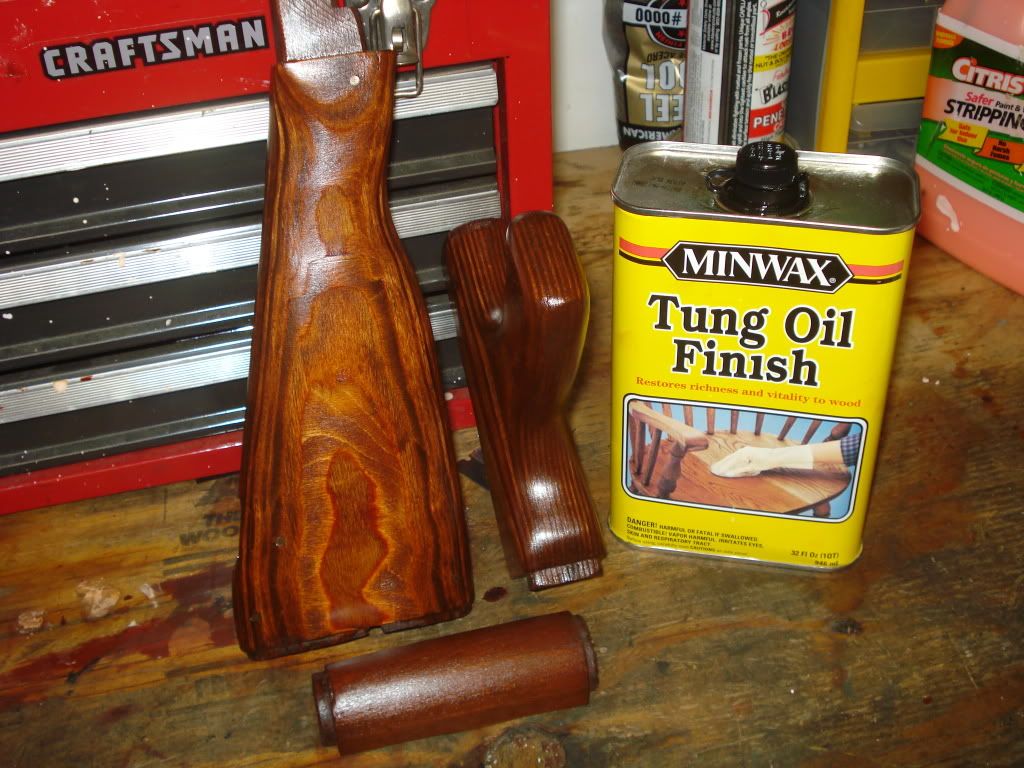
I did 5 coats to get it to the color I wanted. For the clear coat I used Minwax wipe on poly.
For the wipe on poly it went like this, first coat with t-shirt strip then wait at least 3 hours. 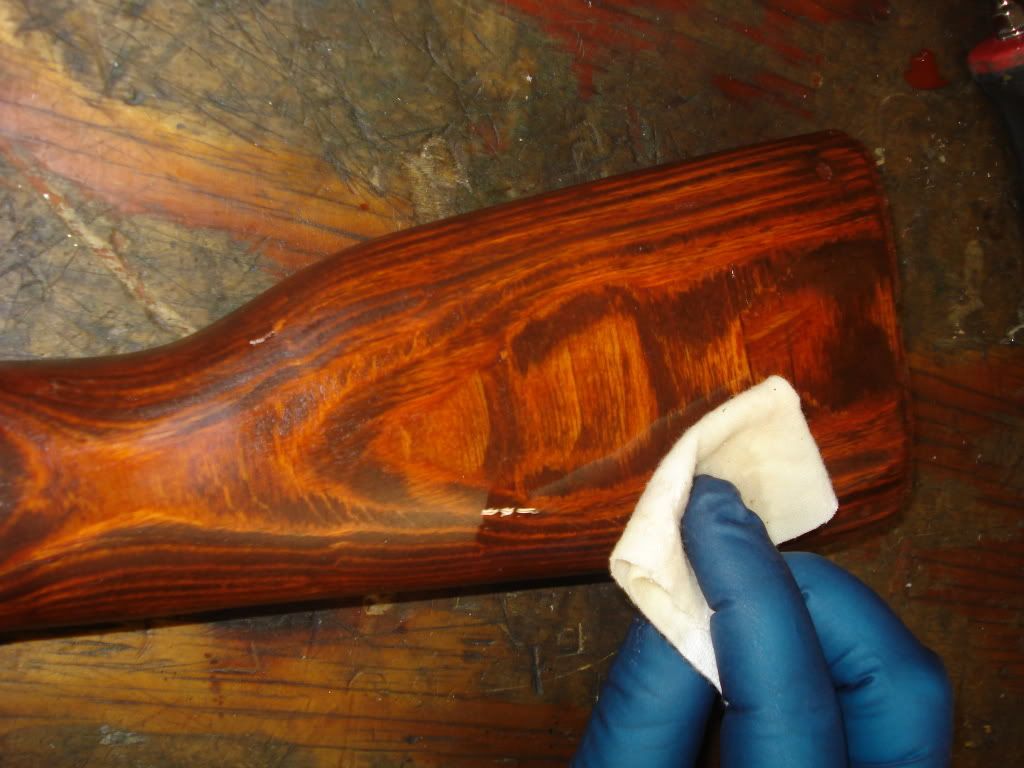  Here it is with i nice thick wet coat of the poly. 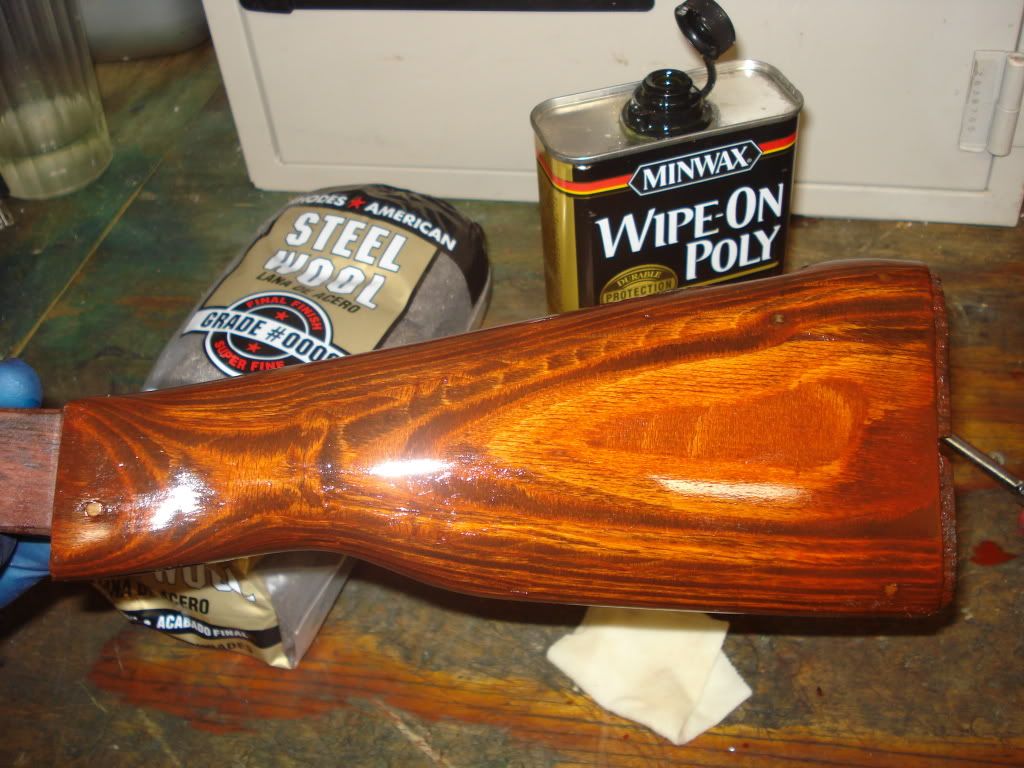 After each coat of clear is completly dry, sand entire stock with 0000 steel wool. Steel wool sanding pic here....Notice the dull finish after the dried poly has been sanded.  Next blow off with air and wipe down with clean t-shirt strip then apply another coat of wipe on poly. I did 5 coats and I really like the way it looks. Applying 2nd coat of clear here..... Last edited by AIMSMALL; 07-28-2010 at 7:36 PM..
|
|
#8
07-13-2010, 11:55 PM
|
||||
|
||||
|
Please note that there are other options including true oil from birchwood casey and lin seed oil which are both highly recommended from others who have used them to refinish stocks. Whatever you choose, just follow the directions and you'll be fine.
UPDATE Here's a Bulgarian AK74 stock I've been working on. One thing I'll mention is I was able to skip the scraping with the buisness card step on this set. I went straight to the tooth brush and did the citristrip twice. Original used condition 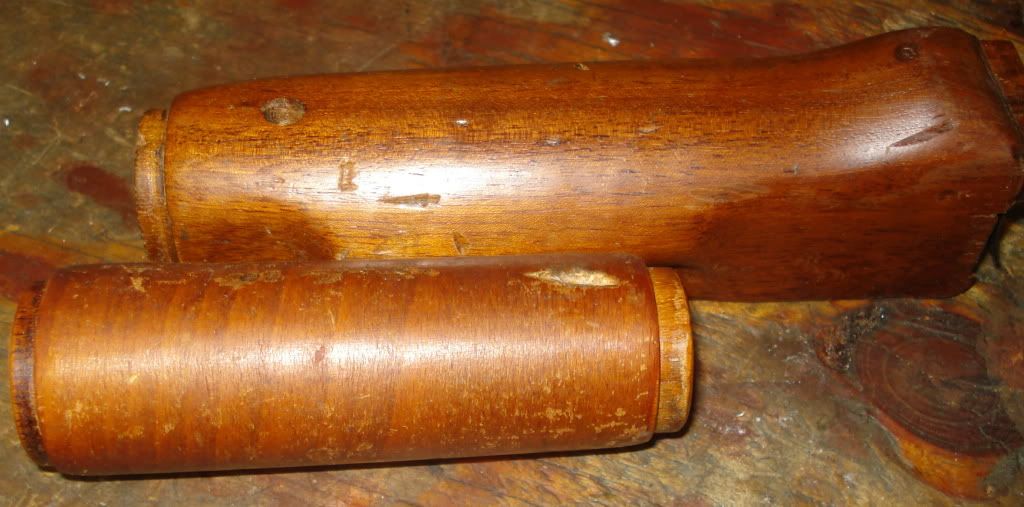 After stripping and sanding  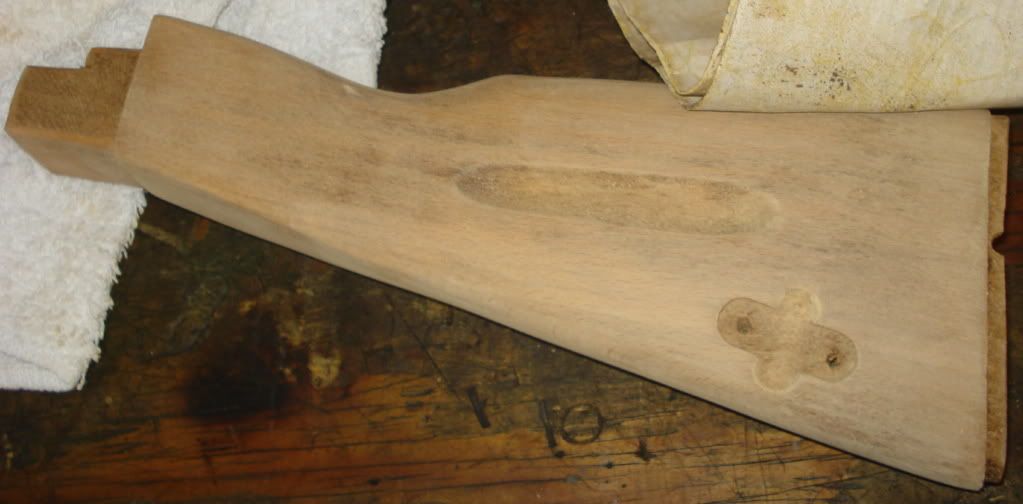 After 4 coats of stain and 4 coats of poly   Completed Rifle 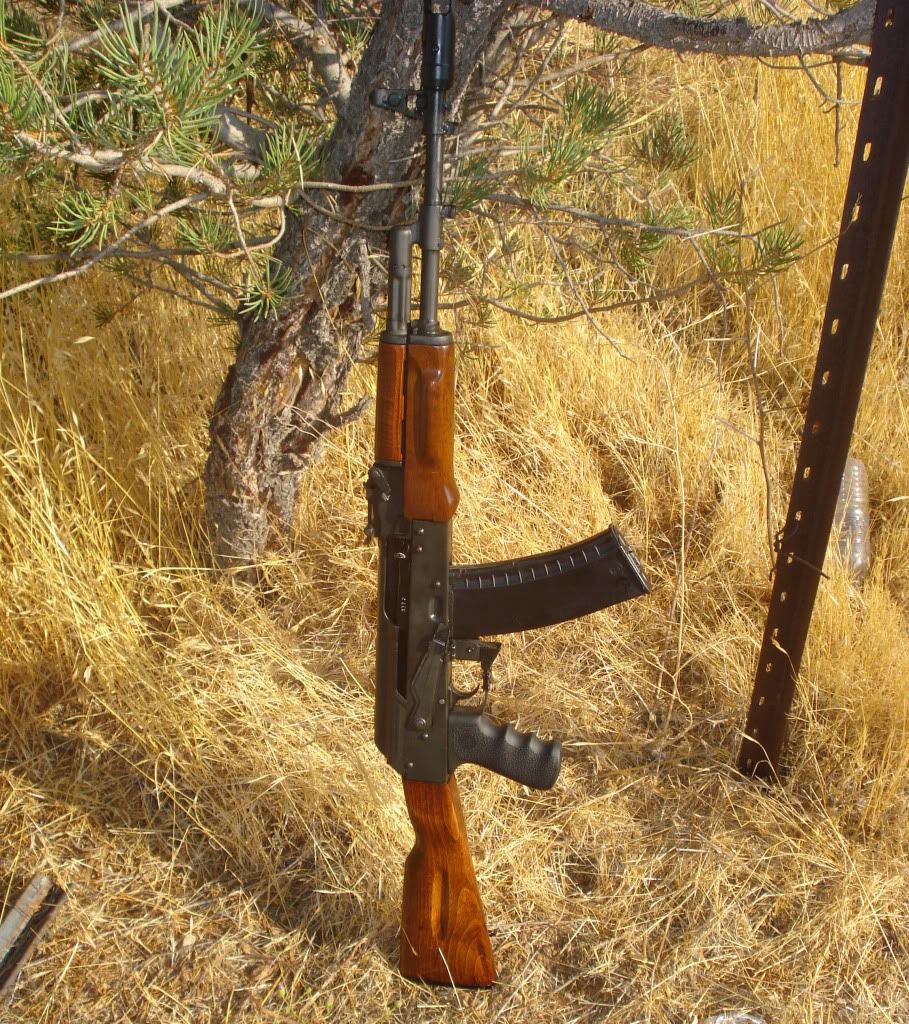
Last edited by AIMSMALL; 10-03-2010 at 7:44 PM..
|
|
#9
07-13-2010, 11:56 PM
|
||||
|
||||
|
First time using Tung oil, this is after 4 coats. The process is a little more tedious then the wipe on poly in my opinion and I think I like the way the poly looks a little better too. For the Tung oil you do everything the same up untill the staining is all done then you wipe it on and wait 5-15 minutes then buff it off with a clean strip of an old t-shirt. I found that the tung oil would get very tacky after 6 or 7 minutes making it really hard to buff off so I immediately added a fresh coat of tung oil and then buffed it right away. That made buffing easy and worked very well.
 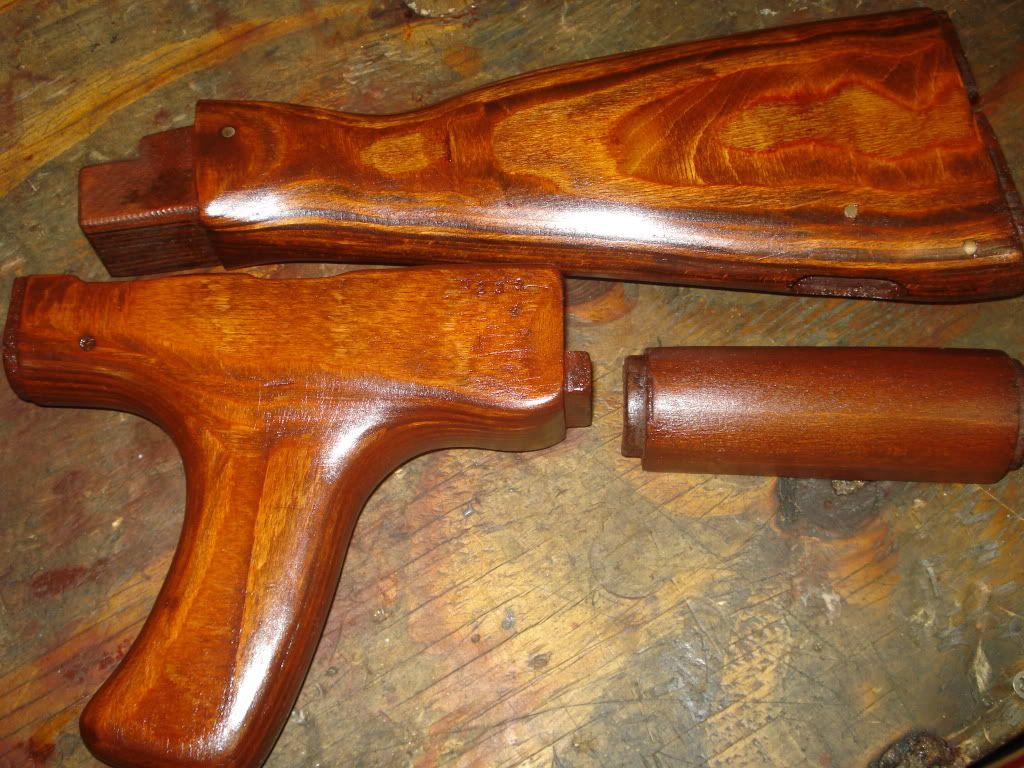 The thing I liked better about the process for the poly was that you just wipe it on and let it dry, no buffing off wet sticky oil. The trade off is that you will need to buff the dry poly coats with steel wool before each additional coat can be applied, with the tung oil you just add another coat. The poly process seemed to be easier overall because I was able to work for a few minutes then walk away and come back to it whenever I wanted. With the Tung oil you have to commit to the time it takes to get thru first coating the furniture, then waiting 5-15 minutes, then re-coat to break the stickyness, then buff. Last edited by AIMSMALL; 09-29-2010 at 9:05 PM..
|
|
#10
07-14-2010, 8:07 AM
|
||||
|
||||
|
Curse you, this makes it look easy enough (though time consuming) that I want to refinish my stocks now! I was content with them originally, but they've got a few dings to the finish...
|
|
#13
07-14-2010, 9:39 AM
|
|||
|
|||
|
Great tutorial! I wonder if this could count as a 922r part now that you have made a good deal of changes... Probably not... dunno
Also, for those who want a custom finish or different finish on their AK Stock but dont really want to carve out a new set or strip what they already have... Checkout this CA based company: http://www.ironwooddesigns.com
|
|
#14
07-14-2010, 9:43 AM
|
||||
|
||||
|
Quote:
__________________
Quote:
Quote:

|
|
#15
07-14-2010, 9:59 AM
|
|||
|
|||
|
Quote:
 but how would I prove that I made it in the US? Thoughts? but how would I prove that I made it in the US? Thoughts?
|
|
#16
07-14-2010, 10:06 AM
|
||||
|
||||
|
Quote:
__________________
Quote:
Quote:
|
|
#18
07-14-2010, 10:20 AM
|
||||
|
||||
|
Quote:
__________________
Quote:
Quote:
|
|
#19
07-14-2010, 11:01 AM
|
|||
|
|||
|
True that...
|
|
#21
07-19-2010, 3:10 PM
|
||||
|
||||
|
Did a few updates on the tutorial today. It's still got a few more things needed to finish it but I guess I'll just have to wait for the stain to dry before I can proceed.
|
|
#22
07-20-2010, 8:46 PM
|
||||
|
||||
|
Awesome aimsmall....i havent refinished my romy kit yet, and this will help a lot....i definitely want to keep the black stripe on the buttstock though, do you have any recommendations of paint to use for that?
|
|
#23
07-20-2010, 9:40 PM
|
||||
|
||||
|
I would measure the black stripe before stripping then tape it with blue painters tape after the first coat of clear. Next I would do a few coats of spray paint, gloss black duplicolor from the autoparts store. Then I'd go thru the clearcoat process as described already.
I haven't tried this method yet because I didn't really care about the black stripe but thats how I would do it. Maybe I'll throw a stripe down on one that I'm working on just for fun...I'll keep you posted. Good luck with your project, post a pic after you get it all done! Hey E-120 whats your take on the stripe? Last edited by AIMSMALL; 07-20-2010 at 9:53 PM..
|
|
#24
07-20-2010, 9:55 PM
|
||||
|
||||
|
I have done a few Romy G stocks. My trick is to stain the wood then apply a coat of clear. After it dries adequately I mask off the stripe and paint it on with a semi gloss black. I then re clear the stock 2 to 3 more times.
The real rifles appear to be simple flat black stripes that are dipped. I say this because if you look inside of the stock with the butt plate off you should see a black ring of paint in it. If you have all ready removed the paint on the outside this is a easy way to figure out how far to go to repaint. If the entire process is to much for you I do have finished Romy G stocks for sale. 
|
|
#26
07-21-2010, 9:09 AM
|
||||
|
||||
|
Nice. I refinished my mosin is almost the same exact fashion. I never knew you could remove the dents like that though, I have to try it.
__________________
Need A Realtor in SoCal? Shoot me a PM. 
|
|
#27
07-21-2010, 9:53 AM
|
||||
|
||||
|
Quote:
Edit: added dent removal to post #4 Last edited by AIMSMALL; 09-27-2010 at 9:11 PM..
|
|
#28
07-21-2010, 11:34 AM
|
||||
|
||||
|
Quote:
__________________
Need A Realtor in SoCal? Shoot me a PM.
|
|
#29
07-21-2010, 11:47 AM
|
||||
|
||||
|
Awesome write up! Great pics! This needs to be a sticky!!!! The only thing I'd add is that you should not use your wife's or GF's toothbrush unless you like caustic chemicals in her mouth. I would not want those caustic chemical to be there when she put other things in her mouth. I'd use an ex's brush but not a current one.
__________________
NRA Certified Pistol, Rifle, Shotgun and Metallic Cartridge Reloading Instructor California DOJ Certified Fingerprint Roller Ventura County approved CCW Instructor Utah CCW Instructor Offering low cost multi state CCW, private basic shooting and reloading classes for calgunners.  CCW SAFE MEMBERSHIPS HERE CCW SAFE MEMBERSHIPS HEREKM6WLV
|
|
#30
07-21-2010, 12:01 PM
|
||||
|
||||
|
Quote:
|
|
#33
07-25-2010, 9:46 PM
|
||||
|
||||
|
This past month I refinished a sears 22 semi-auto rifle, 22 bolt action rifle, 12 gauge bolt action shotgun and a Mosin Nagant 91/30.
I myself, use Birchwood Casey Trueoil. I use spray orange stripper. On all the weapons I used birchwood Casey cold blue. A few years ago I refinished a huge oak table using Minwax wipe on finish and have thought about trying it on guns. I like the wood to shine, your finish looks semi gloss which looks perfect. Your project tutorial is great, thanks for all the extra work you did with the pictures and text. I'm thinking I will try the minwax on my next project.
__________________
I pledge allegiance to the Flag of the United States of America, and to the Republic for which it stands, one Nation under God, indivisible, with liberty and justice for all.
|
|
#36
07-27-2010, 1:17 AM
|
||||
|
||||
|
nice, I just got done with my romy stocks a few weeks ago, I shaved off the vertical grip. did you use 'early american' minwax too?
|
|
#37
07-27-2010, 1:40 AM
|
||||
|
||||
|
Quote:
|
|
#38
07-27-2010, 6:59 PM
|
|||
|
|||
|
Have you ever bleached a stock?
|
|
#39
07-27-2010, 9:08 PM
|
||||
|
||||
|
Quote:
|
|
#40
07-27-2010, 11:54 PM
|
||||
|
||||
|
I looked up wood bleaching. It is an interesting idea. Here is a few bleaching solutions I found.
Oxalic Acid Bleach. Oxalic acid can be secured from any drug store and from paint store stocks in dry crystal form. Usually a saturated solution is made by dissolving as much of the acid crystals in a gallon of water as the water will take up. Hot water is best and the solution is more effective when put on to the surface to be bleached while it is very hot. Use an old flat wall brush or calcimine brush to apply the solution and let it dry on the surface. For bleaching weather stains and also dark sap streaks in wood 8 ounces of oxalic acid in two quarts of water is about right. If the first application of bleach does not remove the dis-colorations or make the whole surface as light as you want it, apply the same solution hot a second time or repeat several times. ¶ When sap streaks or whole surfaces to be bleached are greasy, wipe them off by rubbing with denatured alcohol and let dry before the bleaching solution is put on. ¶ Chlorinated Soda Bleach. When dissolved in water chlorinated soda makes an effective bleach, especially if followed by a solution of peroxide of hydrogen. To make chlorinated soda proceed as follows: Solution A. 10 ½ ounces sal soda, dissolved in 20 ounces of water. Solution B. 5 ounces ordinary chloride of lime (household). 12 ounces of water. Mix well by stirring and allow the solution to settle. Pour off the clear liquid into another vessel and there will be a sediment in the bottom of the first container. Add to the first container 12 ounces more of water; stir well; let settle and pour off the clear liquid again into the second vessel. Now add a little more water, an ounce or two, to the sediment remaining- in the first vessel and strain the solution after mixing through filter paper or silk into the second vessel. Solution C. Mix solutions A and B together and you should have a clear liquid bleach of a greenish color having a faint odor of chlorine and a strong alkaline taste. Use this bleaching solution hot and brush on with an old flat wall brush; let dry; wash up with clear water. ¶ Peroxide of Hydrogen Bleach. This chemical is a positive acting bleach when freshly made. It is a little expensive when large quantities are needed for large areas of surface. For small stains on patches and spots it is entirely practical. Brush on and allow to dry. Wash up with clear water. ¶ Hydro-Sulphite of Soda Bleach. When used in a 10 per cent solution,10 ounces of this chemical to 90 ounces of water, it makes an excellent bleach. Brush on one or several coats to the wood to be bleached. Let each coat dry, however, before another is put on. Wash up with clear water. ¶ Chlorinated Lime Bleach. For bleaching walnut especially, as well as other woods, the ordinary household chloride of lime dissolved in water and brushed on to wood is excellent. ¶ Permanganate of Potash Bleach. This chemical dissolved in water and used of varying strengths makes a good bleach. The wood will have a purple hue when dry. Apply with a brush. When the above solution is dry put on a second wash made by dissolving hyposulphite of soda in water, a saturated solution. This is the solution used by photographers for a fixing bath. A 5 per cent solution of oxalic acid in water is also effective as a second wash over permanganate of potash.
__________________
I pledge allegiance to the Flag of the United States of America, and to the Republic for which it stands, one Nation under God, indivisible, with liberty and justice for all.
|
|
| Thread Tools | |
| Display Modes | |
|
|
 |
 |
 |


 )
)

 Linear Mode

