


|
|
|
|
|
|
|
|
|
 |
|
|||||||
| Handguns Gallery Post your pictures of your favorite sidearm here. |
 |
|
|
Thread Tools | Display Modes |
|
#1
 10-21-2015, 11:28 AM
|
||||
|
||||
|
I picked up a Pelican Storm IM2050 case for my newly acquired G29-SF. While the modular pick-n-pluck insert is purposeful for a basic customized fit of your pistol and accessories, the Tetris look of the removed foam columns would be an eye sore for me. Not to mention, I didn't feel like dropping more cash on a custom foam insert after all of these recent new-hobby expenses.
 I haven't seen any writeups or videos online of people customizing their pick-n-pluck inserts so hopefully this will help people save some money by DIY. If there is a better option, please let me know as this method is a bit crude! I haven't seen any writeups or videos online of people customizing their pick-n-pluck inserts so hopefully this will help people save some money by DIY. If there is a better option, please let me know as this method is a bit crude!Tools needed: -marker or suitable pen -razor blade -long and thin serrated knife Optional: -rubber cement -Plasti Dip Pelican Storm IM2050 case. Very impressed by the initial quality check and value for the money.  Take out your top layer of foam, which is the pick-n-pluck section and make a trace out of your pistol. You should wind up with something like this: 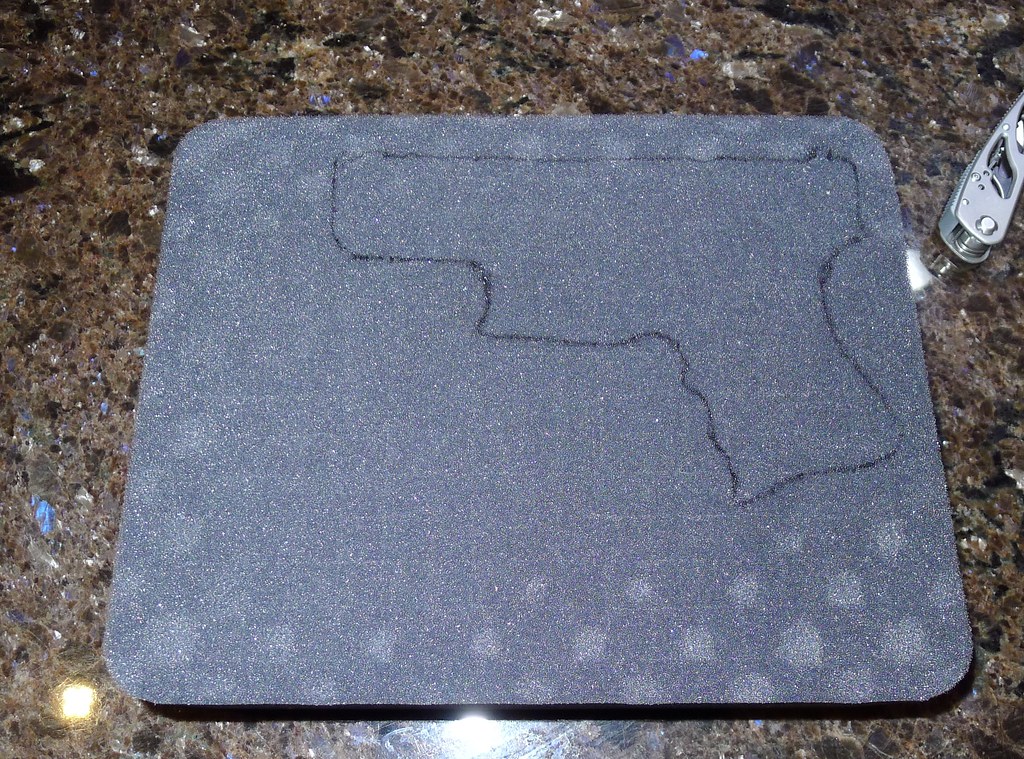 Next, take your razor blade and slowly make relief cuts along your freshly traced line to make it easier for the long, serrated knife to work cleanly. Since the pick-n-pluck foam pieces are pre-scored, it's very easy for the foam to pull and tug so you want to work slow as well. You should wind up with something like this. Remember that the cut-out will be much deeper (a pistol will drop down way too deep) so what I did was take the removed foam pieces and layer it inside the cut-out. Then I found a suitable piece of foam, which in this case was an egg crate style foam and cut it to the gun's shape once again to give it a finished look.  The pistol fit in perfectly, almost too snug and removing it was a little cumbersome. In order to remedy this, I simply removed the foam just behind the backstrap. Now I can fit three fingers in and safely remove the pistol!   That's it! Now on to the optional items and/or steps. The rubber cement is just to repair any mis-cut foam or danglers. You do not want to use super glue (CA) as it will melt the foam and leave a white and hard mess. I came across a couple of videos on YouTube with regards to the use of Plasti Dip for the sole purpose of enhancing the strength of the foam. Basically you spray on a few coats of Plasti Dip which strengthens the foam by rubberizing its pores. I will be doing this later on once I figure out what else I want to place in the Pelican case. Last edited by Jamboree; 10-21-2015 at 11:45 AM.. 
|
|
#2
10-21-2015, 12:21 PM
|
|||
|
|||
|
I tried the plasti dip method and it didn't work as I expected. The foam didn't harden, it became more tacky. II ended up using 1 spray can and 1 can of liquid plasti dip for both back and front of the foam.
|
|
#3
10-21-2015, 1:32 PM
|
||||
|
||||
|
Quote:
Last edited by Jamboree; 10-21-2015 at 10:22 PM..
|
|
#4
10-21-2015, 10:21 PM
|
||||
|
||||
|
I must say it turned out really nice!! The Plastidip really makes it all look more finished, not to mention it helps strengthen the relatively weak pick-n-pull foam. Now I can put this project to rest =)
 
Last edited by Jamboree; 10-21-2015 at 11:38 PM..
|
|
| Thread Tools | |
| Display Modes | |
|
|
 |
 |
 |


 Linear Mode

